Most consumers have a laptop or a desktop computer, but they don’t know what kind of storage device they use. For example, an SSD makes a huge difference in performance compared to an HDD. This post will show how to check your Hard Drive on Windows 11/10.
How to check what Hard Drive you have
What Hard Disk do I have? Do I have an SSD, HDD, or Hybrid Drive? How can I check the Specifications and RPM of the Hard Drive of my Windows computer? These are some of the questions we will try to answer using inbuilt solutions and free software applications.
- Using Device Manager
- Using the MSInfo32 Tool
- Using PowerShell
- Using a third-party tool
- Check Disk Type using the Settings app
- Check if the Disk Type is HDD or SSD using the Defrag tool
- Find the Disk Type using Task Manager
- Find Media Type using Windows Terminal
- Check the Disk Type using Command Prompt.
Not all tools can display the hard disk’s RPM and media type. Some can only find the model number, while others can only tell you the RPM. Be aware that a Solid-State Drive doesn’t have RPM, i.e., there are no spinning platters like HDDs.
1] Using Device Manager
While the Device Manager doesn’t directly display RPM or Disk type, it can have other details, including the model number of the storage device.
- Use WIN+X to open the Power menu and select Device Manager
- Navigate the tree and locate Disk Drives. Expand it
- Right-click on the disk and choose properties. You can also double-click on the same.
- Switch to the Details section and select Hardware IDs from the Property dropdown.
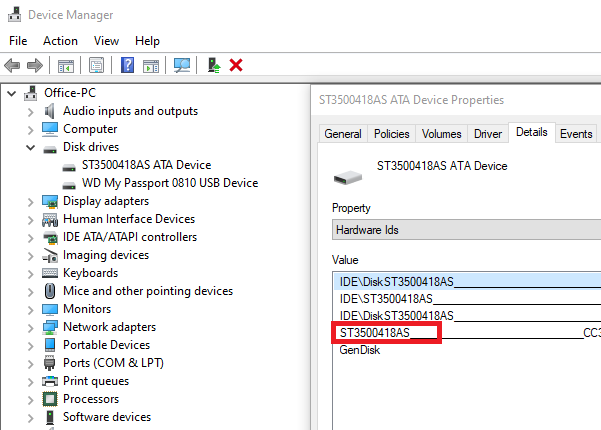
- The model number will be available along with some other details. So, in this case, it is DISKST3500418AS. Hence, the model number would be ST3500418AS
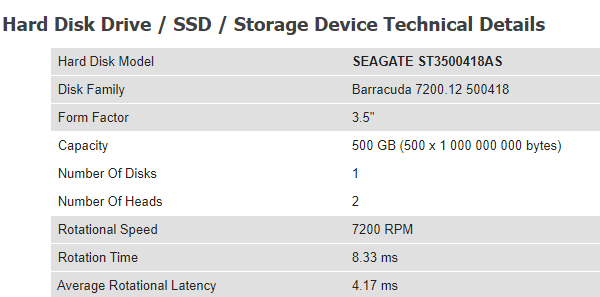
Now search the model number in Google or on Amazon. Websites like hdsentinel.com can give you the complete information. If the drive is an SSD, it will be mentioned explicitly.
2] Using the MSInfo32 Tool
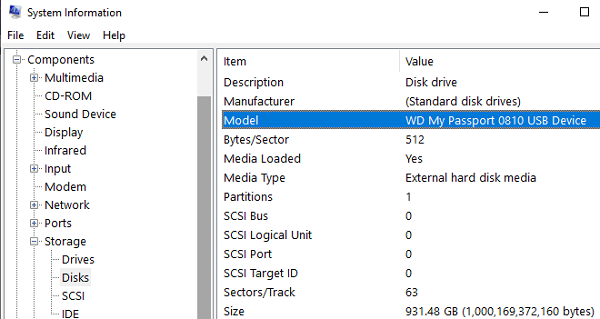
You can also use the msinfo32 tool in Windows to find the manufacturer and model number. Once you have that search on Google or any website which offers details based on the model number of the hardware. Sometimes the model name in the listing will have SSD included in the MSInfo32 tool. Otherwise, you will have to search via the device model number.
3] Using PowerShell
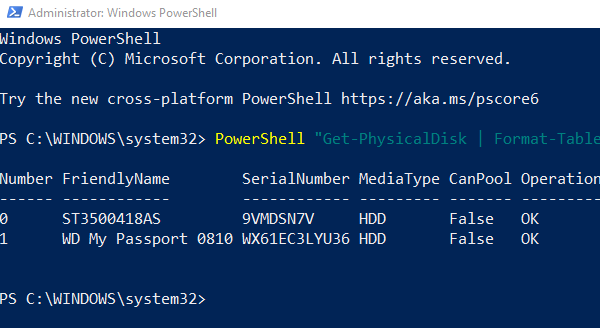
- Use WIN + X to open the power menu and select PowerShell Admin to launch it
- Type and run the command Get-PhysicalDisk
- The output will have a column with the name Media Type.
- Check if it is an HDD or SSD
To find the RPM using PowerShell, you will need to run the following command as mentioned in this thread.
$ComputerName = ".", "."

ForEach ($C in $ComputerName)
{
$Hash = @{
"ComputerName" = $C
"namespace" = "root\Microsoft\Windows\Storage"
"Class" = "MSFT_PhysicalDisk"
"ErrorAction" = "Stop"
}

Try
{
Get-WMIObject @Hash |
Select-Object -Property @{N="ComputerName"; E={$C}},
@{N="Speed(RPM)";E={$_.SpindleSpeed}}, DeviceID,
@{N="Supported";E={$True}}
}
Catch
{
$Obj = New-Object -TypeName PSObject -Property @{
"ComputerName" = $ComputerName
"Speed" = $Null
"DeviceID" = $Null
"Supported" = $False
}
Write-Output $Obj
}

}
You can also use Disk Defragmenter and Windows Command Prompt to find out if it is an SSD or HDD.
4] Using third-party tools
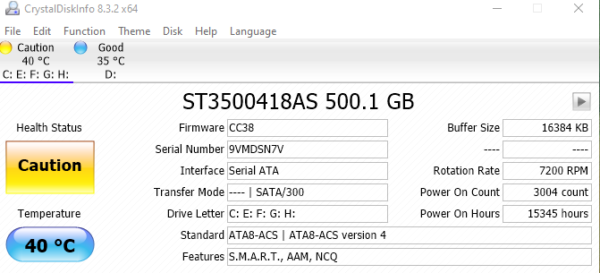
Crystal Disk Info is a handy tool if you want to check the health of your hard disk. While the software doesn’t tell about SSD or HDD, it can show RPM of the storage device.
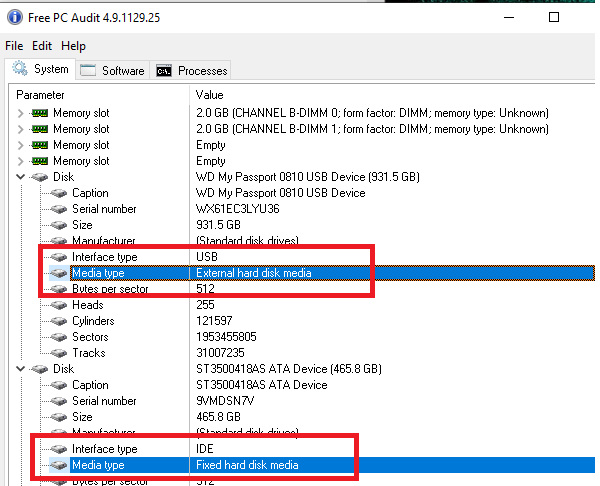
Free PC Audit is another free tool that is one of the rare tools that can find Media Type for the storage device. Once you locate the disk section, expand it, and select media type to see if the storage devices are SSD or HDD. Download it from the official page.
HDD Scan is a free tool for hard drive diagnostics. The program can test storage devices for errors and bad sectors and show S.M.A.R.T. attributes and RPM. Launch the tool, then click on the Tools button > Drive ID. It will generate a report that includes RPM as one of the main parameters. Download the software from HDDScan
If you want to upgrade to SSD but aren’t sure if a full SSD configuration works better than an HDD, read our ultimate guide on Hybrid Drives.
5] Check Disk Type using the Settings app
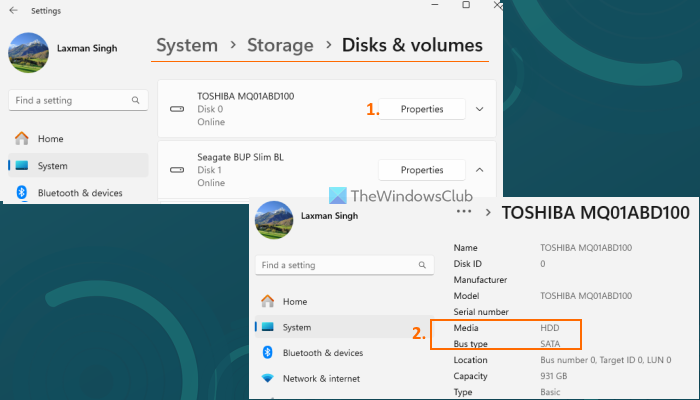
The Settings app in Windows 11 helps to find the disk type (HDD, NVMe (Non-Volatile Memory Express; latest version of solid-state drives), or SSD) with a few mouse clicks. Here are the steps:
- Open the Settings app with Win+I hotkey
- Navigate to System > Storage > Disk & volumes. You will see a list of connected disks
- Press the Properties button available for a disk
- You will see the Media type (HDD, SDD, or NVMe) for that disk and Bus type. For HDD or SDD, the bus type will be shown as SATA. If the SDD disk type is NVMe, then its Bus type is shown as NVMe.
6] Check if the Disk Type is HDD or SSD using the Defrag tool
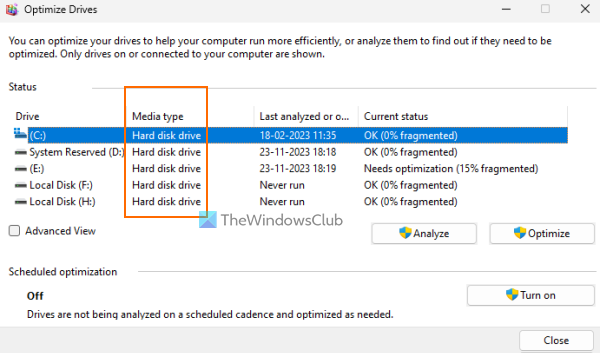
Defrag tool (also known as Microsoft Drive Optimizer or Defragment and Optimize Drives) is a built-in utility in Windows PC. Apart from optimizing your drives, it also lets you find if the disk type is HDD or SSD. The steps are:
- Type defrag in the Search box of Windows
- Press the Enter An Optimize Drives box will open. Alternatively, you can also open the Run Command box (Win+R), type dfrgui, and hit Enter to open this box
- Look for the Media type column in that box. You will see a Hard disk drive and Solid-state drive for all the connected drives.
7] Find the Disk Type using Task Manager

Task Manager option is handy to find the disk type (HDD or SDD) for internal hard drives. It is so because for portable drives, it shows disk type as USB and not HDD or SSD. Let’s check the steps:
- Open Task Manager in Windows PC
- Switch to the Performance tab or category
- There you will see all the connected disks. Select a disk
- At the bottom part, it will show information related to that disk such as disk capacity, system disk or not, Type (HDD or SSD), read and write speed, etc.
8] Find Media Type using Windows Terminal

The steps to find Media Type using Windows Terminal on a Windows 11/10 PC are as follows:
- Right-click on the Start button
- Click on the Terminal option
- When Windows Terminal is opened, launch a PowerShell profile in a new tab
- Execute this command:
Get-PhysicalDisk | Format-Table -AutoSize
The command above creates a list of connected drives along with their names, serial number of each disk, MediaType (SSD or HDD), Health Status, and other information. The command works as expected but it showed Media Type as Unspecified for the portable disk. You may check if you get the same result.
9] Check the Disk Type using Command Prompt

This option uses the PowerShell command (that we included in the above solution) to check the disk type.
Type cmd in the Search box and hit Enter. When the Command Prompt window is opened, execute the command given below:
PowerShell "Get-PhysicalDisk | Format-Table -AutoSize"
That’s all. Hope this helps.
Now read: How to check if a Disk uses GPT or MBR Partition in Windows PC.
Where is the SSD located on the PC?
This entirely depends on the motherboard design and the placement of the SSD. The same applies to the laptop. If you plan to change or upgrade your SSD, it’s best to follow the manual and figure out the location. Usually, the SSDs are visible, but if you have time, they could be under the slots with a cooling fan on top.
How many SSDs can a PC have?
Ideally, you can install as many SSDs as your motherboard allows. However, you will need to consider how much power your PC allows. For most users, 2-3 SSDs strike a good balance. With sufficient space and power, you have the option to install even more SSDs on your PC.
Leave a Reply