If you want to clear the Location history in Windows 11, here is how you can do that. There are two ways to remove the location history on your Windows 11 PC, and they require the Windows Settings panel and the Maps app.
One of the best things about Windows 11 is that you can use it as a mobile platform. For example, you can install and use Android apps, use Maps, etc. The Maps app is quite handy when you need to search for a location, want to get direction from one place to another, get traffic information, read reviews, etc.

Whenever you search for a place in the Maps app, Windows 11 stores that data in the system. There is positive and negative side to this practice. The positive side is that you can quickly find the previously searched place from history. The negative side is that other people can see what you have been searching for on your computer’s Maps app. If the latter reason is more significant than the former, you may want to clear or delete the Location history from your computer.
How to clear Location history in Windows 11 using Windows Settings
To clear Location history in Windows 11 using Windows Settings, follow these steps:
- Press Win+I to open Windows Settings.
- Switch to the Privacy & security tab on the left side.
- Click on the Location setting on the right side.
- Find out the Location history option.
- Click on the Clear button.
To learn more about these steps, continue reading.
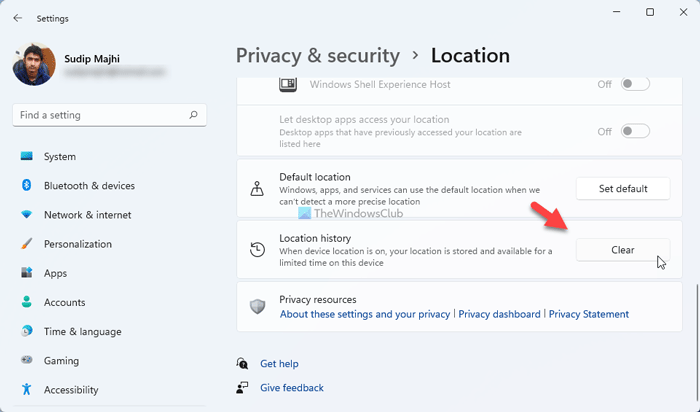
At first, you need to open Windows Settings on your computer. For that, you can use the keyboard shortcut Win+I. Then, you need to switch to the Privacy & security tab on the left side.
After that, you can find a menu called Location. You need to click on that. Next, find out the Location history option. Here you can find a button named Clear. You need to click on this button.

If everything goes right, you can find a correct sign after clicking the Clear button. It denotes that the location history has been cleared from your computer.
How to delete Location history in Windows 11 using the Maps app
To delete Location history in Windows 11 using the Maps app, follow these steps:
- Press Win+S or Win+Q to open the Taskbar search box.
- Search for Maps in the search box.
- Click on the individual search result.
- Click on the three-dotted icon and select Settings from the list.
- Find out the Permissions section.
- Click on the Delete history button.
Let’s delve into these steps in detail.
To get started, you need to open the Maps app on your computer. For that, open the Taskbar search box and search for the Maps. Then, click on the individual search result to open the app.
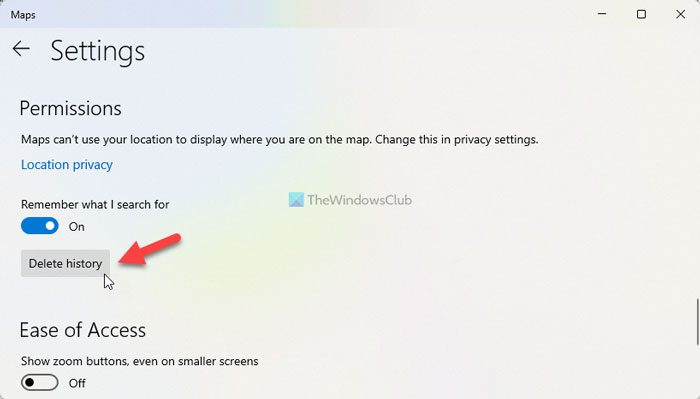
After opening, click on the three-dotted icon, and select the Settings option. Then, find out the Permissions section and click on the Delete history button.

Once done, it displays a History deleted message on the screen.
How do I turn off Location Services in Windows 11?
You can turn off Location Services in Windows 11 from the Windows Settings panel. For that, press Win+I to open the Windows Settings. Then, go to Privacy & security > Location. Here you can find an option called Location services. You need to toggle the corresponding button to turn on the Location Services on your computer.
How do I change my location in Windows 11?
In Windows 11, it is possible to set and change the default location from the Windows Settings panel and the Maps app. For that, open Windows Settings, go to Privacy & security > Location and click on the Set default button. Next, choose a location in the Maps app to set it as default.
That’s all! Hope this guide helped.
Leave a Reply