Clearing the queue on Spotify has long been something users can do if they want, but unfortunately, not everyone knows how to get this done. But worry not because we are here to help you clear your Spotify music queue.

Since the Spotify app is quite easy to use, we can say for certain that clearing your queue won’t be difficult at all. This is a task that can be accomplished in mere seconds if you know what you’re doing. And by the time you’ve completed reading this article, you will leave knowing all that is required.
How to clear the queue in Spotify
Before we begin, it must be noted that the steps here are the same across Spotify for the web or the Windows or Mac app. So, follow the instructions carefully to clear the queue in Spotify, and you’ll be well on your way.
- Open the official Spotify app, or sign in to the web player.
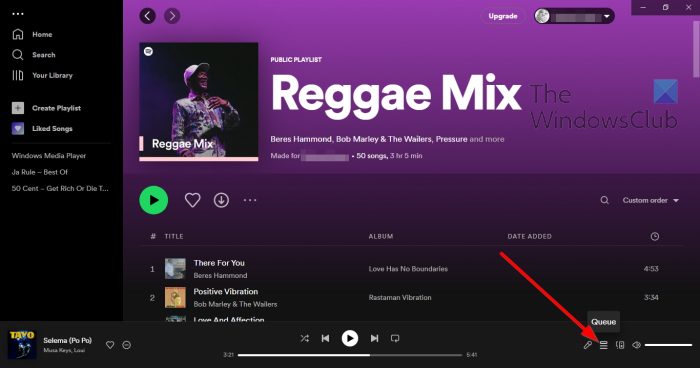
- Click the Queue icon at the bottom-right corner of the app.
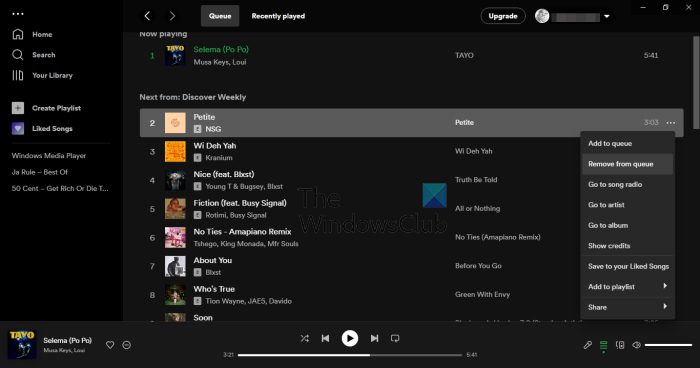
- Hover over the song you want to delete.
- You should now see a three-dotted button. Click on that button promptly.
- From the pop-up context menu, please select Remove from Queue.
Now let us see the steps in detail.

First, we must go to the list of songs located in the queue, and from there, we shall get of them until next time.
- Open the official Spotify app, or sign in to the web player.
- Look for the queue icon at the bottom-right corner of the app.
- Click on it right away.
You should now see all the songs listed in the queue ready and waiting for removal.

Chances are you’re, not interested in deleting all songs from the queue, just the ones no longer needed. So, let us discuss how to get this done in a timely manner.
- Hover over the song you want to delete.
- You should now see a three-dotted button.
- Click on that button promptly.
- From the pop-up context menu, please select Remove from Queue.
Do this for each song until you feel compelled to stop.
How to clear all Spotify songs in the queue
To clear all songs in the queue you need to:.
- Return to the queue using the steps above.
- Click the Clear button to delete all (the desktop client).
- Click the Clear Queue button (web player) then select Yes to confirm.
All songs are now gone, so you can leave and go back to what you were doing prior.
Clear the queue on Spotify for Android and iOS
As we know, Spotify is a cross-platform service, which means, it can also be found on mobile platforms such as Android and iOS. Now, this article wouldn’t be complete if we did not discuss how to clear the queue on those devices.
- Delete songs individually
- Delete all songs from the Queue
Delete Spotify songs individually
Ok, so we will begin by explaining how to remove songs individually. The task is not so different from the desktop version of the Spotify app, so let us begin, shall we?
- First, we must navigate to the queue via the Spotify mobile app. All your songs are located there.
- Open the app from your Android or iOS device.
- After that, sign in with your official credentials if you haven’t already.
- Next, look to the playing menu and tap on the Queue icon.
You should now be looking at a list of songs ready for deletion. To remove a song, you’ll be asked to perform a few simple actions than can be completed in mere seconds.
- Tap the round icon located next to the song you want to remove.
- From there, select the Remove option to get the job done.
Delete all Spotify songs from the Queue
Finally, we want to look at how to remove all songs from the Spotify mobile app queue.
All you have to do in this situation is press the Clear Queue button from within the Queue area. Once done, all tunes from within the queue will disappear, but doing so won’t delete songs from your playlist, so don’t worry about that.
Read: Spotify Desktop and Mobile not Synced
How do I see my queue on my Spotify desktop?
If you want to see the queue, you must first open Spotify, then click on the queue button located on the Now Playing bar. Once done, you will see a list of all the songs in the queue.
Is Spotify queue only for premium?
The queue feature is available for all versions of Spotify, so there is no need for you to spend money for the premium version at all unless you really want to.
Leave a Reply