Modern-day web browsers like Google Chrome, Microsoft Edge, Firefox, and others include an embedded copy of Flash. So, if you are running a Windows 10 computer, you can have up to 4 copies of Adobe Flash Player: one for Internet Explorer, one for Microsoft Edge, one for Firefox, and one for Opera, respectively. Also, you may find instances where two Flash players are running simultaneously, one installed in Chrome as a single plugin and the other installed in Windows, trying to parse the data.
At such times, you may want to remove or uninstall one of the versions of Adobe Flash Player. This post walks you through the process of removing the Embedded Adobe Flash from Windows 10 PC.
How to remove Adobe Flash Player from Windows PC
Before proceeding further, you should sign in with your administrative account and disable the Flash Player in your browser, even if you are not using it or set it as the default browser.
To completely uninstall Adobe Flash Player from your Windows 10 computer, you can follow any one of these methods:
- Use Adobe Flash Uninstaller
- Run KB4577586
- Manually remove Flash.
Let us take a look at these methods.
1] Use Adobe Flash Uninstaller
To completely uninstall and remove Adobe Flash Player from your Windows computer, download Adobe Flash Uninstaller by clicking here.
Next, close all your programs including your browsers and run Adobe Flash Uninstaller. It executes on both 64-bit and 32-bit versions of the Windows operating systems. Then delete all the files in these folders:
- C:\Windows\system32\Macromed\Flash
- C:\Windows\SysWOW64\Macromed\Flash
- %appdata%\Adobe\Flash Player
- %appdata%\Macromedia\Flash Player
Once you do this, restart your computer.
Then open your browser and check the status of Flash Player by visiting helpx.adobe.com/flash-player.html.
2] Run KB4577586
Adobe Flash Player will go out of support on December 31, 2020. To help users, Microsoft has released KB4577586 to uninstall Flash from your PC. You can use this Flash Removal Tool, by going here.
3] Manually remove Flash

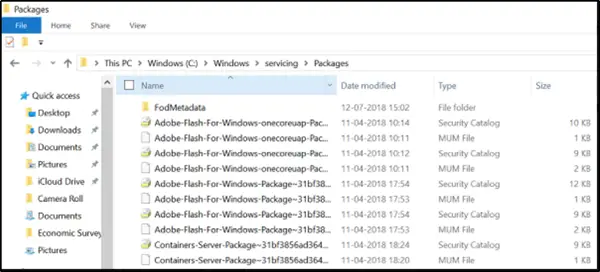
Next, open File Explorer and go the following address C:\Windows\servicing\Packages and check for the following entries-
- Adobe-Flash-For-Windows-Package ~ 31bf3856ad364e35~amd64…. (version number of the Flash Player)
- Adobe-Flash-For-Windows-WOW64-Package ~ 31bf3856ad364e35~amd64…. (version number of the Flash player #)
- Adobe-Flash-For-Windows-onecoreuap-Package ~ 31bf3856ad364e35~amd64… (version number of the Flash Player)
Note down these Adobe-Flash packages names.
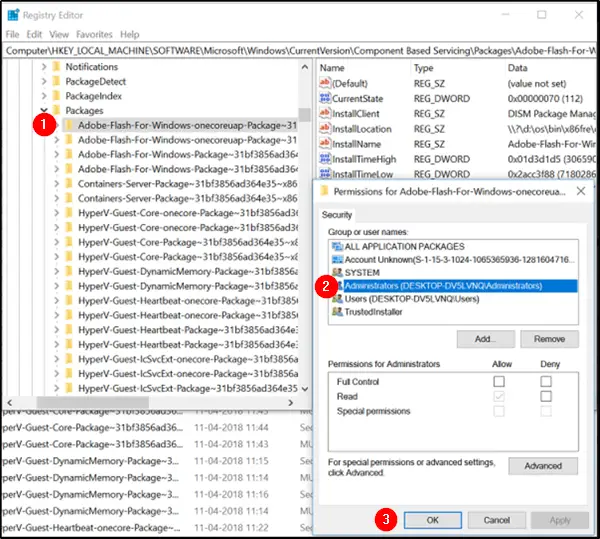
Now, open the Registry editor by launching the ‘Run’ dialog box and entering ‘regedit.exe’ in its empty field. Hit ‘Enter’.
Right-click the three keys which have the above 3 names, individually, one after the other, and select ‘Permissions’.
Enable Full control for the Administrators account by checking ‘Allow’.

Click ‘OK’.
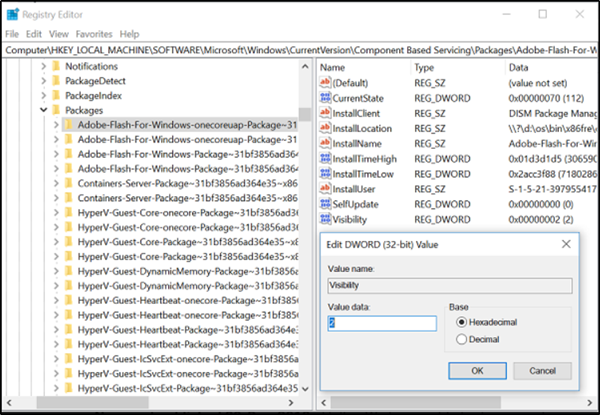
Now, select each of the 3 keys one after the other and then select Visibility DWORD on the right side. Right-click on Visibility and change the Value Data from 2 to 1.

Repeat the same procedure for the other keys as well.
Having done that, you will now be able to remove Packages using the DISM utility. So open an elevated command prompt and execute the following 3 commands one after the other:
dism /online /remove-package /packagename:Adobe-Flash-For-Windows-Package~31bf3856ad364e35~amd64-10.0.17134.1
dism /online /remove-package /packagename:Adobe-Flash-For-Windows-WOW64-Package~31bf3856ad364e35~amd64-10.0.17134.1
dism /online /remove-package /packagename:Adobe-Flash-For-Windows-onecoreuap-Package~31bf3856ad364e35~amd64-10.0.17134.1
NOTE: The numbers at the end could be different in your case, because of the version number difference, so use the numbers on your system.
This action will remove everything inside the Macromed folder under System32 as well as the SysWOW64 folders.
Restart your system.
This completes our action of completely removing the embedded Adobe Flash Player from Windows 10.
Related: Adobe Flash Player is blocked; How to unblock it?
Leave a Reply