In this guide, we will learn how you can install and configure Data Deduplication on Windows Server to optimize free space on a volume which is essential for any Server admin. So, if you are interested in it, this post is for you.
Configure Data Deduplication on Windows Server
Data Deduplication, often referred to as Dedup, allows you to reduce the impact of redundant data on storage costs. When enabled, Data Deduplication optimizes free space on a volume by examining the data and looking for duplicated portions. These duplicated portions are stored once and can be optionally compressed for additional savings. Not just that, it also optimizes redundancies without compromising data fidelity or integrity.
If you want to configure Data Deduplication, follow the steps mentioned below.
- Install Data Deduplication Feature on your server
- Enable and Configure Data Deduplication for the volume of your choice
- Check the Deduplication status
Let us talk about them in detail.
1] Install Data Deduplication Feature on your server

First of all, let us install the Data Deduplication feature on your Server machine. To do so, follow the steps mentioned below.
- Open Server Manager on your computer.
- Then, click on Manage > Add Roles and Features.
- Click on Next, in the Installation Type tab, select Role-based or feature-based installation, and click on Next.
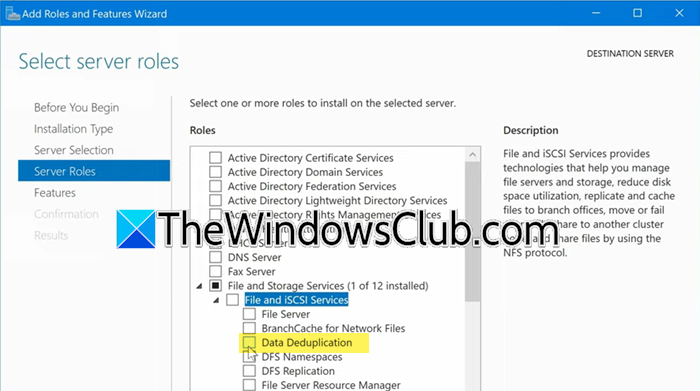
- Keep clicking on Next until you reach the Server Roles tab, expand File and Storage Services, then File and iSCSI Services, tick Data Deduplication and click on Install.
- Click on Add Features when the prompt appears.
Finally, complete the installation process.
Alternatively, you can install Data Duplication using PowerShell. Just open PowerShell as an administrator and then run the following commands.
To install Data Deduplication, use the following command from a server running Windows Server 2016 or later, or from a Windows PC with RSAT installed.
Install-WindowsFeature -ComputerName <Server-Name> -Name FS-Data-Deduplication
However, if you can connect remotely to the server with PowerShell remoting, run the following command.
Enter-PSSession -ComputerName <Server-Name> dism /online /enable-feature /featurename:dedup-core /all
2] Enable and Configure Data Deduplication for the volume of your choice

After installing the feature, we are good to enable it on volumes of our choice. To do so, follow the steps mentioned below.
- In Server Manager, click on the Refresh button.
- Go to File and Storage Services.
- Click on Volumes.
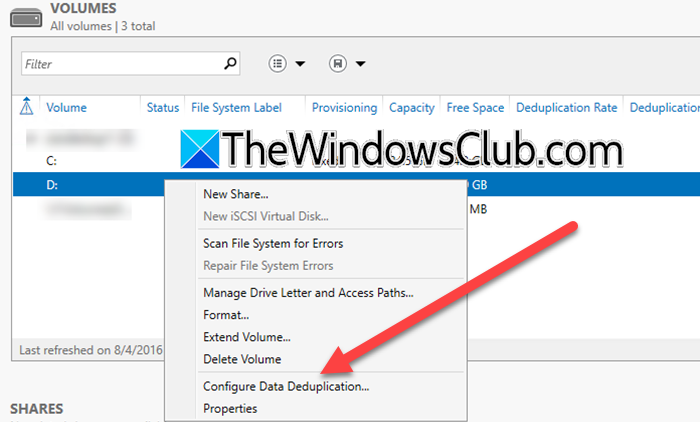
- Right-click on the volume you want to enable this feature on and select Configure Data Deduplication.
- This will open the Data Deduplication interface, click on the drop-down menu in front of Data Deduplication and select General purpose file server.
- In the ‘Duplication file older than’ field, you need to enter the number of days after which files will be duplicated.
- You can set up any exception you need by adding their extension in the designated field (Custom file extensions to exclude) or by adding an entire folder by clicking on the Add button. You have to navigate to the folder you want to exclude and select it.
- Click on Set Deduplication Schedule and then configure the schedule as per your organization’s demand.
- We recommend you keep Enable background optimization ticked as data deduplication should not be a very high-priority task.
- You should also tick Enable throughput optimization and set it at sometime during the night when the consumtion of resources is not a concern for you.
- Tick Create a second schedule for throughput optimization if you want to create a second time window. Click Apply > Ok once you are satisfied with the schedule.
- Click on Apply > Ok.
You can create a deduplication policy in a designated drive using PowerShell as well. For this, run – Enable-DedupVolume -Volume <Volume-Path> -UsageType <Selected-Usage-Type>
This will do the job for you.
3] Check the Deduplication status
If you want to confirm if deduplication is configured or not, run – Get-DedupStatus or Get-DedupStatus | fl in the elevated mode of PowerShell.
To know the schedule of deduplication, you can execute – Get-DedupSchedule. You can also open the Task Scheduler, and go navigate to Deduplication, and then look for all the schedules you have created. You can right-click on the task and select Run if you want to check the task. After running the task, execute Get-DedupStatus command to know the status of the deduplication or Get-DedupJob to know the status of the job.
Once you are satisfied with the schedule and the job, you can just close the Server Manager and rest assured that your job will run on time and your volumes will be deduplicated.
That’s it!
Read: How to set up an FTP Server on Windows 11
How to enable deduplication in Windows Server?
To enable data deduplication in Windows Server, you need first to install the feature from the Server Manager. Once done, you can configure Deduplication and set its schedule by following the steps mentioned earlier in this post.
Read: Free Backup software for VMware and Hyper-V virtual machines
What are the requirements for data deduplication in Windows?
To use Data Deduplication, you need Windows Server 2012 or later. The data volumes must also be formatted with NTFS. Data deduplication works best with certain types of workloads, such as general-purpose file servers, virtualized desktop infrastructure (VDI) servers, and virtualized backup applications.
Also Read: Best free backup software for Windows Server.
Leave a Reply