If you want to switch or configure Exchange Server authentication in Outlook, this article will be handy for you. It is possible to switch between various Exchange Server authentication protocols using Local Group Policy Editor and Registry Editor.

If you want to use the Local Group Policy Editor method, you must install the Administrative template for Office. Otherwise, you cannot find the below path.
How to configure Exchange Server authentication in Outlook
To configure Exchange Server authentication in Outlook, follow these steps:
- Search for edit group policy in the Taskbar search box.
- Click on the search result.
- Go to Exchange in User Configuration.
- Double-click on the Authentication with Exchange Server setting.
- Choose the Enabled option.
- Expand the drop-down list.
- Choose an authentication protocol.
- Click the OK button.
Let’s find out more about these steps to learn more.
First, you need to open the Local Group Policy Editor on your computer. For that, search for edit group policy or gpedit.msc or gpedit in the Taskbar search box and click on the individual search result.
After opening this utility, go to this path:
User Configuration > Administrative Templates > Microsoft Outlook 2016 > Account Settings > Exchange
In the Exchange folder, you can find a setting named Authentication with Exchange Server. You need to double-click on this setting and choose the Enabled option.
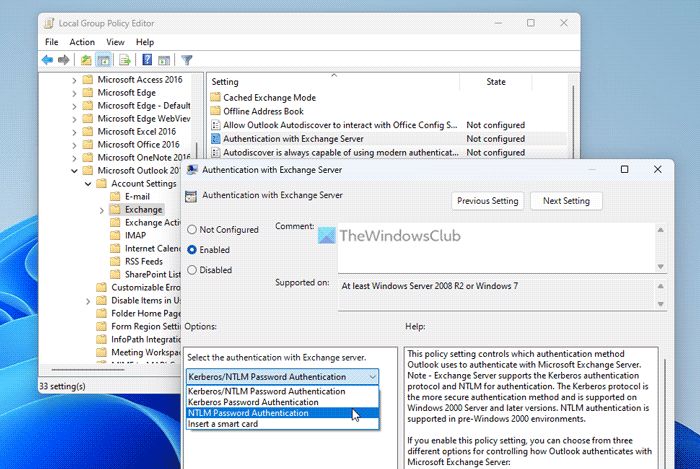
Next, expand the drop-down list and choose an authentication protocol. For your information, you can find these options:
- Kerberos/NTLM Password Authentication
- Kerberos Password Authentication
- NTLM Password Authentication
- Insert a smart card
Once done, you can click the OK button to save the change. Then, you need to restart the Outlook app.
If you want to revert to the original setting, you need to open the same setting in the Local Group Policy Editor and select the Not Configured option.
As said earlier, you can make the change using Registry Editor. If you want to opt for that method, it is suggested to create a System Restore point first.
How to switch Exchange Server authentication protocol in Outlook
To switch Exchange Server authentication protocol in Outlook, follow these steps:
- Press Win+R to open the Run prompt.
- Type regedit and hit the Enter button.
- Click on the Yes button.
- Navigate to Microsoft\office\16.0 in HKCU.
- Right-click on 0 > New > Key and set the name as outlook.
- Right-click on outlook > New > Key and name it as security.
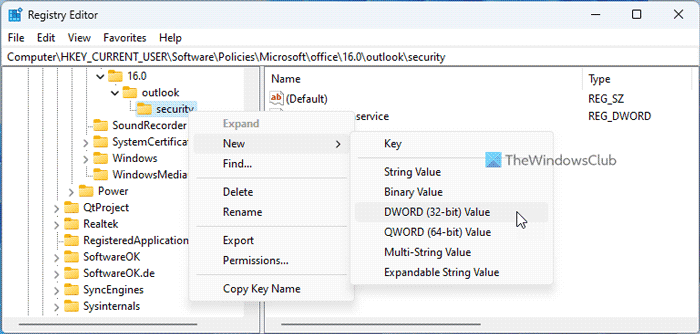
- Right-click on security > New > DWORD (32-bit) Value.
- Set the name as authenticationservice.
- Double-click on it to set the Value data.
- Click the OK button.
Let’s learn more about these steps.
To get started, press Win+R to open the Run prompt, type regedit, hit the Enter button, and click on the Yes button. It opens the Registry Editor on your computer. Once done, you must navigate to this path:
HKEY_CURRENT_USER\Software\Policies\Microsoft\office\16.0
If you cannot find this path, you need to create the sub-keys under the Microsoft key. Then, right-click on 16.0 > New > Key and set the name as outlook.
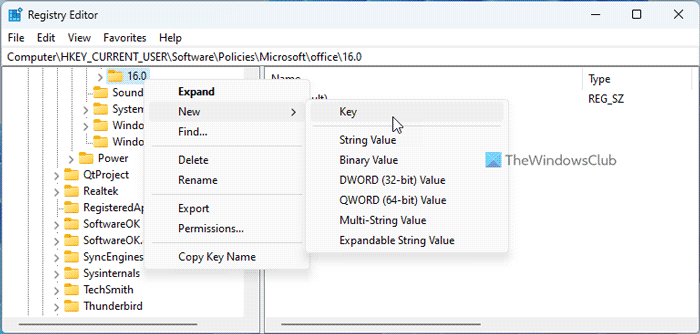
Then, repeat the same steps to create a sub-key under the outlook key and name it as security. Next, right-click on security > New > DWORD (32-bit) Value and name it as authenticationservice.
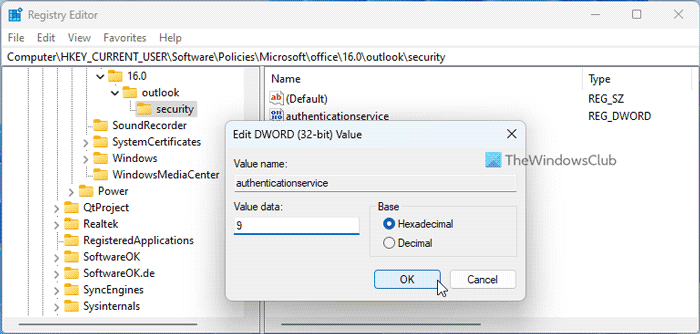
After that, double-click on it and set the Value data as follows:
- Kerberos/NTLM Password Authentication: 9
- Kerberos Password Authentication: 10
- NTLM Password Authentication: a
- Insert a smart card: 8000f000
Finally, click the OK button to save the change and restart your computer.
To opt for the factory defaults, you need to delete the REG_DWORD value. For that, right-click on it, select the Delete option, and click on the Yes button. As usual, you need to restart your computer to apply the change.
Read: Outlook cannot connect to Gmail, keeps asking for password
How do you configure OAuth authentication between your on-premises Exchange and Exchange Online organizations?
To configure Outlook OAuth authentication, you need to connect to Exchange Online PowerShell first. Then, you can enter this command to enable it: Set-OrganizationConfig -OAuth2ClientProfileEnabled $true. If you want to disable modern authentication, enter this command: Set-OrganizationConfig -OAuth2ClientProfileEnabled $false. In case you want to verify the change, you can use this command: Get-OrganizationConfig | Format-Table Name,OAuth* -Auto.
Why is my Outlook not connecting to the Exchange Server?
There are mainly two things you must check when you are getting problems with Outlook authentication. First is Exchange Online PowerShell. For your information, all commands are mentioned above. On the other hand, you can use the Local Group Policy Editor to verify the settings.
Read: Outlook prompts for password when Modern Authentication is enabled.