The Host Guardian Service is a security feature that checks if the host can run highly protected virtual machines. It manages the keys used to start up shielded VMs, which are VMs that provide additional security features. In this guide, we are going to learn how you can configure Host Guardian Service on Windows Server.
What is Host Guardian Service?
The Host Guardian Service (HGS) is a feature in Windows Server 2016 and later, that improves the security of virtual environments. It ensures that only trusted Hyper-V hosts can run shielded virtual machines (VMs). Shielded VMs protect against tampering and unauthorized access, keeping sensitive data and workloads safe.
Configure Host Guardian Service on Windows Server
If you want to install and configure Host Guardian Service on Windows Server, follow the steps mentioned below.
- Install Host Guardian Service Role
- Prepare Active Directory forest for HGS
- Create a Self Designed Certificate
- Initialize the HGS and set the type of attestation that will be used
Let us talk about them in detail.
1] Install Host Guardian Service Role

Before we go ahead and install the Host Guardian Service Role, a quick history lesson-HGS is relatively a new server role introduced in Windows Server 2016 in order to enhance the security of the virtual machines by providing a guardian fabric.
To install the Host Guardian Service role, you must follow the steps mentioned below.
- First of all, open the Server Manager.
- Now, go to Manage > Add Roles and Features.
- Once the Add Roles and Features wizard pops up, click on Next.
- Make sure that the Role-based or feature-based installation option is selected and click on Next.
- Select the server (or keep it default) and click on Next.
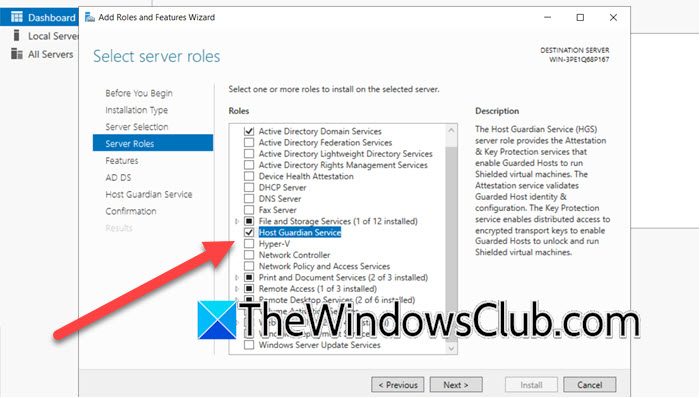
- Once you are at the Server Roles tab, tick the Host Guardian Service checkbox.
- You will see a pop-up asking you to install related features, click on Add Features.
- Click on Next.
- Since we have already selected the required features, click on Next to skip the Features tab.
- Skip the AD DS tab by clicking Next and then skip the Host Guardian Service tab by clicking on Next.
- Once you are on the Confirmation tab, tick Restart the destination server automatically (if required) (if you can do that), and then click on Install.
You will see the installation status bar, wait for it to complete, once done, you can close the installation wizard.
2] Prepare Active Directory forest for HGS

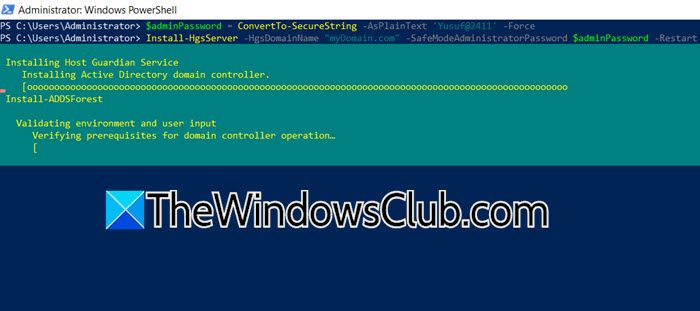
After adding the HGS server role, we will be executing the Install-HgsServer cmdlet. This will prepare the Active Directory forest for HGS, as well as set up the HGS service and its dependencies. It’s crucial to ensure that the HGS machine is not domain-joined before initiating this process the last technical preview before the previous month’s release. Running this cmdlet on the first HGS node will elevate it to a primary domain controller within the chosen domain. Once done, we need to initialize HGS. To do so, run the commands mentioned below.
$adminPassword = ConvertTo-SecureString -AsPlainText 'yourPass' –Force
Install-HgsServer -HgsDomainName "myDomain.com" -SafeModeAdministratorPassword $adminPassword –Restart
Make sure to replace ‘yourPass’ with your actual password and “myDomain.com” with your actual domain name.
3] Create a Self Designed Certificate

To set up the Host Guardian Service (HGS) for encryption and signing, you’ll need certificates. There are three ways to obtain these certificates: Using your own PKI certificate and PFX file, acquiring a certificate backed by a Hardware Security Module, or creating self-signed certificates. Since, self-signed certificates are the simplest option, we are going to use it for this tutorial, though they’re best suited for evaluation and proof-of-concept scenarios.
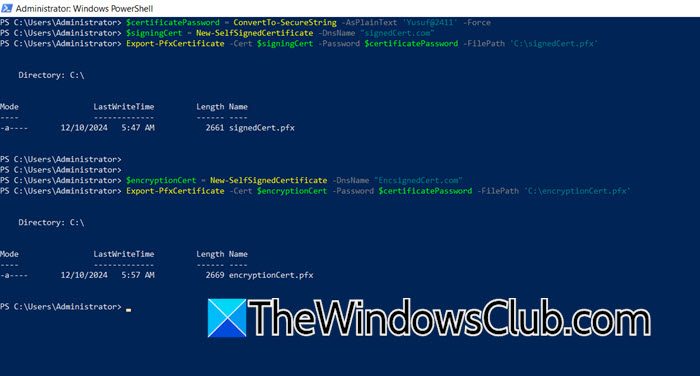
To do the same, you need to open PowerShell as an administrator and then run the following command.
$certificatePassword = ConvertTo-SecureString -AsPlainText '<password>' –Force
$signingCert = New-SelfSignedCertificate -DnsName "certName.com"
Export-PfxCertificate -Cert $signingCert -Password $certificatePassword -FilePath 'C:\signingCert.pfx'
$encryptionCert = New-SelfSignedCertificate -DnsName "EncryptionCert.com"
Export-PfxCertificate -Cert $encryptionCert -Password $certificatePassword -FilePath 'C:\encryptionCert.pfx'
This will create and export, signed and encryption certificates.
Read: How to install and configure File Server on Windows Server
4] Initialize the HGS and set the type of attestation that will be used

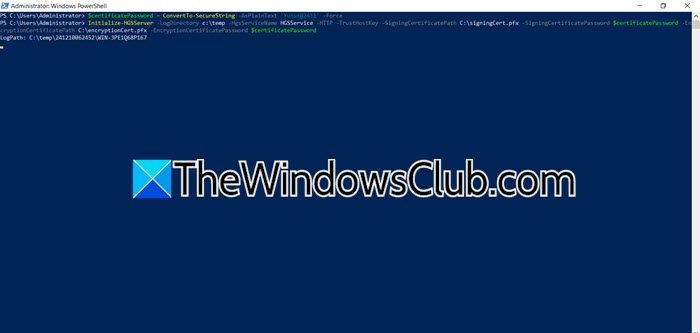
Next up, we need to initialize the HGS and set the type of attestation that will be used. For this, we will be using Host key attestation, which is similar to Admin-trusted attestation if you are familiar with Windows Server 2016. To resolve the issue, you can run the following commands in PowerShell’s elevated mode.
$certificatePassword = ConvertTo-SecureString -AsPlainText 'Yusuf@2411' -Force
Initialize-HGSServer -LogDirectory c:\temp -HgsServiceName HGSService -HTTP -TrustHostKey -SigningCertificatePath C:\signingCert.pfx -SigningCertificatePassword $certificatePassword -EncryptionCertificatePath C:\encryptionCert.pfx -EncryptionCertificatePassword $certificatePassword
Make sure to replace all the variables given in the query.
Now that we have learned how to initiate HGSServer, you can go ahead and create a shield for your Hyper-V VM and protect your organization from malware attacks.
Read: How to install and configure Windows Admin Center?
How to configure Windows server as NTP server?
There are two methods to configure Windows Server as NTP Server, you can either make changes to the registry or do the same using the PowerShell. We just need to enable NTP Server, configure Win32Time, and then restart the NTP Server. You can go through our guide on how to configure NTP Server to know more.
Also Read: Add or change Time Server in Windows.
Leave a Reply