The feedback provided by Windows PC users, especially Windows Insiders will help Microsoft shape the new features of Windows 11. PC users running Windows 11 Insider Preview Build, this post will walk you through the methods on how to configure or change feedback frequency in Windows 11.
How do I submit feedback to Windows 11?
PC users that want to give feedback or report problems using Feedback Hub on Windows 11/10, can follow these instructions: Press Windows key + F to open the Feedback Hub app. Click on Home. Click the Report a problem-button. In the “Summary your feedback” field, create a detailed title of the problem using good keywords. In the “Explain in more details” field, write as many details as possible about the problem.
What is Feedback Hub and do I need it?
Feedback Hub is a universal app bundled with Windows 11/10. It is designed to allow users—and in particular, Windows Insider users—to provide feedback, feature suggestions, and bug reports for the operating system.
Configure or Change feedback frequency in Windows 11
We can Configure or Change feedback frequency in Windows 11 in 2 quick and easy ways. We’ll explore this topic under the methods outlined below in this section as follows.
Change feedback frequency via Settings app

To Configure or Change feedback frequency via Settings app in Windows 11, do the following:
- Press the Windows key + I to open Settings.
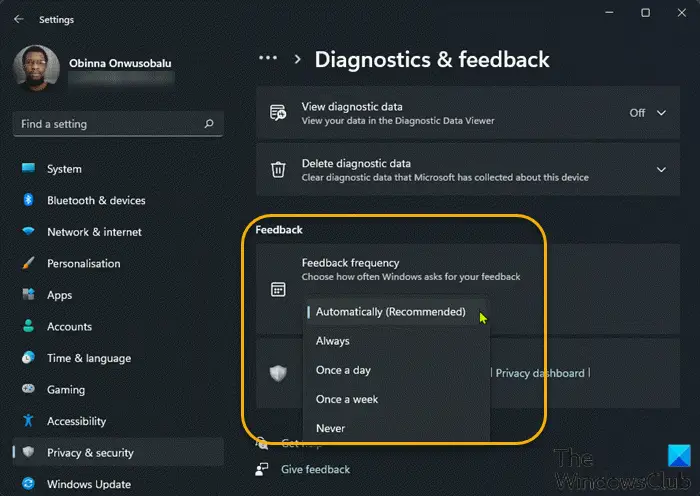
- In the Settings app, go to Privacy & security > Diagnostics & feedback.
- In this section, scroll down to Feedback heading.
The Feedback frequency option by default, is set to Automatically (Recommended).
- Now, you can click on drop-down next to it and set the option to Always, Once a day, Once a week, Never per requirement.
- Exit Settings app once done.
The changes should apply immediately.
Configure feedback frequency via Registry Editor

To Configure or Change feedback frequency via Registry Editor in Windows 11, do the following:
Since this is a registry operation, it is recommended that you back up the registry or create a system restore point as necessary precautionary measures. Once done, you can proceed as follows:
- Press Windows key + R to invoke the Run dialog.
- In the Run dialog box, type regedit and hit Enter to open Registry Editor.
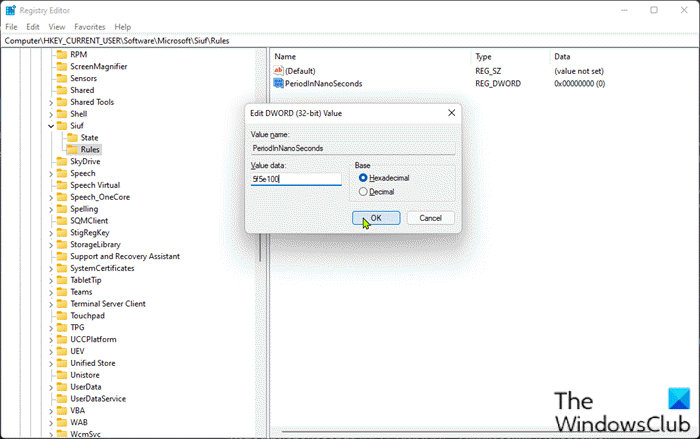
- Navigate or jump to the registry key path below:
HKEY_CURRENT_USER\Software\Microsoft\Siuf\Rules
At the location, in the right pane of Rules registry key, create the registry key and configure the following values in the table below per your requirement:
| Setting | Values |
|---|---|
| Automatically (Recommended) | Delete NumberOfSIUFInPeriod and PeriodInNanoSeconds registry DWORDs |
| Always | PeriodInNanoSeconds (REG_DWORD) – 5f5e100 (Hexadecimal) |
| Once a day | NumberOfSIUFInPeriod (REG_DWORD) – 1 PeriodInNanoSeconds (REG_DWORD) – c92a69c000 (Hexadecimal) |
| Once a week | NumberOfSIUFInPeriod (REG_DWORD) – 1 PeriodInNanoSeconds (REG_DWORD) – 58028e44000 (Hexadecimal) |
| Never | NumberOfSIUFInPeriod (REG_DWORD) – 0 |
- Once done, exit Registry Editor.
- Restart PC.
That’s it on the two methods on how to configure or change feedback frequency in Windows 11!
How do I turn off feedback in Windows?
To turn off or disable feedback in Windows 10, follow this instruction: Open Settings app. Click the “Privacy” category. Click the “Diagnostics & feedback” page in the left sidebar. Scroll down to the “Feedback frequency” section at the bottom of the page. Select the “Never” option in the “Windows should ask for my feedback” drop-down.