A Secured-Core server offers security features for hardware, firmware, drivers, and OS when handling critical data and programs. In this guide, we will show you how to configure a secured-core server using Windows Admin Center, Windows Server Desktop Experience, and Group Policy.
How do I enable Secured Core?
To enable Secured-core, you can use the Windows Admin Center. You need to go to Security > Secured Core and enable all the features. To know more or to find alternate methods, check out the guide mentioned below.
How to configure Secured-core Server for Windows Server
Secured-core is a set of features that includes built-in security for hardware, firmware, drivers, and the operating system. This protection starts before the operating system boots up and continues while it is running. Secured-core servers are made to be a safe platform for important data and applications.
Before we go ahead and configure the Secured-core server, we need to get a few things straight.
- You need to make sure your device has Secure Boot and it is enabled.
- Also, TPM 2.0 is needed to run a Secure-core server.
- System firmware must meet pre-boot DMA protection requirements and set appropriate flags in ACPI tables to enable Kernel DMA Protection. For more information, see Kernel DMA Protection (Memory Access Protection) for OEMs.
- You need to have virtualization extension, IOMMU, and Dynamic Root of Trust for Measurement enabled in BIOS.
- Finally, if you have an AMD-based system, you must enable Transparent Secure Memory Encryption.
If you have these things in place, let’s configure a Secured-core server using one of the following methods.
- Using Windows Admin Center
- Using the Computer Management
- Using Group Policy
Let us talk about them in detail.
1] Using Windows Admin Center
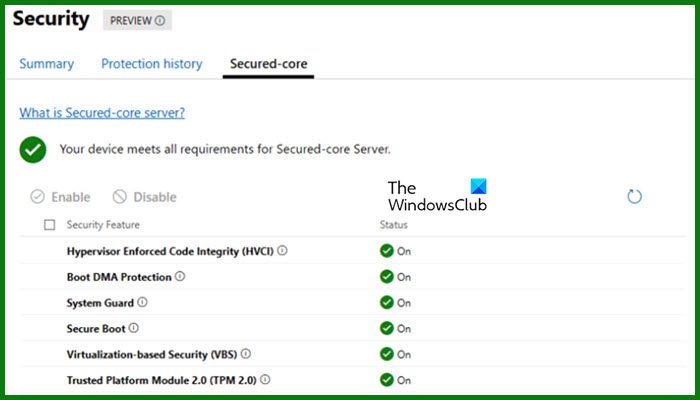
First, we need to enable the Secured-core server using Windows Admin Center. To do so, follow the steps mentioned below.
- Open the Windows Admin Center and sign in to the portal.
- Now, you need to select the server you want to configure.
- Then, go to Security > Secured-core.
- Look for Security Features that are set to Not configured, and then set it to Enable.
- You will be prompted to select Schedule system reboot, so, do that and then restart as per your convenience.
Now that we have enabled it, we need to check if it is configured. So, in the Windows Admin Center portal, you need to go to the server and then navigate to Security > Secured-core. Then, check all the security features; they should be configured.
2] Using GUI
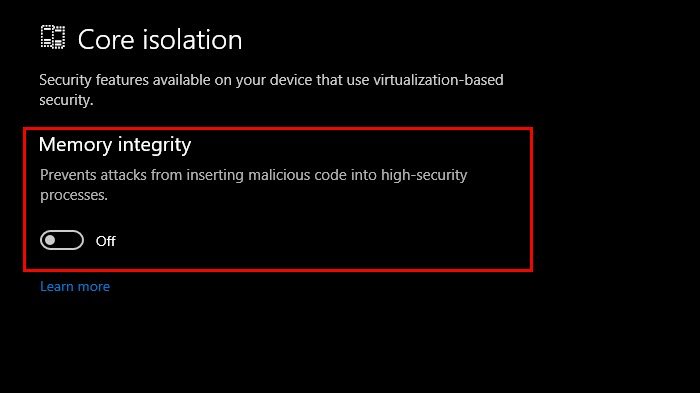
If you don’t want to use the Windows Admin Center, we will enable this feature from the GUI. You can follow the steps mentioned below to do the same.
- From Windows Administrative Tools, open Computer Management.
- Then, you need to go to the Device Manager and make sure that there are no issues with your drivers. AMD users must have a DRTM Boot Driver.
- Then, go to Windows Security > Device security > Core isolation details and enable Memory Integrity and Firmware Protection.
- Reboot your computer.
Once you have enabled it, we need to verify it.
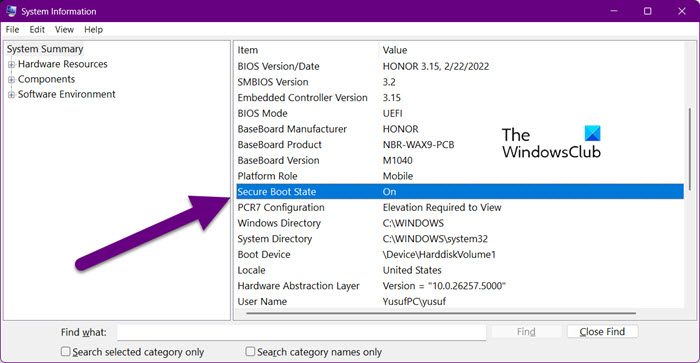
To do this, open Run, type msinfo32.exe, and open it. Then, ensure that the following things are set to the mentioned values.
- Secure Boot State – On
- Kernal DMA Protection – On
- Virtualization-based security – Running
- Virtualization-based security Services Running – Hypervisor enforced Code Integrity and Secure Launch.
It will do the job for you.
Read: How to Start, Stop, Restart Windows Server Backup Service
3] Using Group Policy
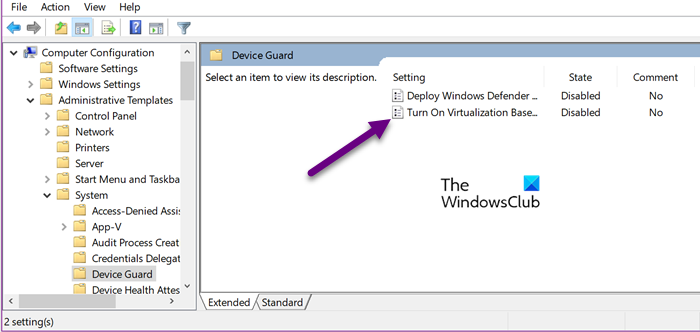
If you want to configure Secured-boot for a group of users connected to your domain network, you will have to make use of the Group Policy Editor. Since, GPO has centralized management and configuration of operating systems, applications, and users’ settings, you can make changes here that will reflect in all other devices connected to your network. To make this work, follow the steps mentioned below.
- Open the Group Policy Management Console.
- You need to create a group or edit it and add all the required members to get the policies applied to them.
- Go to Computer Configuration > Administrative Templates > System > Device Guard.
- Double-click on Turn On Virtualization Based Security.
- Now, enable it and then do the following configuration.
- Select Secure Boot and DMA Protection for the Platform Security Level.
- Select either Enabled without lock or Enabled with UEFI lock for Virtualization-Based Protect of Code Integrity.
- Select Enabled for the Secure Launch Configuration.
- Then, click on Ok.
Finally, you can reboot your computer to apply the changes.
If UEFI lock for Virtualization Based Protection of Code Integrity is enabled, it cannot be disabled remotely. To turn it off, set the Group Policy to “Disabled” and remove the security functionality from each computer with a physically present user to clear the configuration persisted in UEFI.
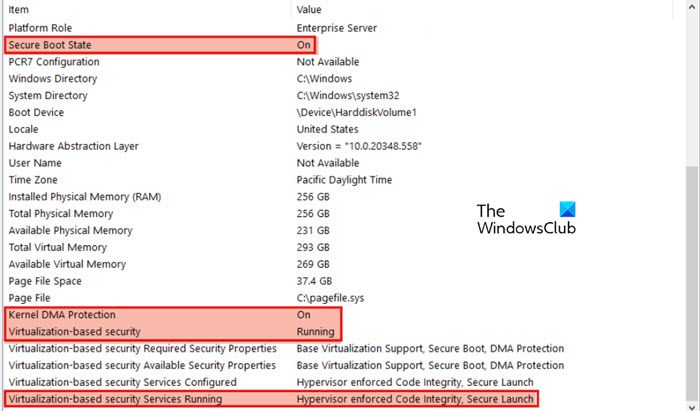
To verify if it is enabled, run gpresult /SCOPE COMPUTER /R /V in PowerShell (as an admin) or open msinfo32.exe from Run, and see if all the Virtualization settings we verified in the previous method are there or not.
That’s it!
Read: Windows Server 2022 vs 2019 vs 2016 Feature differences
How do I make my server more secure?
You can do a few things to make your server more secure, such as installing all the security patches regularly, making sure that your SSL certificate is renewed, configuring policies to prevent any unlicensed app from getting into your computer, enabling a firewall, and more.
Also read: Backup and restore Active Directory in Windows Server.