A Virtual Switch (vSwitch) software allows one virtual machine (VM) to communicate with another. They are also used to connect virtual and physical networks and to transport VM traffic to other VMs or physical networks. However, keep in mind that Virtual Switch is configured on Hyper-V. Hyper-V is a program that allows us to create and manage virtual machines that run other instances of Windows 11 and older versions of Windows and other platforms, such as the Linux operating systems. In this tutorial, we will learn how to create and configure the Virtual Switch in Hyper-V.

What is the use of Virtual Switches?
The use of Virtual Switches (vSwitch) is the same as a physical switch; the latter is used in a physical network, whereas the former is there for connecting virtual machines. There are three types of vSwitch, External, Internal and Private. They have different permissions, and based on the use case, the network administrator creates and deploys a particular switch. We will discuss these switches and how we can create them in Hyper-V Manager.
How to configure the Virtual Switch in Hyper-V
Before creating and configuring a virtual switch in your computer, your computer must have the Hyper-V program installed on the computer and have administrative rights. There are three types of Hyper-V virtual switches that you can configure through Virtual Switch Manager in Windows 11.
- External Switch
- Internal Switch
- Private Switch
Depending on your organization’s requirement, we need to create either of the three switches. Let us talk about each one of them in detail.
1] External Switch

An external switch allows a virtual machine to access a physical network adapter. One of the advantages of using the external switch is the ability to share management and VM traffic on the same switch.
Here is how to create an External switch in Hyper-V.
- Press Windows key and type Hyper-V Manager in the search bar and press enter button.
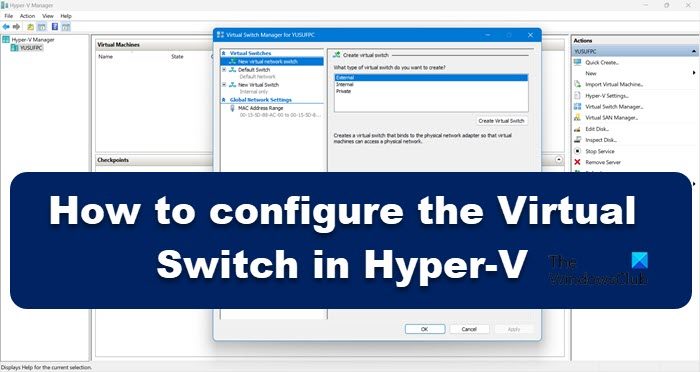
- Click on Virtual Switch Manager and select the External option there.
- Hit on Create Virtual Switch and write down the name of the virtual machine.
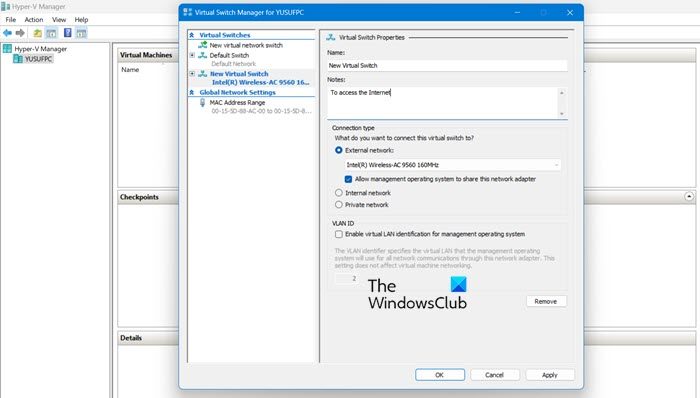
- In the Notes, write To access the Internet in the text box.
- Make sure that External Network is checked.
- From the External Network drop-down, you can select whichever adapter should be accessed by the switch.
- Now click on the Apply button and click on Yes to create an External switch on Windows 11 machine.
That’s how you can create an External Switch which can then be accessed by your VMs.
2] Internal Switch

An Internal switch allows all the virtual machines to communicate with each other, and it also provides these virtual machines access to the physical computer. However, VMs connected to an Internal virtual switch cannot access network resources from the internet. and if you want to create an Internal switch on Windows 11 compute here is how you can do the same:
- Launch Hyper-V Manager
- Click on Virtual Switch Manager and select the Internal option there.
- Hit on Create Virtual Switch and write down the name of the virtual machine.
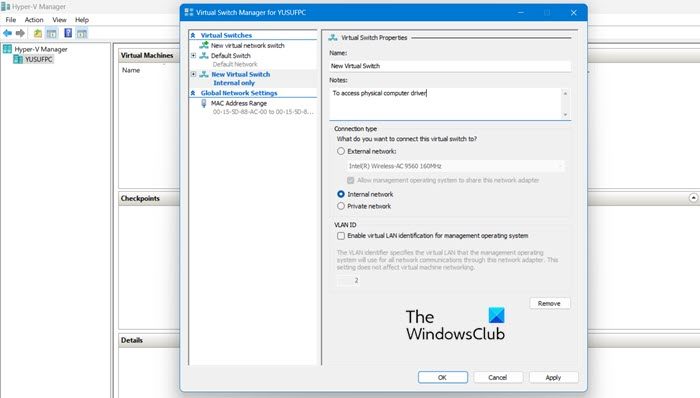
- In the Notes, write To access physical computer drives in the text box.
- From the Connection type, you have to choose Internal network.
- Finally, click on apply button.
Read: How to convert Physical Machine to Virtual Machine in VirtualBox
3] Private Switches
Private switches completely isolate your virtual machine from the network and do not allow communication between the host and virtual machines. Virtual machines can communicate with each other but they can not communicate with the base machine or the Internet. To create a private switch, follow the steps given below.
- Open the Hyper-V Manager on your system
- Click on Virtual Switch Manager and select the Private option there.
- Hit on Create Virtual Switch and write down the name of the virtual machine.
- In the Notes, write To communicate with other VMs in the text box.
- From the Connection type, choose Private network.
- Finally, click Apply > Ok
Leave a Reply