Instead of spending time setting up everything on multiple Windows 10 devices, it is better to turn on the Windows Sync Settings functionality. Although the Windows Settings panel comprises a user-friendly option, allowing users to enable or disable the synchronization settings, you can configure Windows Sync Settings using Registry Editor as well.
When you need to apply the same set of settings, theme, language, etc., on multiple Windows computers, and you have the option to use a Microsoft account, you can opt for Sync your settings option. Upon visiting Accounts > Sync your settings in the Windows Settings panel, you can see the options on your screen. However, if you see Some settings are managed by your organization message in the Windows Settings panel, the Registry Editor can be of help.
Before getting started, you should know two things – one, you must have a Microsoft account added to your computer, and two, you should backup Registry files before making any change.
Configure Windows Sync Settings using Registry Editor
To configure Windows 11/10 Sync Settings using Registry Editor, follow these steps-
- Type Win+R to open the Run prompt.
- Type regedit and press the Enter button.
- Click the Yes option.
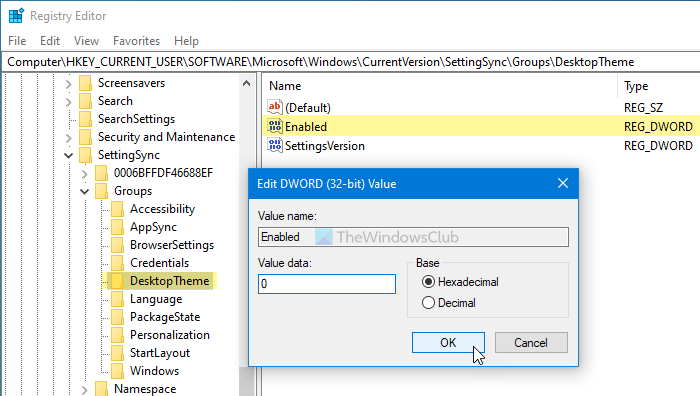
- Navigate to Groups in HKEY_CURRENT_USER.
- Select Sync settings under Groups.
- Double-click on the Enabled DWORD value.
- Set it as 1 or 0.
- Sign out and re-sign into your account.
To learn more about these steps, keep reading.
You have to open Registry Editor on your computer. For that, press Win+R, type regedit and hit the Enter button. Once the UAC prompt appears, click the Yes button to find Registry Editor on your screen.

Then, navigate to the following path-
HKEY_CURRENT_USER\SOFTWARE\Microsoft\Windows\CurrentVersion\SettingSync\Groups
Groups is a key, which contains some sub-keys named as follows-
- Accessibility
- AppSync
- BrowserSettings: If you want to synchronize IE and Edge settings, this option is for you.
- Credentials: Synchronize your saved passwords across multiple Windows 10 computers.
- DesktopTheme
- Language: Helps you synchronize the language preference setting.
- PackageState
- Personalization
- StartLayout: This Lets you synchronize your Start Menu layout.
- Windows
By default, you can see all these sub-keys in the Groups key, and each sub-key contains two DWORD values called – Enabled and SettingsVersion.
If you see the 1 as the Value data of Enabled DWORD value, it implies the activation of the settings, whereas 0 represents the deactivation. In other words, if you want to turn on, let’s say, DesktopTheme synchronization setting, click on DesktopTheme, double-click on Enabled, enter 1 as the Value data, and click the OK button.
Similarly, if you want to turn off the DesktopTheme synchronization setting, click on DesktopTheme, double-click on Enabled, enter 0 as the Value data, and click the OK button.
Whether you enable or disable a Sync setting, it is required to sign out of your account re-sign into it to get the effect.
I hope this guide helps.
Related: Windows Sync settings not working.