If you want to control bandwidth in a router, here is how: Through your router’s admin panel, you can control and allot bandwidth for a specific computer or device.

We have used a TP-Link router to demonstrate all the steps here. However, almost all the other routers have the same option in the admin panel.
How to control Bandwidth in Router
To control bandwidth in a router, follow these steps:
- Sign in to the router’s admin panel.
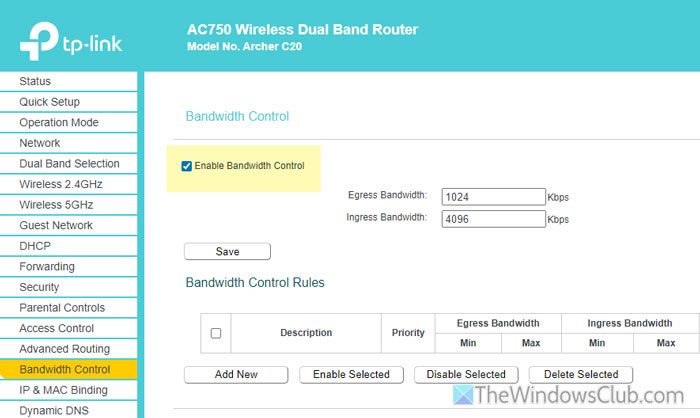
- Go to the Bandwidth Control section.
- Tick the Enable Bandwidth Control checkbox.
- Enter the Egress Bandwidth and Ingress Bandwidth.
- Click the Save button.
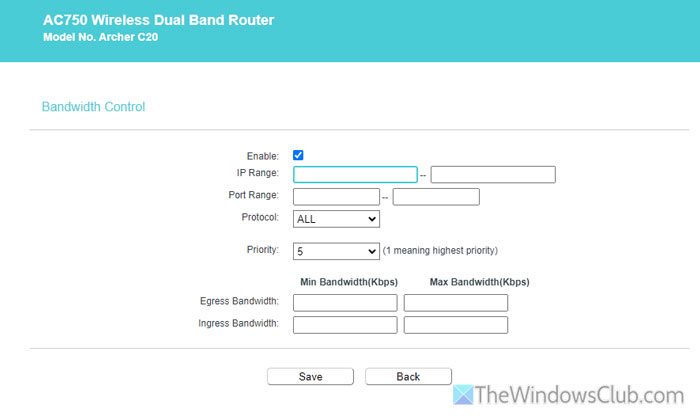
- Click the Add New button.
- Tick the Enable checkbox.
- Enter IP range, Port Range, Protocol, Priority, etc.
- Click the Save button.
- Tick a profile and click the Enable Selected.
Let’s see this in detail.
First, you need to sign into your router’s admin panel from where you can set things up. Next, you need to go to the Bandwidth Control section.
Then, tick the Enable Bandwidth Control checkbox and enter the Egress Bandwidth and Ingress Bandwidth.

In case you don’t know these terms, Ingress Bandwidth denotes the incoming bandwidth, and Egress Bandwidth denotes the outgoing bandwidth. In simpler terms, the former defines the download limit, and the latter defines the upload limit.
After that, click the Save button and click on the Add New button to add a rule.
Tick the Enable checkbox and set an IP Range, Port Range, Protocol, Priority, and Egress/Ingress Bandwidth.

For your information, you can set a priority from 1 to 8. In other words, you can create eight profiles and set eight priorities.
Once you do that, click the Save button. After that, you can find all the profiles on your screen. You need to select a profile and click the Enable Selected button.
If you want to delete a profile, click the respective Delete button to confirm the removal. However, if you want to delete all the profiles, tick all the checkboxes and click the Delete Selected button.
For your information, D-Link routers do not have the Bandwidth Control option. Instead, it would be best to go to the Advanced Network section. Then, tick the Enable Bandwidth Profiles checkbox and click the Add button. Next, you can enter the details as mentioned earlier.
This post will help you if you cannot access the Router configuration page using the login URL or IP address.
I hope this step-by-step guide helped you.
Read: How to set Data Limit for Wireless and Ethernet Adapter on Windows
Can I control the bandwidth on a router?
Yes, you can control the bandwidth on a router to stop or prevent a specific computer from using all your data. You can use the bandwidth control feature to do that, or you can also use MAC Binding.
Read: How to secure and protect your WiFi Router
How do I adjust my bandwidth?
It would help if you used the Bandwidth control to adjust your bandwidth on a router. Open the router’s admin panel and go to the Bandwidth control or any other similar settings. Here you need to set the Egress and Ingress Bandwidth, IP range, Port range, protocol, priority, etc.