The conversion of a Virtual Machine (VM) to a physical one moves the virtualized instance of an Operating System and the associated or installed application software from a virtualized environment to a physical hardware platform. Such a conversion can help optimize the OS’s performance and the system’s physical hardware. In this article, we aim to explain in detail how to convert a Virtual machine to a Physical Machine.
How does Virtual Machine to Physical Machine migration work?
Typically, the conversion process is carried out by third-party software external to the Virtual Machine. The conversation process of a virtual machine to a physical one involves the below-mentioned phases:
- Prepare the Physical Machine:
- The very first step would be to ensure that the physical machine meets the hardware requirements for Windows.
- We need to take backups of the data on the physical machine, as the conversion process will overwrite the existing data.
- The username and password for the Admin account for Admin privileges to create a system image.
- Convert the Virtual Disk to a Physical Disk: A disk imaging tool is required to create a copy of the virtual machine’s disk as a physical image.
- Prepare the Virtual Machine: The Windows VM must be shut down before the conversion process starts.
- Transfer the Disk Image to the Physical Machine: After creating the disk image from the VM, it needs to be transferred to the physical machine through external hard drives, USB, etc.
- Boot the Physical Machine from the Disk Image: We can create a bootable USB drive or CD/DVD with the disk image using the disk imaging tool.
- Configure the Physical Machine: Once the physical machine is booted from the disk image, we can follow any additional setup or configuration steps as prompted by the Windows installation process.
Tools Required for V2P Migration
The migration tools required for the process would include:
- Application to prepare OS image transfer: The application performs configuration changes for the hardware devices while virtual and physical migration happens. This application must be installed in the VM before the conversion process starts.
- Image transfer application: To transfer the OS from the Virtual Machine to the Physical one, which should be installed in the VM.
- Hardware device drivers: For the target physical machine and its hardware resources.
Various Third-Party software are available for individually performing the processes mentioned above. However, this article will use a single application (AOMEI Backupper) to perform the entire conversion process for easy understanding.
Apart from AOMEI Backupper, tools like VMware vCenter Converter, Clonezilla, Platespin Migrate, etc., can also be used for the conversion. However, looking at reports in forums, it’s better to use a paid tool than a free tool, as the latter will take more time and is complicated.
How to convert Virtual machine to Physical Machine (V2P)?
Before starting the conversion, two preliminary processes need to be performed, as detailed below:
Creation of a bootable USB drive
- Open the AOMEI Backupper application and select Create Bootable Media under the Tools section.

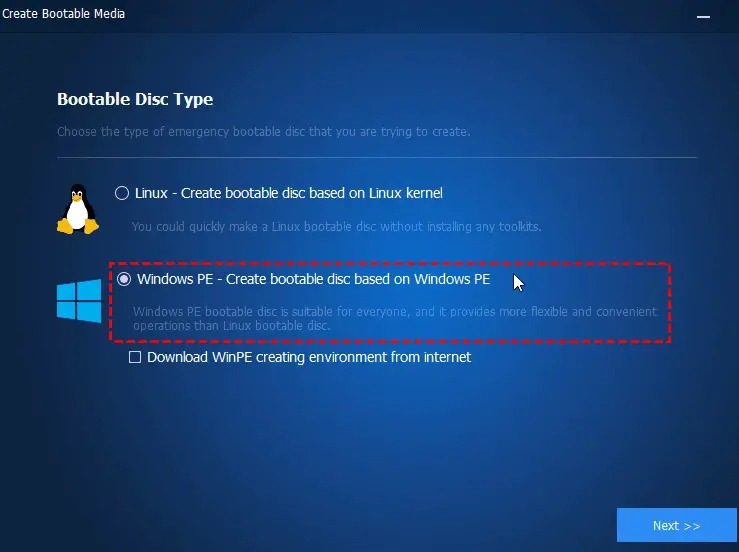
- On the next window, choose “Windows PE – Create bootable disc based on Windows PE” and click Next.
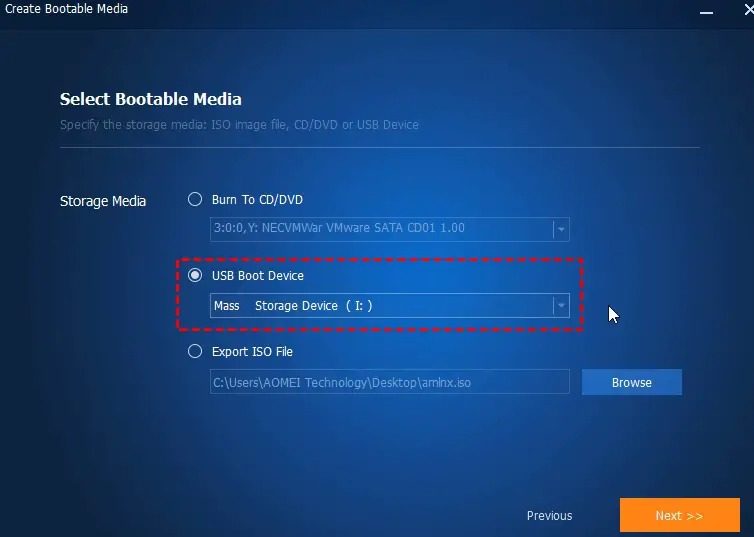
- Select the option USB Boot Device and click Next.
- Click on Finish on the Next window once the boot device creation process is completed.
Creation of system backup image
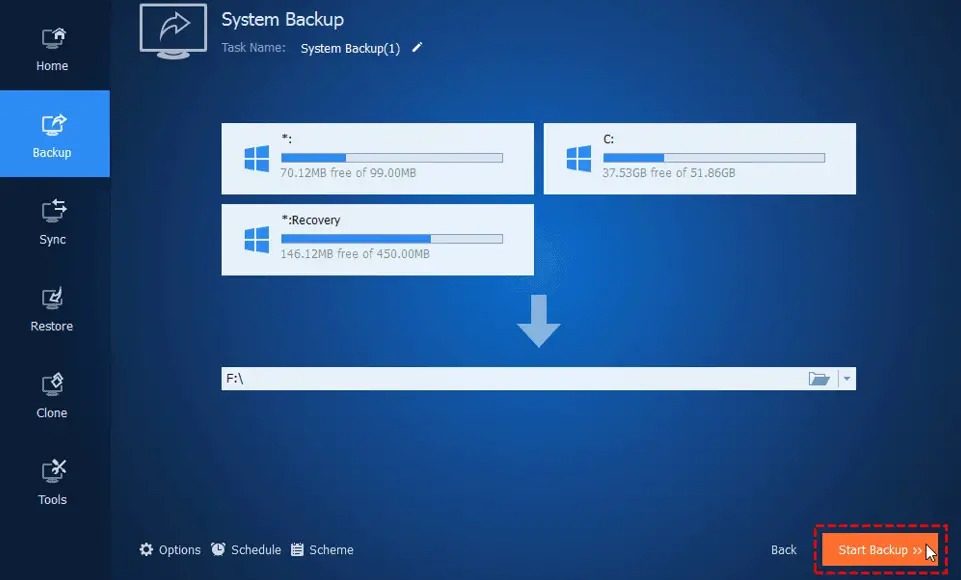
- Open the AOMEI BACKUPPER application and select the System Backup option under the Backup section.

- Enter a name for the backup task at your convenience. When the backup option is selected, the system will select the system and the boot partition as the source drive for backup by default.
- Choose the destination path for storing the backup (USB drive, external drive, etc.)
- Click on Start Backup to initiate the process.
- Click on Finish once the process is completed.
Steps for virtual to physical machine conversion
Make the necessary changes in the BIOS or UEFI to ensure the first boot device is selected as USB.
- Shut down the PC where you must install and reboot it from the bootable USB created through the above process.
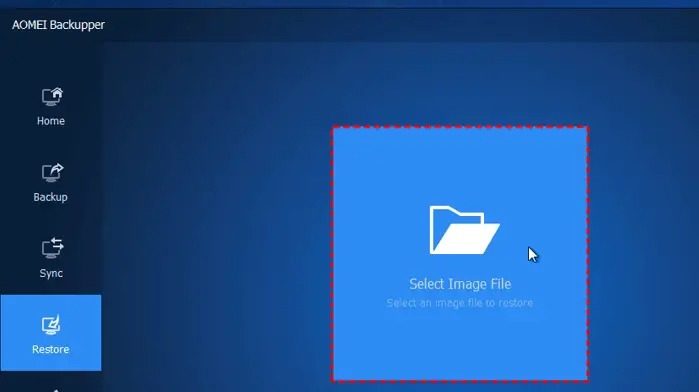
- The AOMEI Backupper application will be launched automatically once the system boots. In the application, click the Restore section on the left and then click the Select Image File option to select the path of the backup system image already created on the USB drive.
- Click on Restore this system backup followed by checking the option Restore system to other location.
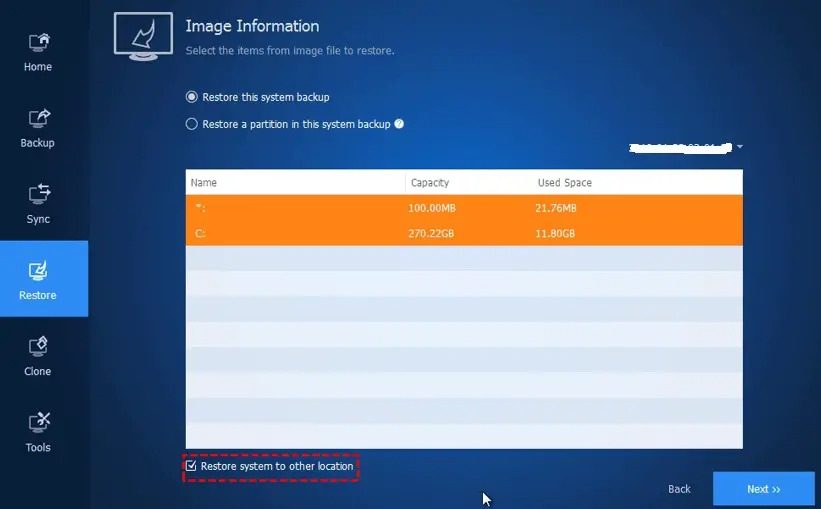
- Click on Next to proceed.
- Select the destination partition to transfer the restored data and click Next.
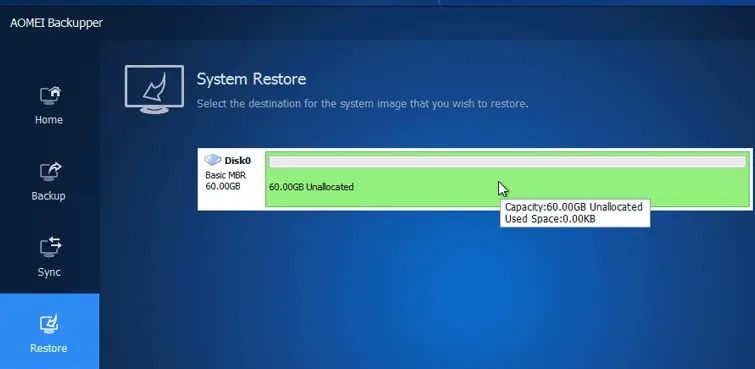
- On the next page, check and confirm all the information and settings before starting the restore process. Check the Universal Restore option to ensure the system is bootable once the restoration process is complete.
- Finally, click Start Restore to transfer the OS image to the physical system, completing the conversion process.
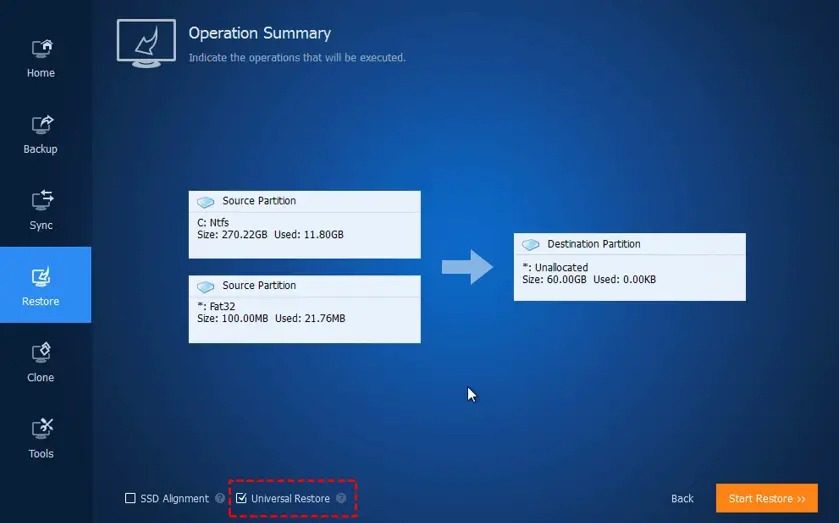
- Once the conversion is completed, updating the device drivers of the hardware from the manufacturer’s website is advised to ensure optimal performance.
I hope the post was helpful and you could migrate the Virtual Machine copy to a Physical drive.
Do I need to reactivate Windows after the conversion/migration?
Yes, since there is a significant change in the hardware platform during the conversion/migration, the reactivation process is initiated as a part of Microsoft’s Genuine Security Measure.
How do I copy a VM image to a hard drive?
Most VM software offers an export option, which you can use to make a copy on your hard drive. The form will be similar to what the VM software supports. For example, VMware supports OVF or OVA.