Microsoft Word is a powerful tool, but sadly many folks do not know this. They believe Word is only good for writing documents, but that is so far from the truth. This program is used for a multitude of things, including the creation of calendars. The question is, then, how does one make a calendar using Microsoft Word? We can say for certain that it is easier than you might think, but at the same time, it will take a few moments out of your time.
How to create a Calendar in Microsoft Word

Creating a calendar in Word is much easier than you might believe, but it will take a few minutes out of your time, especially if you want to add all the goodies.
- Open a blank Word document
- Navigate to Margins
- Use the keyboard keys
- Draw a basic table
- Increase the cell size to 1-inch
- Align the table to the right
- Add the dates to the table
- Choose your preferred line design
- Add Month to the table
- Add Days to the table
1] Open a blank Word document
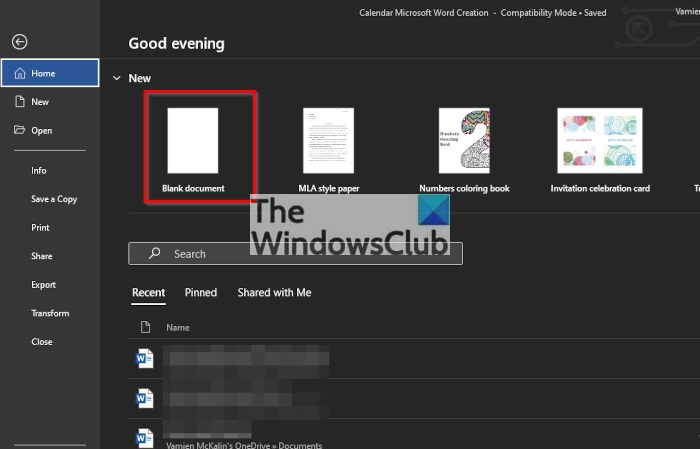
The first thing you want to do after firing up Microsoft Word is to create a blank document. To do this, click on the option that reads, Blank Document, and right away an empty page will appear.
2] Navigate to Margins
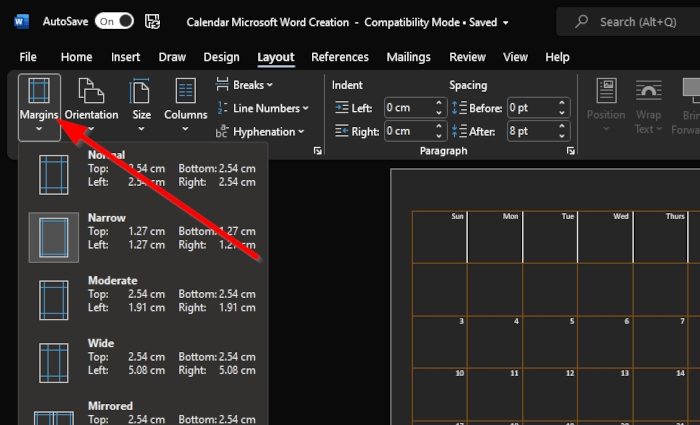
Moving on, you must now select Layout at the top, and from there, click on Margins to reveal a dropdown menu. You will want to choose one of the options from the list that best fits your calendar needs. We have decided to select Narrow.
3] Use the keyboard keys
Next up, you must press the Enter key twice on the keyboard, once you’ve done that, please press the Up arrow a single time.
4] Draw a basic table
Drawing a table is very important when it comes down to creating a calendar in Microsoft Word, so let us look at how to get it done quickly.
- Select the Insert tab on the Ribbon above the document.
- Click the Table icon to reveal a dropdown menu.
- Drag your mouse cursor to select seven grids horizontally, and six grids vertically.
- Press the left button on the mouse to add the table to the chart.
5] Increase the cell size to 1-inch
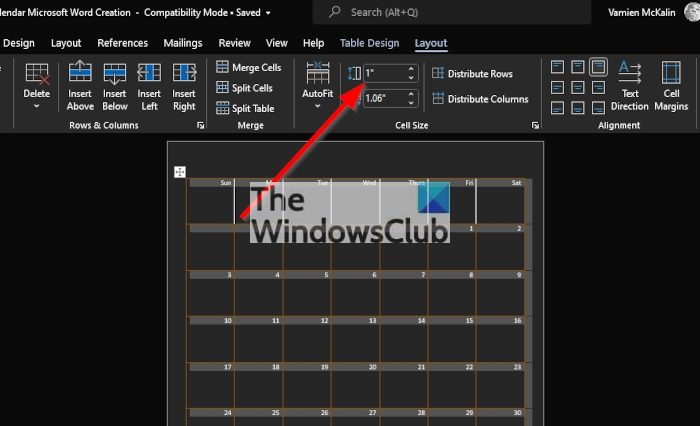
Now, we will have to increase the cell size to an inch, but you are free to increase it to whatever size fits your calendar plans.
- Use the mouse to highlight each cell in the table you’ve recently created.
- Up on the Ribbon, you should now see Table Design and Layout. Please click on the Layout option.
- Look for the Cell Size option and be sure to change it to 1-inch. The table should now expand and become bigger.
6] Align the table to the right
The next step here is to align the table to the right of the document. To get this done, simply click on Home > Paragraph > Alight Right, or CTRL + R to make things easier.
7] Add the dates to the table
You are now required to add the dates to the table. You will need to do this properly to fully represent a calendar.
- Click on the time and date section on the Taskbar.
- Add the dates in the same format as the ones on your Windows calendar.
8] Choose your preferred line design
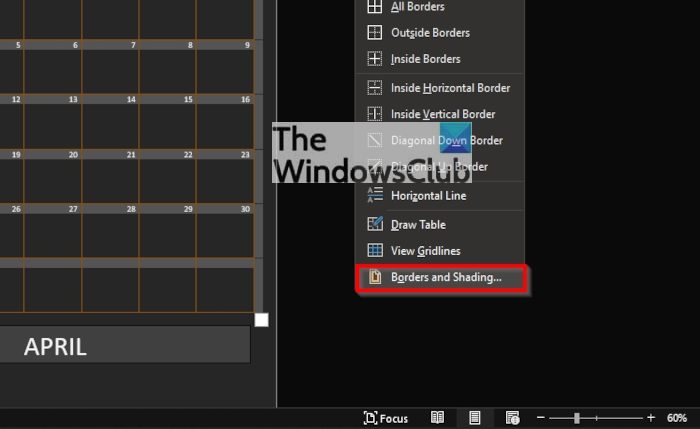
If the current setup is not to your liking, you can make additional edits by changing the lines to add some spice.
- Select the entire table with the added dates.
- Go to Table Layout from the Ribbon menu at the top of the document.
- Select Borders, then go to Border and Shading via the dropdown menu.
- From the Borders tab, choose the color that best fits your style, then hit the OK button.
9] Add Month to the table
After you’ve added the dates, it is now time to add Days and Months to the table to make it a legit calendar.
- Open the Text Box by clicking on the Insert tab.
- After that, choose the first Text Box template.
- Add the name of the Month to the Text Box.
- Finally, drag the Text Box to the bottom of the table.
10] Add Days to the table
In terms of adding days to the table, you will have to perform additional work. Worry not though because this is the last piece of the puzzle.
- Press the right-click button on the mouse from within a Cell.
- From the context menu, please select Insert > Insert Row Above.
- Go to Borders from the Table Design tab on the Ribbon.
- From the Borders dropdown menu, please click on Insider Vertical Borders.
Finally, add the days to the Cells and that’s it, you’ve officially created a calendar from within Microsoft Word.
Read: How to mirror an Image in Microsoft Word.
How do I access Microsoft calendar?
If you want to easily view the calendar in Windows, just click the date and time section on the Taskbar. When it comes down to the app itself, you can find it from within the app catalog via the Start Menu.
Is there a calendar in Microsoft Outlook?
From what we have gathered, Outlook does not have its own calendar tool. It uses the same calendar app from Microsoft that is integrated to work seamlessly without any issues.
Leave a Reply