This post will show you how to create, export & print a Folder Tree in Windows 11/10. If you scroll through hundreds of files, then a Folder Tree could help.
Taking a leap back, the early computer designers comprehended that lumping together several files on your computer systems would create massive junk and make it impossible to find anything. Hence ‘Directory’ on Windows systems was created. The many names for the same thing are directory, system, structure, and directory tree.
Simply put, a directory structure (or system or tree) is a simple layout of a computer system’s directory. We have all heard about directory structures and folder trees for years. Let’s start using it today as it can vastly improve your organization’s workflow. Now exporting the entire directory tree from a particular folder on Windows 11 or Windows 10 is easy. But there is no straightforward way of creating a Folder Tree in Windows 11/10.
Create a Folder Tree in Windows 11/10
File Explorer helps to view or open files quickly in Windows 10 system. Users can steer through the directories using back, forward, up menus, navigation menus, directly entering the location in the address bar and scrolling over left or right panes.
But there are no ways Windows Explorer, lets you understand the entire structure of a directory. If you have spent an absurd amount of time scrolling through hundreds of files trying to spot the one you want, then a Folder Tree could make a difference. We already mentioned, that there is no direct way of viewing the folders/ files in a Tree format in Windows Explorer. Here a ‘Tree command’ could work.
The tree command can make it very simple for you to trace files and folders using the command line. You can view how a directory on your system is structured and where every file is located. Let’s see how to do this.
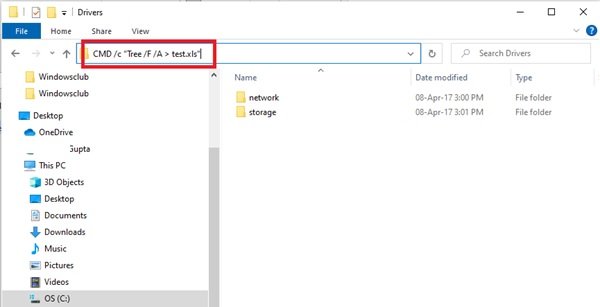
1] Press Win + E keys to open the File Explorer and navigate to the target file folder for which you want to create a Folder Tree.
Please note – In our case, we selected the C:\Drivers folder.
2] In the address bar, copy-paste the below command:
CMD /c "Tree /F /A > test.xls"

Explaining the composition of Tree Command – CMD /c “Tree /F /A > test.xls”
- ‘cmd /c’ – used to activate command prompt.
- ‘Tree’ – Command name that generates the structure.
- ‘/F’ – list’s down the list of all the files in every folder. In the absence of this parameter, only folders would be listed.
- ‘/A’ – used for exporting the result in a file.
- ‘> Test.xls’ – Sample name and file type. In this case, it’s in excel format, but the same can be altered to txt, doc, pdf, dat, etc. to create the folder tree in the desired format.
3] Press ‘Enter’.

This will create a new folder tree file name ‘Test’ in the C:\Drivers folder.
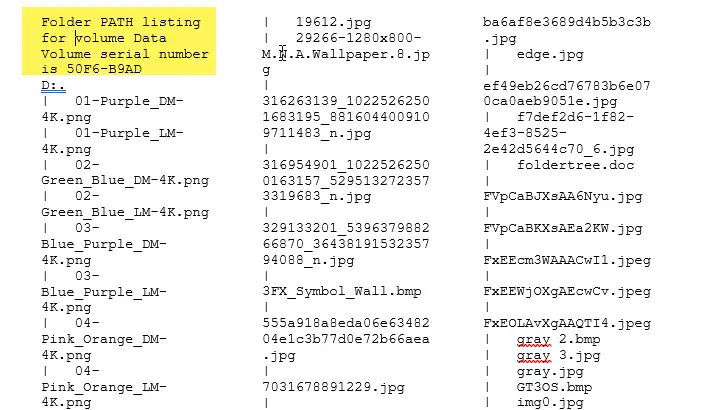
Double-click on the file and you will be able to see the structured tree format of all files.

A Folder tree can be created for any specific folder on Windows 10. So, if the folder is located in ‘F:\test’ then the command should be altered to the following command:
cmd /c "tree F:\test /f /a > Test.xls"
This simple tree command gives us a complete view of the directory on Windows 11/10. In no time, you will be able to create a folder tree that will give your files excellent organization and keep your Windows files within easy reach.
How to export Folder tree to a file using CMD

Open File Explorer and navigate to the folder for which you want to export the Folder tree
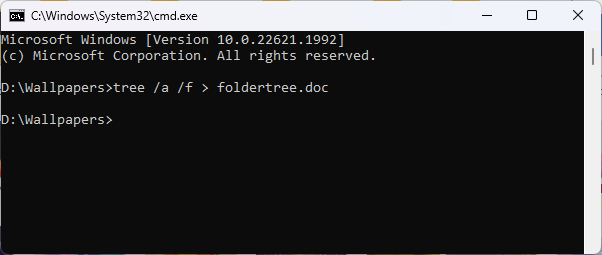
Type cmd in Explorer address bar and hit Enter to open the Command Prompt directly
Type the following command tree /a /f > foldertree.doc and hit Enter
The entire directory tree is saved in the foldertree.doc Word file.

We have used the name foldertree and the file extension as do, but you can change the name and save the files in any other file forma like txt, html, etc.
You can then use this file to print the Folder tree.
Read: How to Copy list of file and folder names to Clipboard in Windows.
Leave a Reply