Using calendar groups makes it easy for you to see the combined schedules of your work colleagues or your family at a glance. This feature comes in handy especially if you have a set of calendars that you frequently view together. In this post, we will walk you through the steps on how to create a Group Calendar in Microsoft 365.

How to create a Group Calendar in Microsoft 365
You may want to create a calendar group if you and your team use a set of calendars. The group calendar can also include resources, Internet calendars, or SharePoint calendars. This feature requires a Microsoft Exchange Server account, which simply means work or the school email account provided by the organization that is running a Microsoft Exchange Server or is using Microsoft 365 which uses Exchange Server to provide an email.
Calendar groups are a great collaborative tool for teams of any size because it compiles individual calendars into a group that allows you and your team members to see every single calendar included in the group at a glance. You can create a Group Calendar in Microsoft 365 in either of the following ways:
- Create Group Calendar from Global Address Book or Contact List
- Create Group Calendar from Shared Calendar
Let’s explore both methods in detail.
1] Create Group Calendar from Global Address Book or Contact List

To create a Group Calendar from the Global Address Book or Contact List, do the following:
- Launch Outlook email desktop client.
- Click the calendar icon in the navigation pane in the bottom-left corner of the window to display the calendar view.
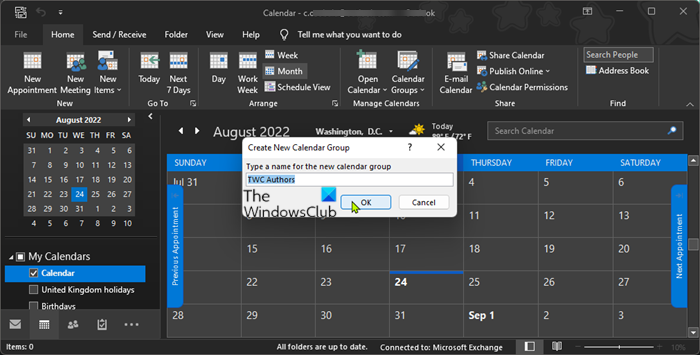
- In Manage Calendars, click Calendar Group > Create New Calendar Group.
- Give the group a descriptive name.
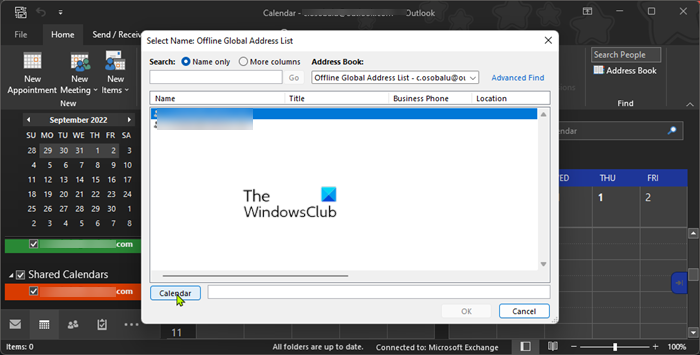
- Next, under Address Book, choose the Address Book or Contact list from which you want to pick members of your group.
- Browse or search for the user(s) or user group(s) to add to the group.
- Click the Group Members button or double-click the username/group name to add.
- Click OK to create the calendar group when all desired users have been added.
Read: How to create a Calendar in Microsoft Word-
2] Create Group Calendar from Shared Calendar

To create a Group Calendar from a Shared Calendar, you must have a Shared Calendar. If you don’t have one, follow the instructions below to create a Shared Calendar:
- Launch Outlook.
- Click the calendar icon in the navigation pane in the bottom-left corner of the window to display the calendar view.
- Click +Open Calendar in the ribbon > Create New Blank Calendar. In the Simplified Ribbon, click +Add > Create New Blank Calendar.
- Give a descriptive name to the calendar.
- Next, select where to place the calendar.
- Click OK.
- Click the calendar that was just created in the navigation panel to open the calendar.
- Click New Appointment, New Meeting, or New Items to add events to the calendar.
Read: Outlook Calendar Checking Tool (CalCheck) reports problems with entries
You can now proceed to create a Group Calendar from a Shared Calendar as follows:
- Launch Outlook email desktop client.
- Click the calendar icon in the navigation pane in the bottom-left corner of the window to display the calendar view.
- Click the desired calendar in the left navigation pane to view the calendar.
If the calendar that you want to add is not in your Navigation Pane, do the following: in Calendar, on the Home tab, in the Manage Calendars group, click Open Calendar, and then click the type of calendar that you want. Browse or search for names, click the name that you want, and then click Calendar. Repeat this step for each calendar that you want to include in the group, and then click OK when done. Alternatively, in Schedule View, you can click the Add a Calendar box at the bottom of the view and then enter the name that you want – the added calendars will now appear in the Shared Calendars folder in the Navigation Pane. Now, you can simply drag calendars from Shared Calendars in the navigation pane to the calendar group that you want.
- Next, click Calendar Groups > Save as New Calendar Group in the ribbon.
- Name the calendar group.
- Click OK to create the calendar group.
The new calendar group opens beside any calendars or groups that were already open. To add other calendars to the view, select the check boxes of the calendars that you want in the navigation pane. If you want you can move a member of any calendar group to a different group by dragging the calendar in the navigation pane to the calendar group that you want.
Read: How to share Calendar in Outlook
View, Hide, or Delete a Group Calendar

To view the calendars in overlay mode because group calendars are shown side by side or in horizontal Schedule View, do the following:
- Go to the Home tab.
- in the Arrange group, click Day, Work Week, Week, or Month.
- Click the View in Overlay Mode arrow on the tab on each calendar that you want to overlay.
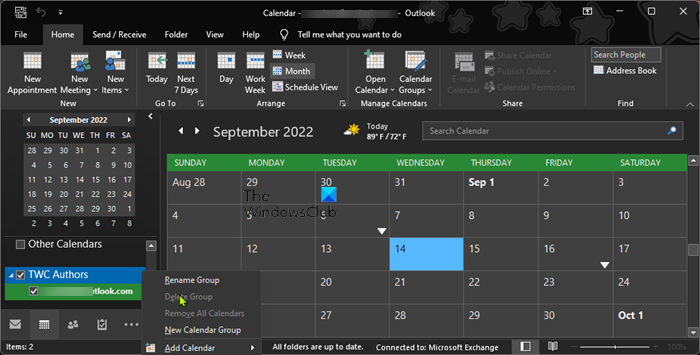
To view multiple calendar groups together, select the check box of any calendar or calendar group that you want to view in the navigation pane and you can view any calendar together with any group even if it is not a member of that group. To hide any calendar from the view, simply uncheck the calendar box in the Navigation Pane, or click Close Calendar on the calendar’s tab. To delete a group calendar, right-click the calendar group that you want to delete in the left navigation pane, and then click Delete Group. To print the calendar, see this guide.
Read: How to change the Background Color of the Calendar in Outlook
That’s it!
These posts might interest you:
- How to schedule a Skype meeting on a Group Calendar in Outlook
- How to sync Outlook Calendar with Samsung Calendar
- How to attach Calendar Invite to an email in Outlook
- How to stop Outlook Calendar email notifications
Does Office 365 have a group calendar?
The Microsoft 365 Groups workspace connected to modern SharePoint team sites provides a shared calendar. You and every member of your group can schedule a meeting on a group calendar in Outlook. A group calendar enables you to see multiple calendars at the same time.
Read: How to create a Calendar in Microsoft Word
How do I create a shared calendar for multiple users of Office 365?
To create a shared calendar for multiple users in Office 365, do the following:
- Select Calendar.
- Select Home > Share Calendar.
- In the email that opens, type the name of the person in your organization that you want to share your calendar in the To box.
- In Details, specify the level of details that you want to share with the person in your organization.
- Select Send.
Read:
- How to use Calendar App on Windows 11 PC
- The name cannot be matched to a name in the address list – Outlook error
Does Outlook 365 have a group calendar in Outlook?
Select the Calendar icon at the bottom right of the Outlook window. You should now see the calendar for the group under the All Group Calendars heading. Check the box to view the group calendar. Any appointments you place here will be viewable by all other members of the group.
Read: Create, edit and delete Recurring Calendar Appointments in Outlook.