Here is a complete guide on how you can make a Kaleidoscope on your Windows 11/10 PC. You can use multiple methods to apply a Kaleidoscope effect to your images and convert them into Kaleidoscopes. If you want to create a Kaleidoscope from scratch, you can also do that. There are multiple methods that we have discussed in this post. You can use some popular graphics editing software to do so. There are some free online tools to make a Kaleidoscope in your web browser. Let us check out all the free Kaleidoscope Maker software or online tools to make a Kaleidoscope image on a PC.
How to create a Kaleidoscope on Windows computer
Here are the methods using which you can make a Kaleidoscope on your Windows 11/10 PC. You can use a free Kaleidoscope Maker software or online tools.
- Create a Kaleidoscope in GIMP.
- Add a Kaleidoscope effect in IrfanView using an external plugin.
- Make a Kaleidoscope in Paint.NET using Kaleidoscope Effect Plugin.
- Use dedicated free software to create a Kaleidoscope.
- Try a free online tool to make a Kaleidoscope.
Let’s talk about the above-mentioned methods in detail.
Kaleidoscope Maker software or online tools
1] Create a Kaleidoscope in GIMP
You can use GIMP to create a Kaleidoscope on your PC. GIMP is a popular vector graphics and photo editing software for Windows 11/10 and other operating systems. You can use it to crop, flip, rotate and change image size, make new graphic designs, remove image background, generate animated GIFs, and do much more.
Apart from all these tasks, you can also use it to add a Kaleidoscope effect to your images. It provides several filters one of which is the Kaleidoscope filter. Let us check how to use this filter and generate a Kaleidoscope design.
How to make a Kaleidoscope Effect in GIMP?
Here are the main steps for making a Kaleidoscope in GIMP:
- Download and install GIMP on your PC.
- Launch the app.
- Open the source image or draw a pattern.
- Go to Filters > Distorts.
- Select the Kaleidoscope filter.
- Set up the input parameters as per your requirement.
- Save the Kaleidoscope.
Firstly, if you haven’t installed GIMP on your system, download and install GIMP right away. After that, open the application and import the input image to which you want to add a Kaleidoscope effect. If you want to draw a design or pattern and convert it into a Kaleidoscope, you can use the available painting tools.
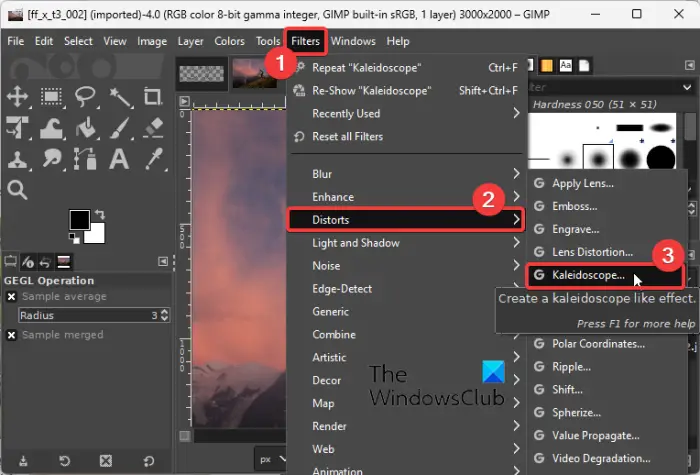
Now, go to the Filters menu and open the Distorts category. Next, select the Kaleidoscope filter from the available filters.
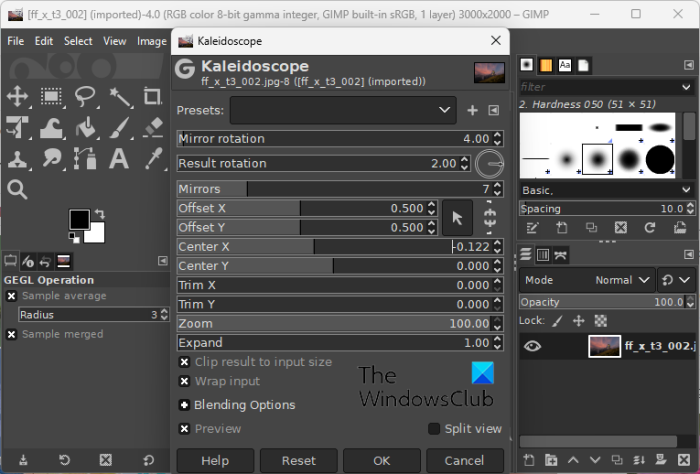
A new dialog window will open up where you can customize the input options. You can set up options like mirror rotation, result rotation, the number of mirrors, position of symmetry center in output, zoom, blending options, expand, and more. As you vary these options, you will be able to view the preview of Kaleidoscope on the screen.
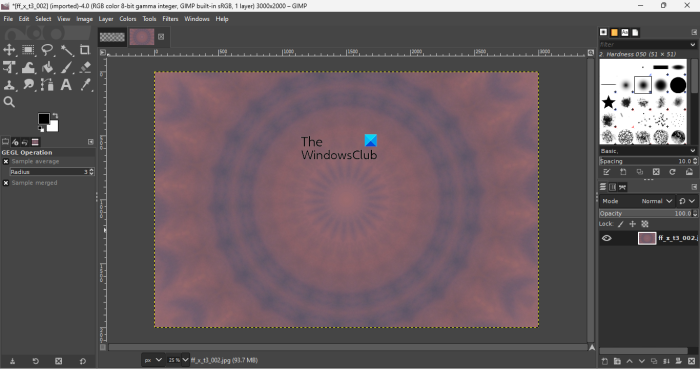
If you are happy with the results, you can save the Kaleidoscope in a supported output image format like JPEG, PNG, WEBP, BMP, GIF, etc. For that, you can use the File > Export as option.
GIMP is a great Kaliesocope maker software for Windows users. If you use this software regularly, it is a convenient method to convert your images and designs into Kaleidoscopes.
Read: How to edit Frames of an Animated GIF using GIMP.
2] Add a Kaleidoscope effect in IrfanView using an external plugin
You can also use IrfanView to create a Kaleidoscope on Windows. It lets you import an image and then apply a Kaleidoscope effect to it. However, it doesn’t provide any inbuilt option to make a Kaleidoscope. So, you will have to use an external plugin to do so. Let us check out how.
How to make a Kaleidoscope in IrfanView?
You can try the below steps to create a Kaleidoscope in IrfanView:
- Download and install IrfanView and its plugins set.
- Download the Kaleidoscope plugin and extract the plugin file.
- Open IrfanView and import the source image.
- Go to Image > Adobe 8bf plugins > Filter Dialog.
- Add the Kaleidoscope plugin.
- Press the Start selected filter option.
- Set up the Kaleidoscope options.
- Save the final image.
Let us discuss the above steps in detail.
First of all, you have to download and install the IrfanView software as well as its Plugins package on your PC.
Now, you need an external plugin in order to convert your images into Kaleidoscopes in IrfanView. You can download the required Kaleidoscope plugin from here. This plugin can be used with Photoshop, IrfanView, and other compatible software. After that, extract the downloaded folder and you will see a kaleidoscope2-1.8bf file in it.
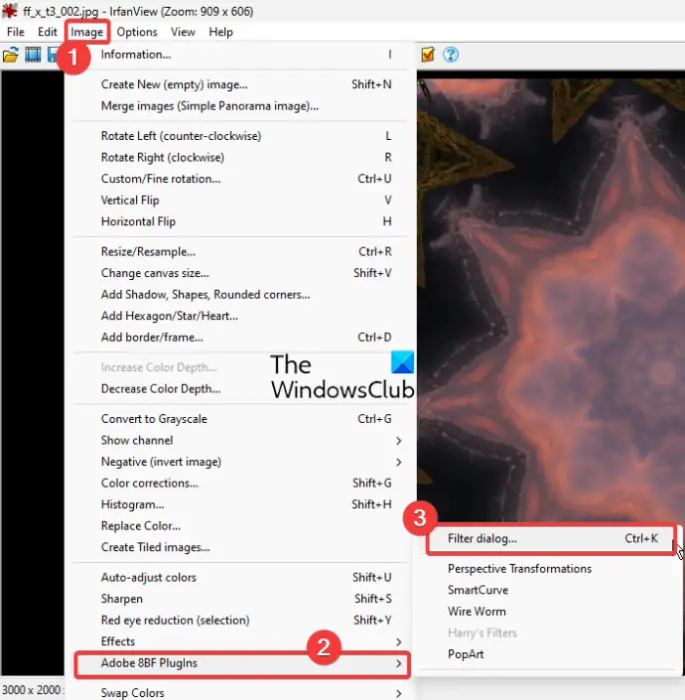
Next, launch IrfanView and open the source image to which you want to add a Kaleidoscope effect. Then, go to Image > Adobe 8bf plugins and select the Filter Dialog option, or simply press the Ctrl+K hotkey.
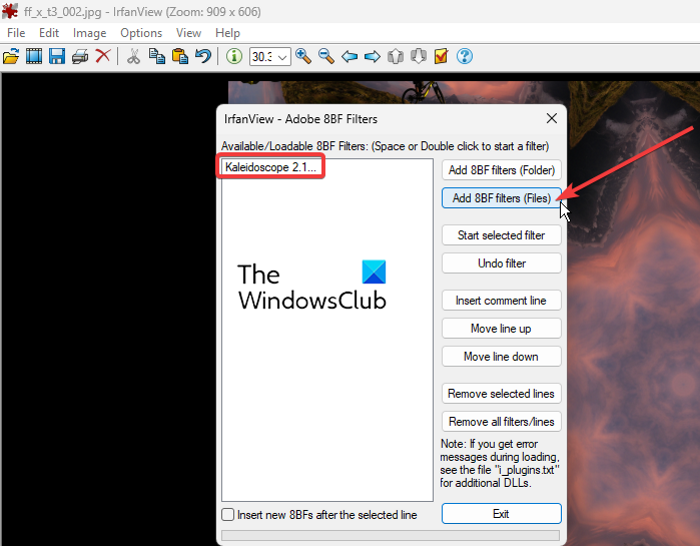
In the Adobe 8bf dialog box, you need to add the downloaded kaleidoscope2-1.8bf file. To do that, tap on the Add 8bf Filters (Files) button and browse & select the file.
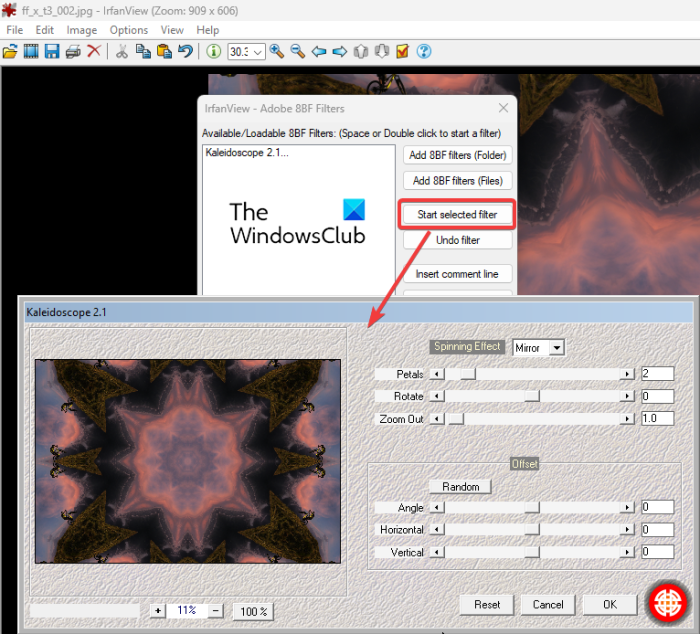
Once the Kaleidoscope plugin is added, you can click on the Start selected filter button. Now, you can customize various input parameters to draw a Kaleidoscope. It also shows the preview of output in real-time. You can configure multiple options like spinning effect (mirror, blend, copy), petals, rotation, zoom out, and offset options (angle, horizontal, vertical, etc.).
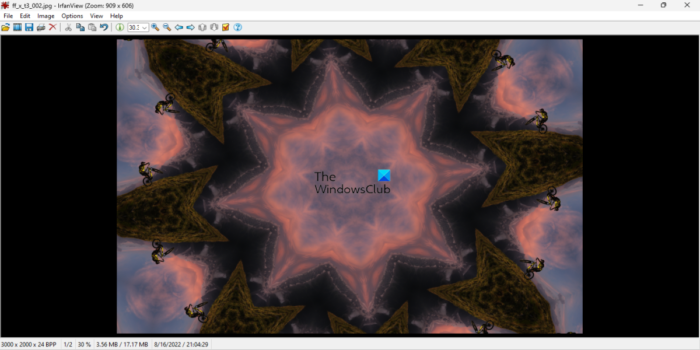
When done, press the OK and it will convert your image into a Kaleidoscope. You can now save the final image in different output image formats. Some of the supported output formats are JPG, BMP, PNG, GIF, WEBP, TIFF, etc.
IrfanView is a great image viewer and editor software using which you can also make a Kaleidoscope.
See: Free Photo Collage maker online tools & software.
3] Make a Kaleidoscope in Paint.NET using Kaleidoscope Effect Plugin
If are a user of Paint.NET, you can use an external plugin to create a Kaleidoscope in it. Paint.NET is a popular free image editing and designing software for Windows. It can be used to perform a lot of image editing tasks. For example, you can crop, resize, rotate, flip, apply filters, draw designs, and do much more.
You can also use it to create a Kaleidoscope. But, it doesn’t provide you a direct option to do so. You will be required to install an external plugin for that. The installation of the required plugin is very simple. Let us check out the sorted procedure.
Also read: How to split an image in Paint.NET.
How to make a Kaleidoscope in Paint.NET?
You can follow the below simple steps to make a Kaleidoscope in Paint.NET:
- Download and install Paint.NET.
- Download the Kaleidoscope Effect Plugin.
- Install Kaleidoscope Effect Plugin.
- Open Paint.NET.
- Import an image.
- Go to Effects > Distort > DPL Kaleidoscope.
- Customize your Kaleidoscope.
- Save the final image.
Let us elaborate on the above steps now.
First, make sure you have Paint.NET installed on your PC. And then, Download the Kaleidoscope Effect Plugin from forums.getpaint.net. After downloading the plugin folder, extract it and copy the consisting DPL KAL.dll. Now, go to the installation directory of Paint.NET and open its Effects folder. You will most likely find it at the following location> C:\Program Files\paint.net\Effects. You need to paste the DPL KAL.dll at this location.
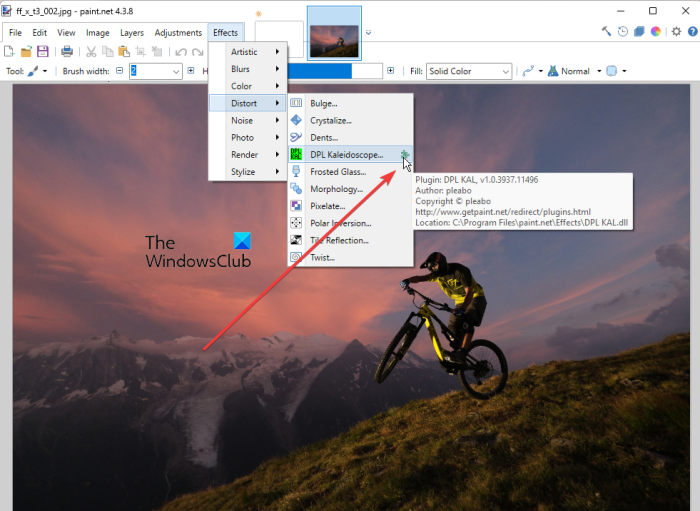
Next, open the Paint.NET software and import an image to it. After that, go to Effects > Distort and select the DPL Kaleidoscope effect.
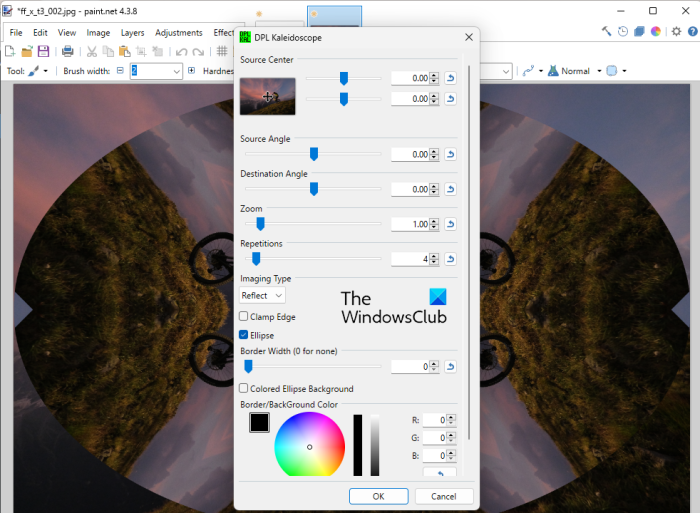
Now, in the DPL Kaleidoscope customization window, set various parameters as per your requirements. You can customize options like source center, source engle, destination angle, zoom, repetitions, imaging type (reflect, left, right), border width, background color, etc. As you vary the value of these parameters, you will be able to preview the output in real-time.
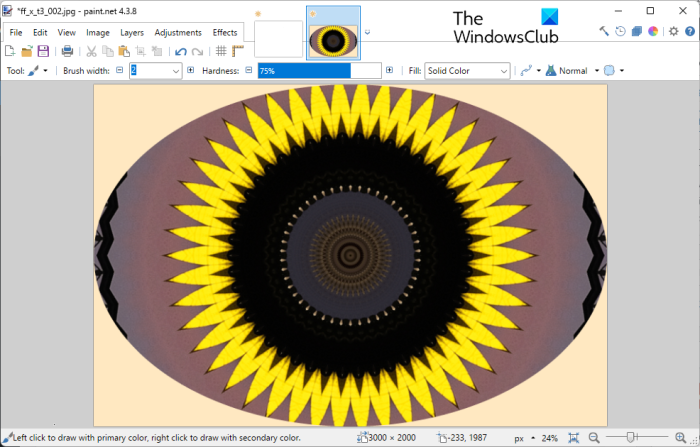
When done, press the OK button and save the final Kaleidoscope in the desired image format like JPG, PNG, BMP, WEBP, TGA, GIF, HEIC, etc.
Paint.NET can be a good Kaleidoscope maker software. You just need to download and install a simple plugin for that and then you will be able to create beautiful Kaleidoscope images using it.
Read: How to create a Web Button using Paint.net.
4] Use dedicated free software to create a Kaleidoscope
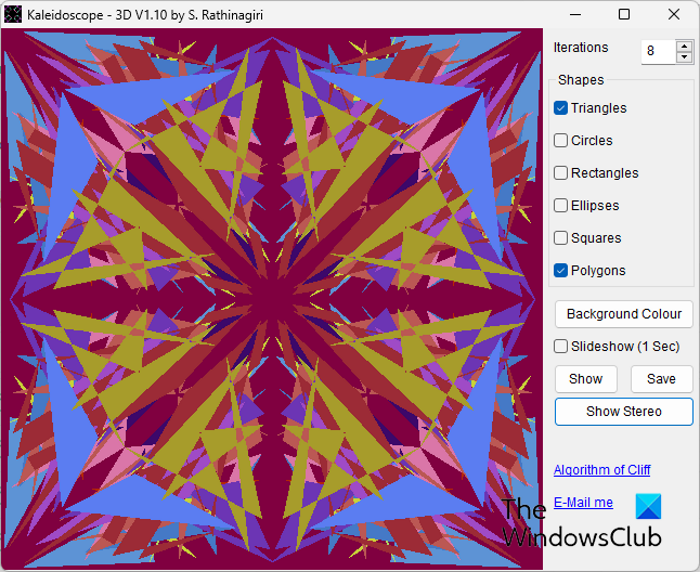
If you want a dedicated desktop application specially designed to make a Kaleidoscope, there are many options. You can use this free software called Kaleidoscope – Stereo to generate Kaleidoscope images. It lets you select directed shapes, color, and other parameters, and then draw a Kaleidoscope. You can also generate a stereo image. Let’s see how.
To start with, download this software and then install it on your PC. After that, launch it and then customize various input options. You can set up options like the number of interactions, shapes (triangles, rectangles, ellipses, squares, etc.), and background color When done, click on the Show button to preview the resulting Kaleidoscope image. You can save the final image in BMP format by pressing the Save button.
You can download this software from sourceforge.net.
Read: Best free Image and Photo Viewer apps for Windows 11/10.
5] Try a free online tool to make a Kaleidoscope
You can also create a Kaledisocope online using a dedicated online tool. There are some free online tools that allow you to make a Kaledisocope in your web browser. Here are some free online Kaleidoscope makers that you can use:
- Kaleidoscope Painter
- LunaPic
A) Kaleidoscope Painter
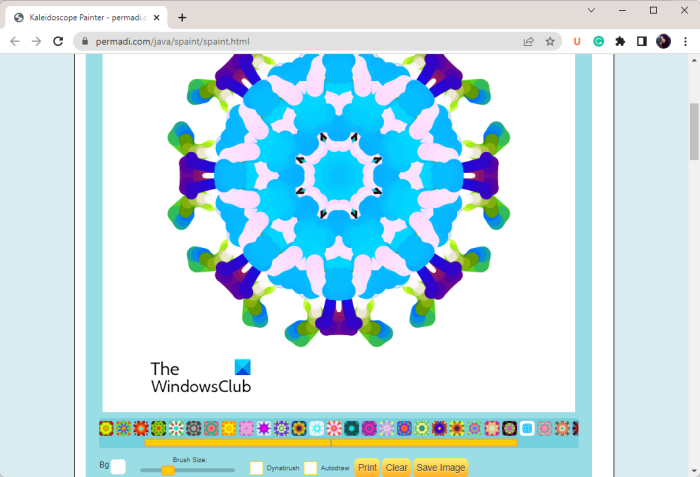
Kaleidoscope Painter is a free online Kaleidoscope generator tool. It lets you make a Kaleidoscope automatically based on some beautiful patterns.
To use it, open its website in your web browser. And then, enable the Autodraw checkbox to automatically draw a Kaleidoscope. Now, select the patterns from the bottom using which you want to create a Kaleidoscope. Next, choose the brush size or enable Dynamic Brush. You can also select a background color. Finally, you can press the Save Image or Print option to download or print the Kaleidoscope image.
You can try it here.
Read: Best free Image Compressor and Optimizer software for PC.
B) LunaPic
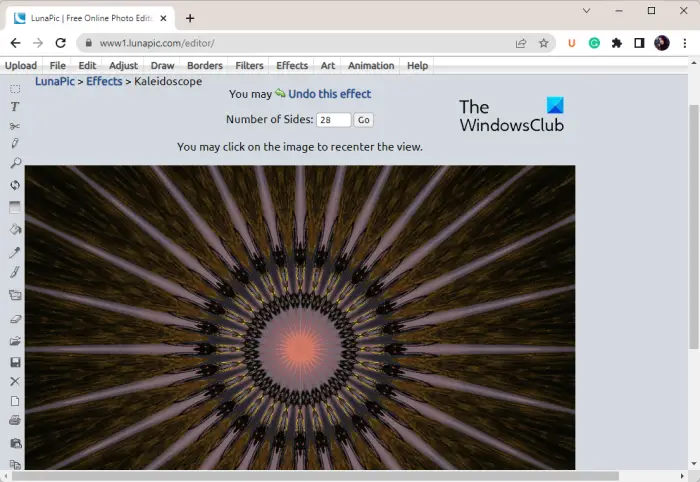
LunaPic is a free online photo editor using which you can also create a Kaleidoscope. It lets you convert an image into a Kaleidoscope. It is very easy to use.
First, open the LunaPic online editor in a web browser. After that, import the source image to it and then go to the Effects menu. Now, select the Kaleidoscope option and enter the number of sides. Next, press the Go button and it will generate a respective Kaleidoscope. If you want to reenter the number of slides, do that and hit the Go button.
When you are satisfied with the results, you can download the Kaleidoscope image in JPG format by clicking the Save button. You can even share the results directly on social networks like Twitter, Facebook, etc.
Read: How to Check and Change Image DPI in Windows 11/10?
How can I turn my photo into a Kaleidoscope?
You can convert an image into a Kaleidoscope, you can use GIMP photo editing software for Windows 11/10. It provides a dedicated filter using which you can turn an image into a Kaleidoscope. To access it, go to the Filters > Distort > Kaleidoscope option and set up the customization options. Apart from GIMP, you can also use IrfanView and Paint.Net to convert images into a Kaleidoscope. However, you will need to install an external plugin for that. We have discussed the detailed procedure that you can check out above.
What is Kaleidoscope software?
A Kaleidoscope software is a desktop application that allows you to make a Kaledisocope on your PC. You can try this free software called Kaleidoscope – Stereo which lets you automatically generate a Kaleidoscope from scratch. If you want to convert a photo into a Kaleidoscope, you can also try GIMP, IrfanView, or Paint.NET.
How do you make a mandala effect?
You can make a Mandala using a fee online Mandala generator tool. There are free web services like mandalamaker.online, MandalaGaba, STAEDTLER Mandala Creator, and Mandala Maker to create a mandala online. You can open any of these websites and then draw a Mandala easily.
Hopefully, this post helps you create a Kaleidoscope on Windows.
Now read: How to open PSD files without using Adobe Photoshop.