In this post, we will show you how you can create a repeating pattern in GIMP and how to use it. You can create customized repeating patterns in GIMP and then add and use them from the Patterns library.
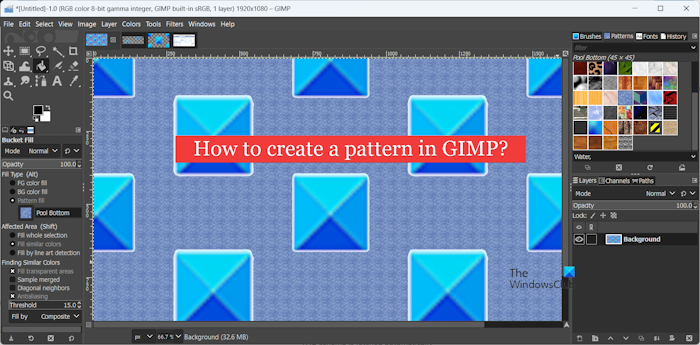
GIMP (GNU Image Manipulation Program) is a free, open-source, and cross-platform graphics editing software that is quite popular amongst graphics designers. It lets you create different kinds of designs and graphics including patterns. A pattern is primarily a design that repeats itself multiple times. It can be a simple design or even a complicated, eye-catching digital pattern used in graphics design. You can apply it to another image to make it look fascinating. GIMP contains several predesigned patterns that you can use in creating graphics. It also lets you create new custom patterns.
Can you make patterns in GIMP?
Yes, you can make customized patterns in GIMP. For that, you need to use the image of the object and then repeat the object in the final image using the Layers menu. It includes resizing the object and pattern image, copying the object, creating a new layer, pasting the object into the new layer, merging the original and pattern layers, and then saving the image with the .pat file extension.
How to create a Pattern in GIMP?
You can follow the below steps to create a repeating pattern in GIMP on your Windows PC:
- Download and install GIMP, and open it.
- Open the image that you want to turn into a pattern.
- Resize it to a smaller size.
- Change the size of the pattern tile.
- Copy the object from the original image.
- Create a new layer.
- Paste the copied object into it.
- Disable the visibility of the original image layer.
- Select the new layer.
- Click on Layer > Transform > Offset.
- Set up the Offset Layer properties.
- Toggle the visibility of the original layer.
- Merge down the pattern layer into the original layer.
- Export the created pattern.
First, you need to have GIMP installed on your computer. Download the latest version from the official website and install it on your PC. After that, launch the software to open its main GUI.
Now, click on the File > Open option to open the source image that contains the object that you want to turn into a pattern.
Next, if the image size is big, you must decrease the object’s size to create a proper pattern. Go to the Image menu and press the Scale Image option.
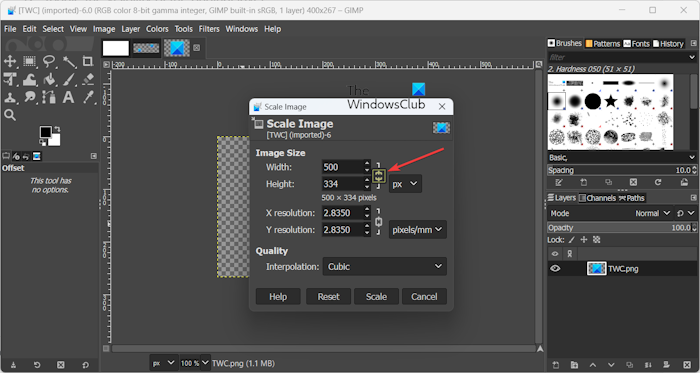
While setting up the size, make sure to enable the link to resize the image proportionally. When done, press the Scale button to resize the image.
After that, you need to change and configure the size of the pattern tile. The pattern tile should be larger than the main object that you want to repeat. Click on the Layer menu and then choose the Layer boundary size option.
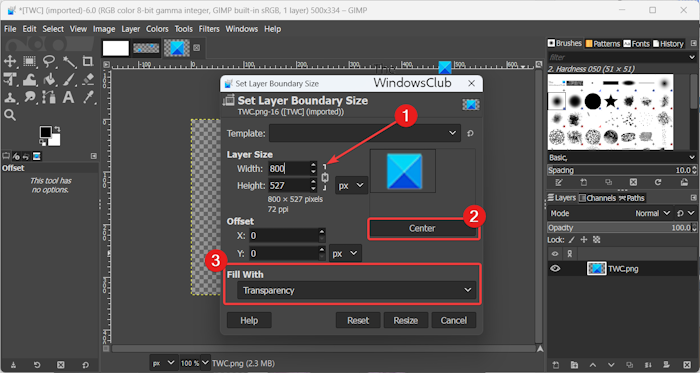
Then, increase the layer size proportionally, click on the Center button to set the offset values, and set the Fill With option to Transparency. And, click on the Resize button to resize the tile.
RELATED: How to scan an Image with GIMP?
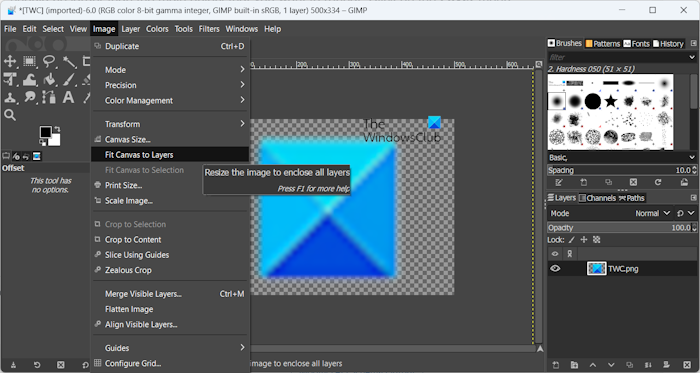
You now need to resize the canvas without changing the size of the object. To do that, click on the Image menu and choose the Fit Canvas to Layers option.
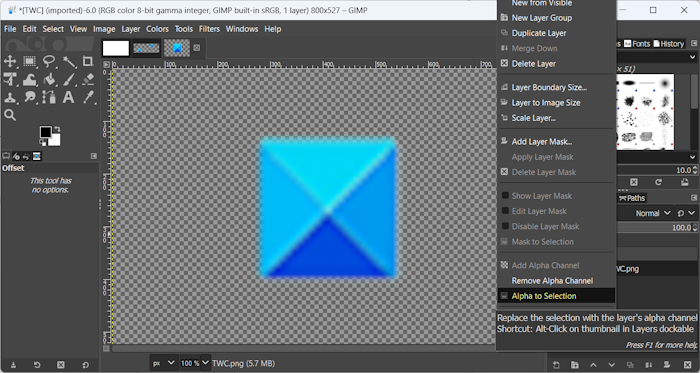
Now, navigate to the Layers panel on the right-hand side and right-click on the picture layer. From the context menu, choose the Alpha to Selection option. And, press the CTRL+C hotkey to copy the main object.
Read: How to crop, rotate, and change Image size in GIMP?
Next, go to the Layer menu and click on the New Layer option. Name this layer as the Pattern Layer or something similar so that you can identify it.
After that, select the new layer and paste the above-copied object into this new layer by pressing the CTRL+V.
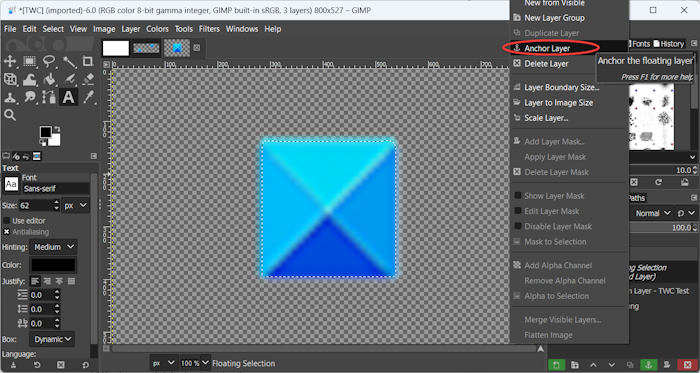
You will now see a new Floating Selection layer at the top of the Layers panel. Right-click on the layer and from the context menu, choose the Anchor Layer option.
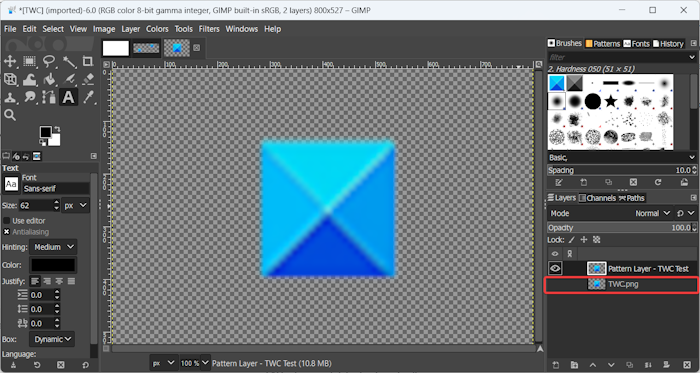
Next, disable the visibility of the original image layer by clicking on the Eye button.
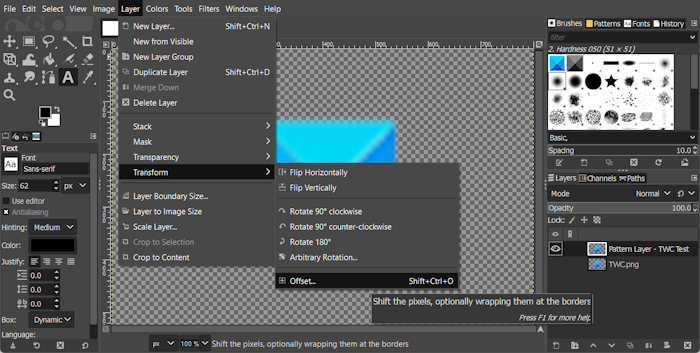
Now, go to the Layer menu and click on the Transform > Offset option.
Read: How to Check and Change Image DPI in GIMP on Windows?
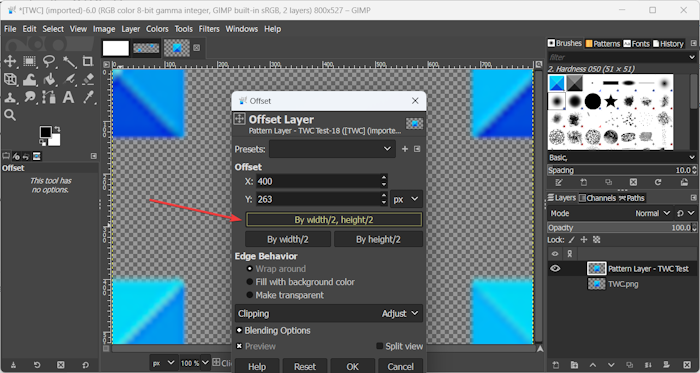
In the opened Offset dialog, press the by width/2, height/2 option and leave all other values as it is. And, press the OK button.
The main object will be split at the corners of the image.
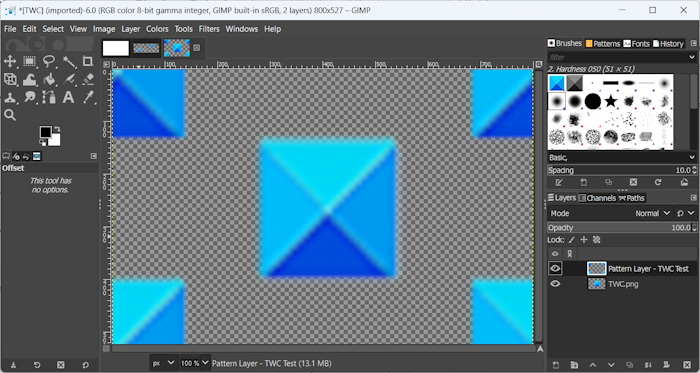
Next, toggle on the visibility of the original image.
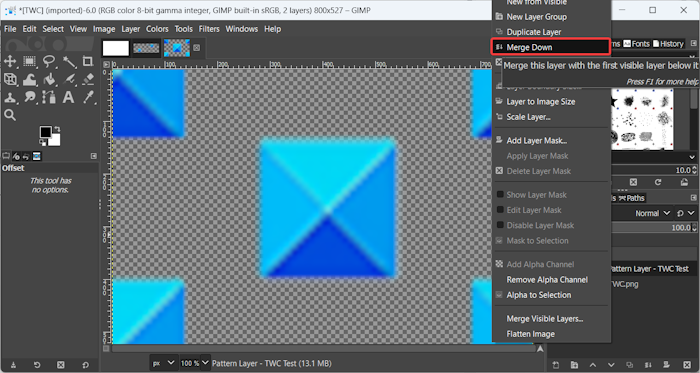
After that, right-click on the pattern layer and choose the Merge Down option from the context menu to merge it into the original image layer.
This will complete the pattern. You can repeat the above procedure to extend the pattern as per your requirements.
See: How to add a Neon Glow effect to Text in GIMP?
Finally, you need to save the pattern file. Click on the File menu and select the Export As option.
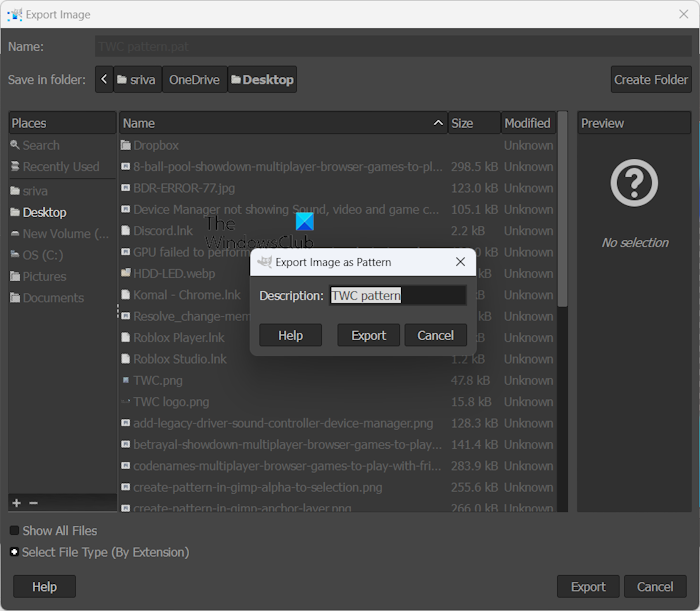
Then, save the file as <filename>.pat and press the Export button. An Export Image as Pattern prompt will open; just enter the description of the pattern and click on the Export button.
This is how you can easily create a custom pattern with repeated decorative design in GIMP.
Read: How to create a transparent GIF with GIMP in Windows?
How to add and use a custom pattern to GIMP’s Pattern Library?
The next question is how you can add the above-created pattern to your GIMP’s pattern library. And how you can use the pattern in your images. In this section, we will answer both of these questions.
To add the created pattern in GIMP, you can follow the below steps:
First, open File Explorer using Win+E and move to the folder where you previously saved the created pattern. Then, copy the created pattern (.pat) file.
Now, open your GIMP app, click on the Edit menu, and select the Preferences option.
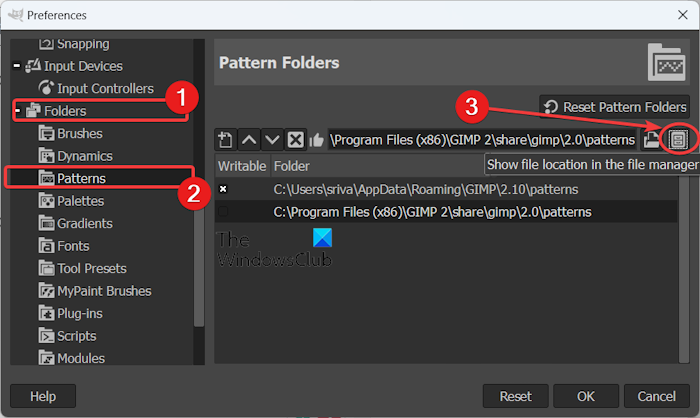
Next, locate the Folders category in the left-side pane and click on the + icon to expand it. Then, select the Patterns folder from the available folders.
From the right-side panel, select the shown folder that contains GIMP pattern files and press the Show file location in the file manager button (as highlighted in the above screenshot).
In the opened File Explorer location, paste the earlier copied pattern file in it using the CTRL+V hotkey.
Now, go back to the GIMP app and click on the Windows > Dockable Dialogs > Patterns option to open the patterns library.
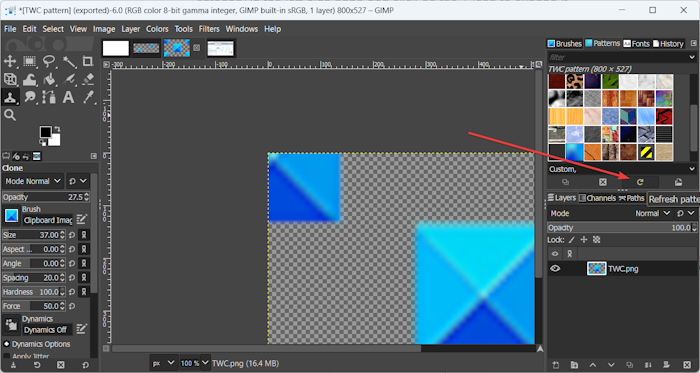
Then, press the Refresh button to refresh your Pattern library and show the newly added pattern in the library. You will now be able to see it in the list that you can use as per your requirements.
Now, you can use the added pattern using one of the following methods:
- Use the Bucket Fill tool.
- Use the Fill with Pattern feature.
- Use the Clone tool.
- Use the Paths tool.
- Use the Stroke Selection feature.
1] Use the Bucket Fill tool
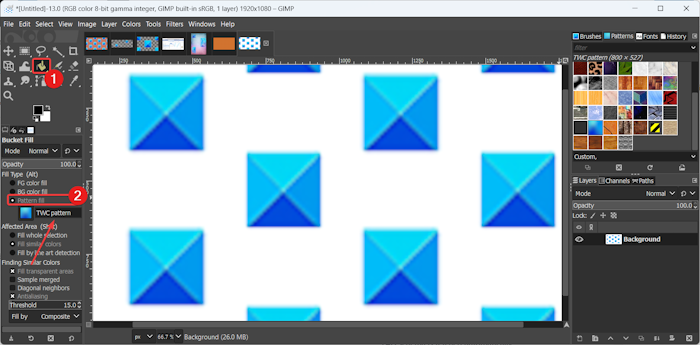
The easiest method to use the newly created pattern in GIMP is to use its Bucket Fill tool. Here’s how you can do that:
First, click on the Bucket Fill tool from the toolbox and then select the Pattern fill option.
You can now click on the pattern icon and then choose the newly created pattern.
After that, click on the image to fill it with the chosen pattern.
RELATED: How to Edit Frames of an Animated GIF using GIMP in Windows?
2] Use the Fill with Pattern feature
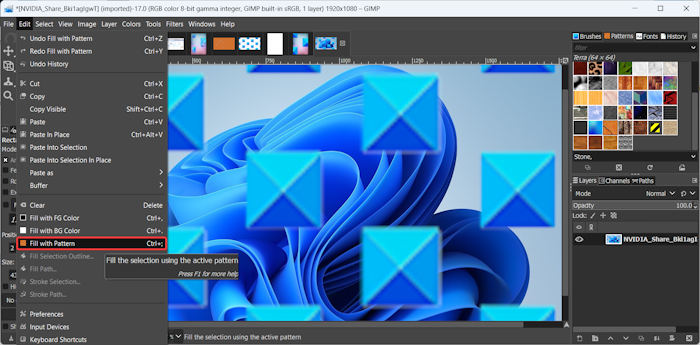
GIMP also provides a dedicated feature to fill an image or canvas with the selected pattern. You can use it by following the below steps:
- First, open the source image or create a new graphic image.
- Now, from the Patterns panel in the right-side panel, select the pattern that you want to use.
- Next, go to the Edit menu.
- After that, click on the Fill with Pattern option or press the CTLR+; hotkey to choose this option.
The pattern will be applied to your image.
See: How to zoom an image in or out in GIMP?
3] Use the Clone tool
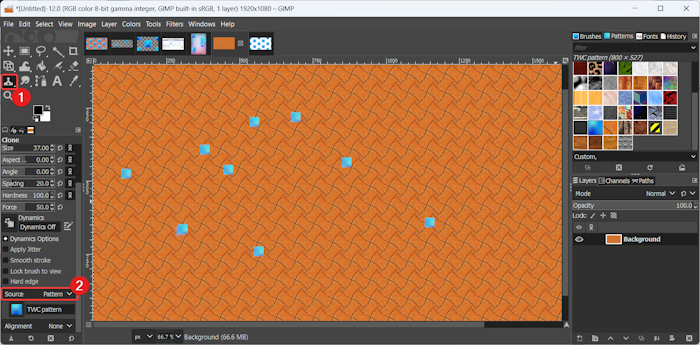
Another method to use a pattern on an image is to use the Clone Tool. Choose this tool from the toolbox on the left side or press the C key to select the Clone tool.
Then, set the Source to Pattern and choose the pattern you want to use. Also, set up other parameters like opacity, size, spacing, hardness, etc.
Once done, start drawing on the image with the selected pattern.
Read: How to do Photo Retouching in GIMP?
4] Use the Paths tool
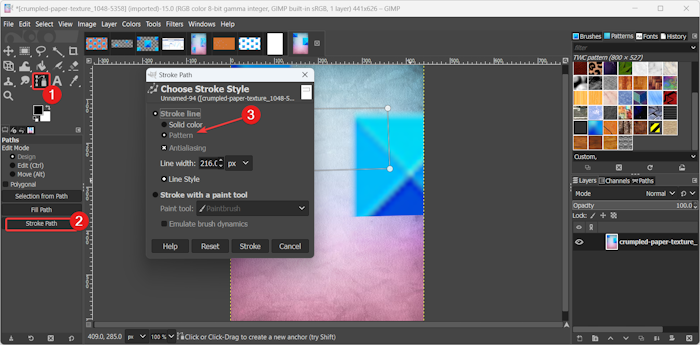
The next method to use a pre-designed or custom pattern in GIMP is using the Paths tool. Here are the steps to use this method:
First, select the Paths tool from the left-side toolbox or press the B key to choose it quickly.
Next, select the main image window and start creating anchor points as per the shape you want.
Now, press the Stroke Path button from the left-side panel.
In the newly opened Stroke Path dialog window, set Pattern under the Stroke line option and customize other settings accordingly.
Finally, press the Stroke button and it will apply the pattern to the drawn path.
In this method, there is a disadvantage that you can’t choose the pattern you want to apply at the time of setting up the stroke parameters. It automatically applies the last selected pattern in your pattern library. So, make sure the pattern you want to use is already selected.
Read: How to resize images without losing quality with GIMP image editor?
5] Use the Stroke Selection feature
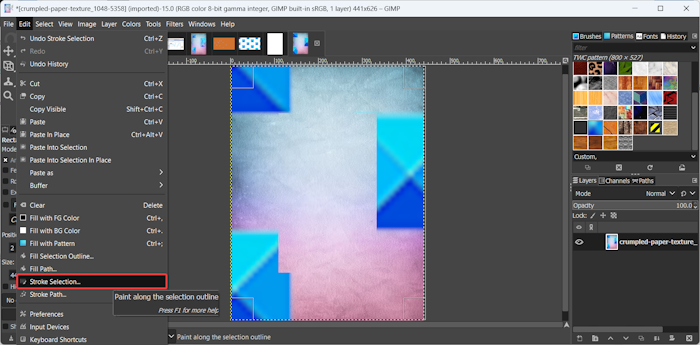
One more method you can use to apply a pattern on an image in GIMP is via its Stroke Selection feature. It is similar to the above-discussed method showing you to use a pattern with the help of the Paths tool. Here’s how:
First, from the toolbox, click on the Selection tool and make a selection on the image using your cursor.
Now, go to the Edit menu and click on the Stoke Selection option.
A Stroke Selection dialog window will appear; simply choose the Pattern option and then set up the line width. After that, hit the Stroke button and the last selected pattern will be drawn on the image.
How do you fill with pattern in GIMP?
To fill a picture with a pattern, you can use the Bucket Fill tool and then choose the pattern fill option. Or, you can even use the Edit > Fill with Pattern feature to do the same. We have discussed the full steps above; so check out this post.
Leave a Reply