In this post, we are going to show you how to create an internet kill switch on Windows 11/10. It is mostly used in a panic situation when you need to disconnect your internet quickly. Thus, it is also known as a Panic Button.

What is the kill switch on Windows internet?
The “Kill Switch” on Windows refers to a feature or mechanism enabling users to instantly and efficiently cut off their computer’s internet access or disconnect it from a network. It is commonly used as a security safeguard that helps protect sensitive data, maintain privacy, and prevent unauthorized access while browsing the internet on Windows.
How to create an Internet Kill Switch on Windows 11/10?
Here are the steps to create an internet kill switch on your Windows 11/10 PC:
- Open Settings.
- Go to Network & internet.
- Write down the name of your network adapter.
- Create a desktop shortcut.
- Edit the location.
- Name the shortcut as Internet Kill Switch or likewise.
- Right-click on the newly created shortcut.
- Select the Properties option.
- Click on the Advanced button.
- Tick the Run as administrator checkbox.
Let us discuss the above steps in detail now.
First, open the Settings app by pressing the Win+I hotkey and move to the Network & internet tab from the left-side pane.
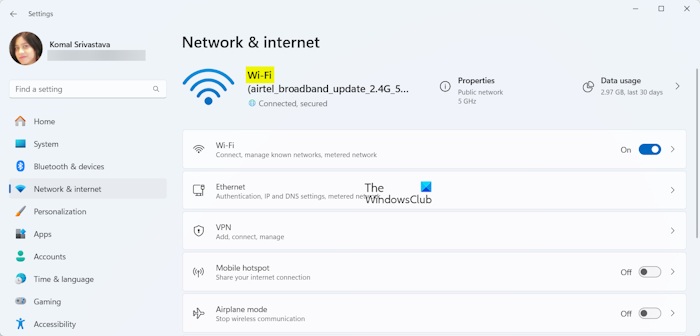
Now, note down the name of your network adapter from the Status section. You can see your network adapter’s name at the top in the right-side pane. For a wireless connection, the adapter’s name is usually Wi-Fi. On the other hand, if you are using a wired connection, the name is Ethernet.
Once you have written down the adapter’s name, go to your desktop and right-click on the empty area. From the context menu, select the New > Shortcut option to create a new desktop shortcut.
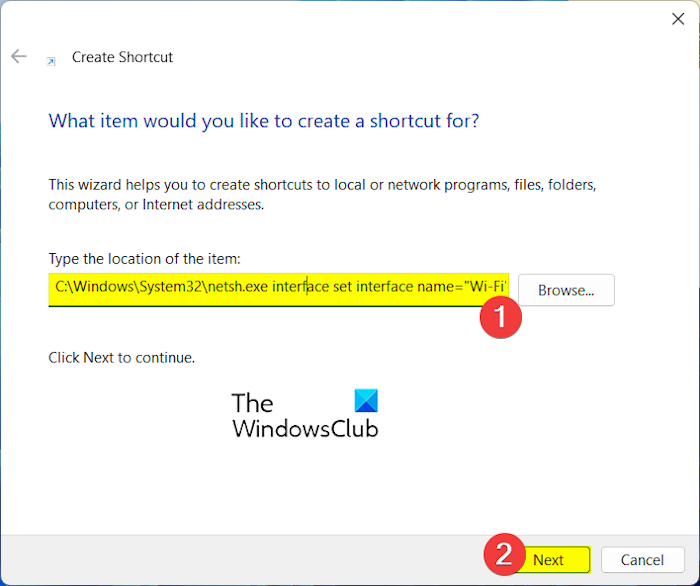
Next, in the location box, you need to enter the below command:
C:\Windows\System32\netsh.exe interface set interface name=”NET” admin = disabled
C:\Windows\System32\netsh.exe interface set interface name="WiFi_Name" admin = disabled
In the above command, replace “WiFi_Name” with the name of your network adapter’s name.
For example, in my case, the command would be:
C:\Windows\System32\netsh.exe interface set interface name="Wi-Fi" admin = disabled
Next, press the Next button.
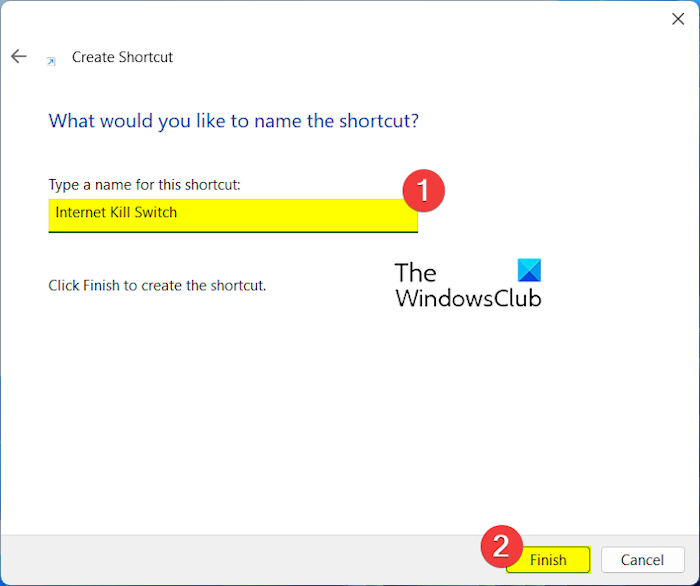
After that, name this shortcut “Internet Kill Switch” or something similar to easily identify the shortcut when needed. And, press the Finish button.
Once the shortcut is created, right-click on it and choose the Properties option from the context menu.
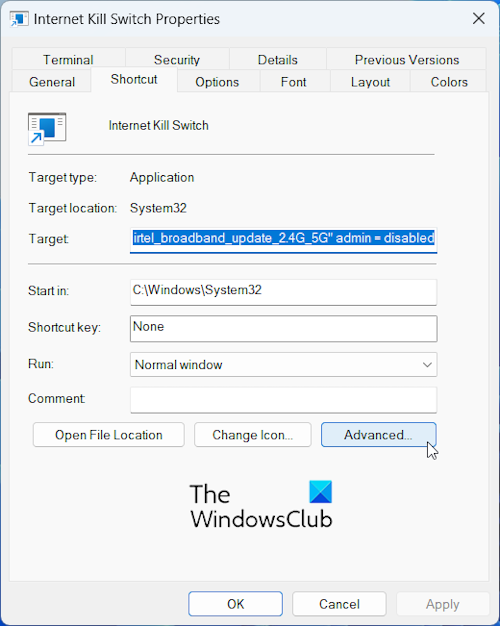
Now, click on the Advanced button.
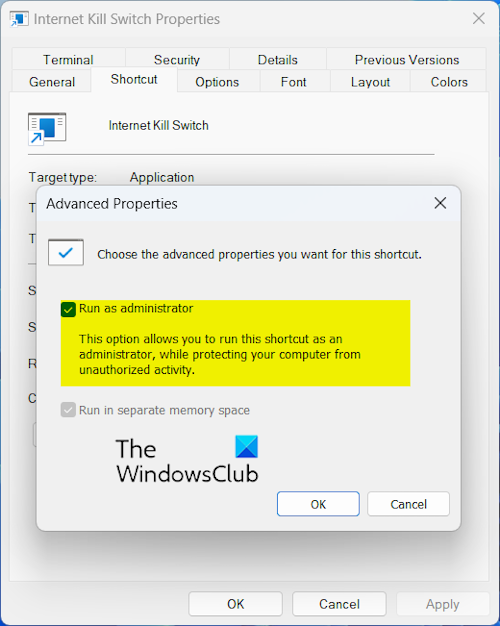
Then, tick the Run as administrator checkbox in the opened prompt. And, click on the OK button.
Next, press the Apply > OK button to save changes.
You can now double-click on this newly created shortcut i.e., internet kill switch to run the command and quickly disconnect your computer from the internet.
In case you want to reconnect the internet, you can create another switch to instantly connect to the internet. To do that, follow the steps mentioned above to create a shortcut. However, while entering the location of the shortcut, enter the below command:
C:\Windows\System32\netsh.exe interface set interface name="Wi-Fi" admin = enabled
Once the shortcut is created, you can run it whenever you want to quickly reconnect your internet.
Related: How to disable WiFi using CMD or Powershell
Create an Internet Kill Switch using a Batch file
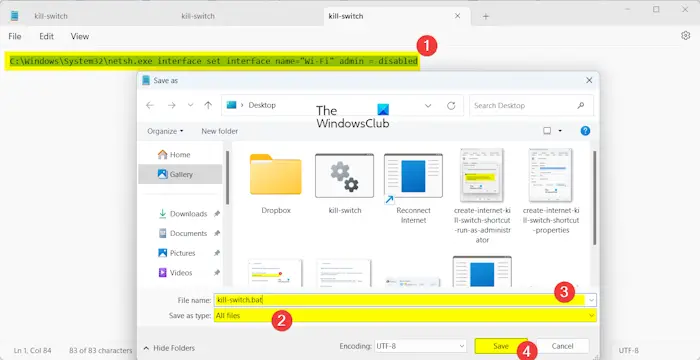
Another method to create a kill switch is via a batch file. You can create a batch file to instantly cut off your internet connection. Here’s how you can do that:
First, open Notepad using Windows Search and then enter a similar command like the following one:
C:\Windows\System32\netsh.exe interface set interface name="Wi-Fi" admin = disabled
Replace Wi-Fi with your network adapter’s name in the above command.
Now, go to the File > Save as option and choose the Save as type as All files in the opened Save as prompt.
After that, enter the name of the batch file, e.g., KillSwitch.bat or PanicButton.bat. And, click on the Save button to create the batch file.
When done, right-click on the newly created batch file and choose the Run as administrator option. It will then disconnect your internet.
You can also create a batch file to restore your internet connection, you can create another batch file using the same steps. Just replace the command you have used above with the following one:
C:\Windows\System32\netsh.exe interface set interface name="Wi-Fi" admin = enabled
This is how you can create a kill switch to quickly disconnect Windows from the internet.
Read: VPN Kill Switch and Obfuscated Servers not working.
How do I turn off internet on Windows 11?
To switch off your internet on a Windows 11/10 PC, click on the WiFi icon from your taskbar. After that, click on the right arrow button and then press the Disconnect button. Alternatively, open Settings using Win+I, go to the Network & internet tab, and switch Off the toggle associated with the Wi-Fi option.
Leave a Reply