In Microsoft Excel, Form Controls, it is useful for selecting items in a list of a dialog sheet. Form Controls makes it easier for the users to interact with the cell data that they have created. Several Control Forms will add to your worksheet; these are Label, Group box, Checkbox Button, Option Button, List Box, Combo Box, Scroll Bar, and Spin Button.
The Types of Form Controls
- Label: Labels shows descriptive text such as pictures, titles, and caption, it also identifies the objective of a cell.
- Group box: Closely related contents are grouped with an optional label.
- Button: this Control runs a macro and performs an action when a user clicks on it.
- Check Box: this gives the user the option to turn on and off a value that implies the opposite choice. You can select more than one Check Box.
- Options Button: Like the Check Box, it also gives you the option to turn on and off a value that indicates an opposite choice. The only difference is that the Option Button only allows the user to select only one choice, unlike the Check Box.
- List Box: Displays a list of text items that the user can choose from.
- Combo Box: This is a text box with a list box to create a drop-down list box. The combo box allows the user to click a drop-down arrow to display the list.
- Scroll Bar: Scroll through a range of values using the scroll bar arrow keys or drag or drag the scroll box.
- Spin Button: This increases or decreases values such as numbers, dates, or time. To increase the value, click the up arrow; to decrease the value click the down arrow.
Create & use Form Controls in Excel
In this article, we are going to discuss these topics:
- How to Find the Form Controls
- How to Create a Label
- How to create a Button
- How to create a Check Box
- How to create an Option button
- How to create a List Box
- How to create a Combo Box
- How to create a Scroll Bar
- How to create a Spin Button
- How to create a Group Box
How to Find the Form Controls in Excel
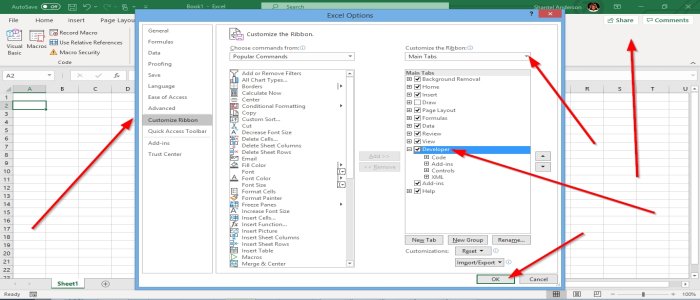
Right-Click on the Standard Tool Bar and select Customized the Ribbon. A dialog box will pop up called Excel Option. On the left of the dialog box, click the Check Box beside Developer, then OK. On the Menu Bar, you will see the Developer tab.
How to Create a Label in Excel
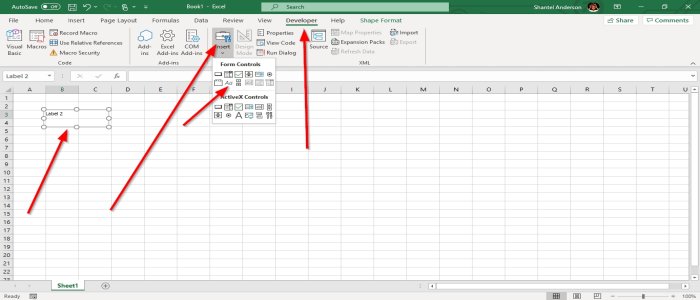
On the Developer Window, click the Insert Tool, you will see a list of the Control Forms. Click Label. You will see a cross-shaped cursor appear; use it to draw the Label, then right-click and select Edit Text to enter your text in the Label.
How to Create a Button in Excel
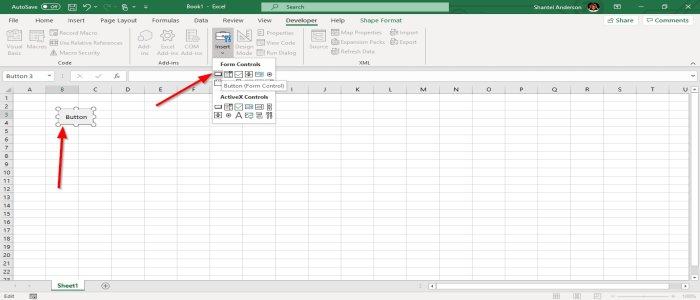
Go to the Insert Tool in the Controls Group. Select the Button Tool. You will see a cross shape cursor; drag it across to create the button. An Assign Macro dialog box will appear. Click OK. You will see a button in the excel sheet.
How to Create a check box in Excel
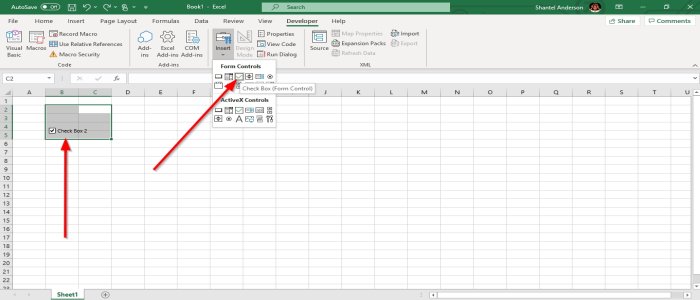
Go to the Insert Tool and select the Check Box Tool. A cross shape cursor will appear draw your Check Box. Now you have a Check Box. To rename, right-click the Check Box and select Edit text.
How to create an Option button in Excel
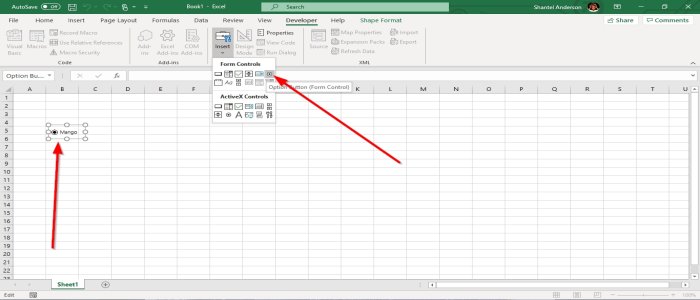
In the Insert Toolbox, select the Option Button. There will be a cross shape cursor; take the cross-shape cursor, and draw your Option Button. To enter text into the Option Button, right-click or double-tap in the button and enter your text or right-click and select Edit Text.
How to create a List Box in Excel
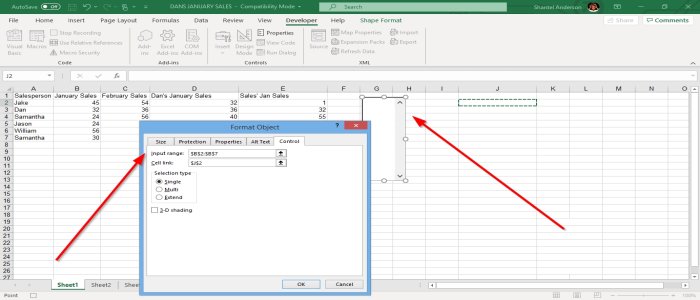
Go to the Insert Tool, select List Box; a cross-shaped cursor will appear in the workbook, and use the cross-shape cursor to draw the List Box. To enter data into the box, right-click the box, and select Format Control, a Format Control Dialog Box will appear, click on Control, click into the Input Range entry, then go over the cell that you want to be in the list, click on it and drag it down. The input range selected is in the Input Range in the dialog box, now click into the Cell Link entry and choose a cell where you want the Cell Link to be inserted.
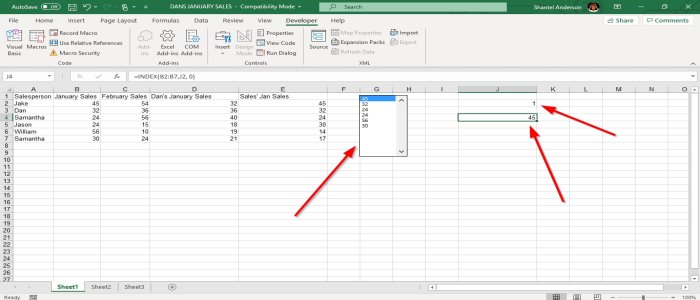
The Cell Link will display whatever data you click in the List Box; the row will appear for every value selected. Then OK. If you want the List Box to show the rows for every number you selected within the box, click the range of cells you selected, click any of the data in the list and display which row the data is in. If you want to show only the list data, use this formula =INDEX (B2:B7, J2, 0). B2:B7 is the range of cell you selected, J2 is the row that you have displayed before. When you press enter, you will see the original number from the list when you click on any number within the list.
How to create a combo Box in Excel
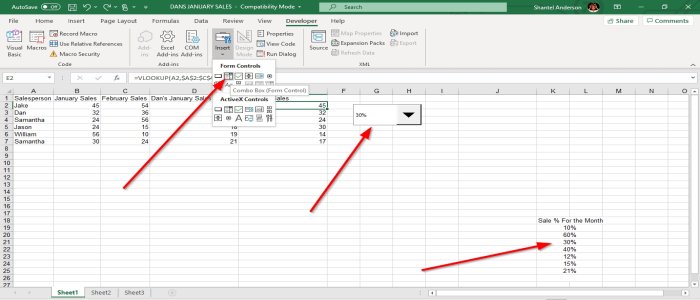
Click the Insert Tool, select Combo Box. Use the cross shape cursor to draw the Combo Box, right-click the Combo Box, select Form Controls, click into the Input Range, then go over the cell that you want the list to be in and drag it down, click into the Cell Link and choose a cell where you want the Cell Link to be placed. In this article, we put it over the Combo Box that was drawn. Then OK. Now you have a functional Combo Box in your workbook.
How to create a scroll Bar in Excel
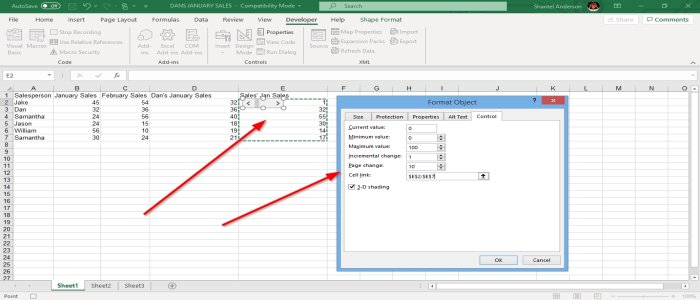
Click Insert, select Scroll Bar, draw the Scroll Bar in the worksheet, then right-click, select Form Controls, and then select OK. Then right-click the Scroll Bar, then select Form Control. A Form Control dialog box will pop up. Click Controls to make your changes; select a Cell Link where you want the Controls to be taken. In this article, we choose the cell $E$2. OK. A Scroll Bar will be created. When you click on the Scroll Bar‘s left arrow, the number Decreases when you click on the right arrow of the Scroll Bar, the number Increases.
How to create a Spin Button in Excel
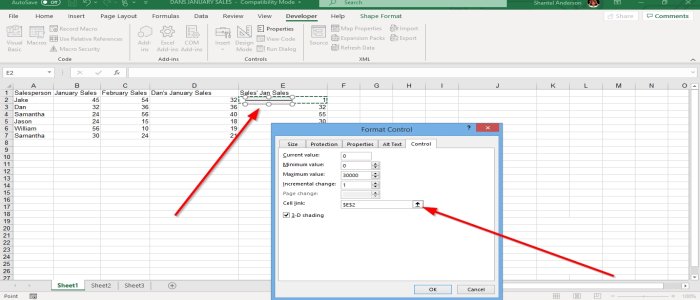
Click Insert, select the Spin Button. Use the cross shape cursor that appears in the worksheet to draw the Spin button. Then right-click select Form Controls; select the Control tab in the Form Control dialog box, make any changes if you want, select a Cell Link by clicking into the Cell Link entry, then click a cell it will appear into the Cell Link entry box then OK. Now we have a Spin Button. Click the up-arrow button; the number Increases; click the down arrow button the arrow Decreases.
How to create a group box in Excel
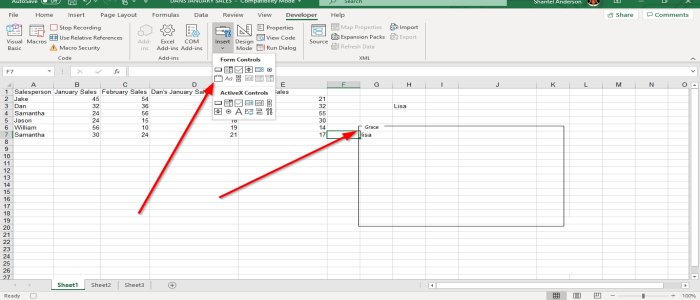
Click Insert, choose Group box, use the cross shape cursor to draw the Group Box. To enter data into the Group Box, right-click, select Edit Text, or double-tap right outside the Group Box.
I trust this helps.
Now read: How to add or change the Theme for Workbook in Excel.
Leave a Reply