Discord gives its users the option to create their own stickers and then send them to their friends. That’s because not all emotions can be written; some need to be expressed using images, and what better way than creating your own stickers? In this post, we will see how to create and use Stickers on Discord.
What are stickers in Discord?
When Discord was launched, there was no option to create stickers. They added the feature later on. You can do both static and animated stickers in Discord. If your server has two or more server boosts, stickers will be available. 15 Stickers slots are provided to Level 1 server, and Level 2 are granted 30 slots, and Level 3 60 slots. A server user requires Manage emojis and stickers permission to manage custom stickers for a server.
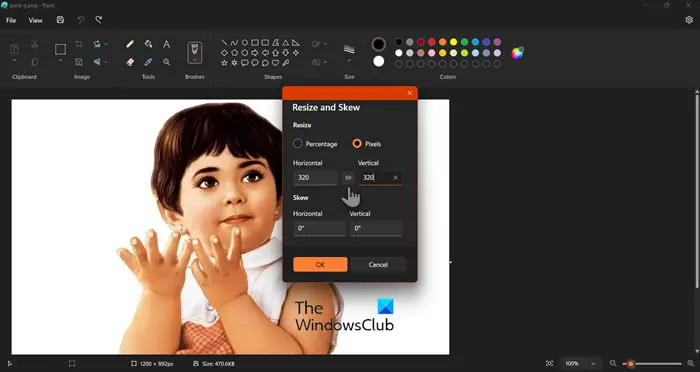
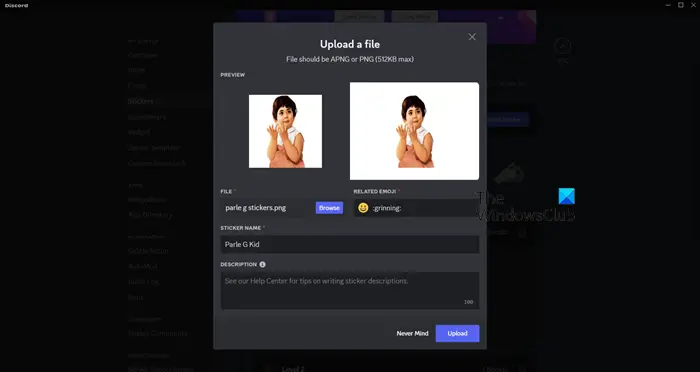
As mentioned earlier, Discord Stickers are available in both animated and static formats, the former has APNG and Lottie (Partnered and Verified servers) file types, and the latter uses PNG file types. The file should not exceed 512 KB, and the dimensions should be 320x320px.
How to create and use Stickers on Discord
Now let us see how to create and use stickers in Discord. In this guide, we will talk about the following things.
- Create Discord Stickers
- Upload Stickers on Discord
- Remove an uploaded sticker
Let us talk about them in detail.
1] Create Discord Stickers

You can convert any image into a Discord Sticker. If the dimensions of your image are 320x320px and its file size is less than 512 KB. You can use any free photo editor to adjust your image accordingly. However, we will show how to adjust the image’s dimension using the MS Paint app. So, launch Paint from the Start Menu. Now, hit Ctrl +O, go to the location where your image is stored, and open it. Then hit Ctrl + W to open the Resize utility, select Pixels, enter 320 in both the Length and Width fields, and make sure to uncheck the link option so that Paint doesn’t try to balance the image. Finally, save the image in PNG format.
If you think it’s way too much work, go to kapwing.com, which is a website that allows you to create Discord stickers.
2] Upload stickers on Discord

Now that we have created a sticker let us upload it on Discord. Follow the steps mentioned below to do the same.
- Open Discord and go to your server.
- Now, click on your server with a down arrow (v) right next to it.
- Then select Server Settings from the list.
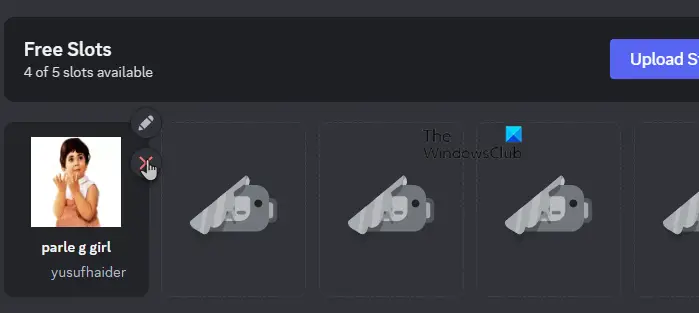
- You now have to go to Stickers > Upload Stickers. Discord gives its users free slots. If you have exceeded the threshold, you need to pay, but since it is your first time, there is no need to pay even a penny.
- Now, upload the image, fill in all the mentioned fields, and click on Upload.
This will do the job for you.
Read: How to change Discord Background?
3] Remove an uploaded sticker

Finally, let us learn how to remove any uploaded sticker. It’s actually quite easy. So, open Discord, log in, and go to your server. Then, navigate to Server Settings as mentioned earlier. Click on Stickers and go to the one that you have uploaded. When you hover over the sticker, you will see a cross icon. Just click on it and the sticker will be deleted.
So, that’s how you can upload a sticker to Discord.
Read: What is Discord Nitro? Should you buy it?
How do I add stickers to Discord?
It is pretty simple to upload a sticker to Discord. First of all, you need to create a sticker, which should obey the parameters set by Discord, as we have mentioned earlier. Then you need to go to Server Settings and upload the image. To know how to do the same, just check the guide mentioned above.
Read: How to improve Discord audio quality on Windows PC?
How do you use stickers in Discord without Nitro?
Discord provides you with some free slots to upload stickers, but if you want more without having to get Nitro, there is a way to do the same. You can go to nqn.blue to get the NGN bot. Then create a sticker and upload it using the command, !sticker create. This will do the trick for you.
Also Read: Discord GIFs not working or are broken.
Leave a Reply