Autotext allows users to insert words, phrases, and whole paragraphs into the document without having to type them again and again. It is an important feature of MS Word for users who do a lot of typing. For example, if you use your signature often in your documents, you can create a text shortcut (called “Autotext” in MS Word). Whenever you type the shortcut, for example, “sign”, the entire signature is entered automatically into the document you are working on. In this post, we shall see how to create and use Autotext entries in Word.
How to create AutoText in Word
You can use two methods to create and use recurring words or phrases. One method is the Autotext method and the other is the AutoCorrect method. I’ll explain the AutoCorrect method first and then the Autotext method.
Create AutoCorrect entries to be used as AutoText

To create an AutoCorrect entry for using it as AutoText, follow these steps.
- In your MS Word document, select some text (up to 255 characters) that you want to reuse;
- Click File
- In the File menu, click or tap Options
- Click on Proofing in the left pane of the window
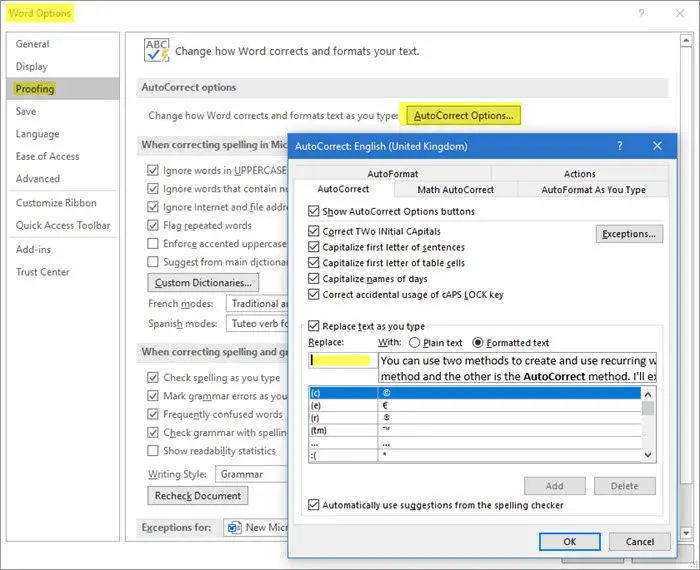
- In the right pane of the window, select the tab that says AutoCorrect Options
- You will see two text boxes
- The second text box labelled “With” contains the phrase you selected in your document
- In the first box labeled “Replace“, enter a text shortcut that you can use to insert the text visible in the “With” text box.
- Click Add and then OK
You now have an AutoText entry for the selection. Whenever you want to insert the selection, simply start typing the text that you used to create the AutoCorrect entry. Word will show you a small bubble box that contains the whole AutoText. If you wish the text to appear where the cursor is placed, simply press the Enter key. Alternatively, you can also use the text shortcut that you created in step 8. Just type the text shortcut and press the spacebar to fill in the saved phrase automatically.
The issue with the AutoCorrect method is that you cannot use large chunks of text. There is a limit of 255 characters, including whitespaces. The bright side is that Word will show you complete target text so that you can use the Enter key to fill it in.
You cannot use the Enter key in this case to create multiple lines, so the expanded phrase is just a line or a few words.
Make sure that the checkbox saying Replace as you type is ticked. The option is in the same dialogue box, just above the list of AutoCorrect entries.
Create AutoText entries for use with MS Word

Unlike AutoCorrect entries that can’t be larger than 255 characters, AutoText can add huge chunks of text. For example, you can create two to three paragraphs that you use daily in your email as a disclaimer. Once you create AutoText with Word, you can use it across MS Office applications.
The method to create AutoText entries is easy.
- Type the entire text that you want to save as AutoText
- Select the text you typed for AutoText
- Press ALT+F3
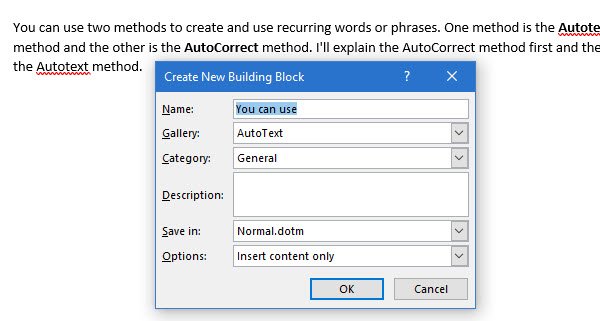
- You get a dialogue box that asks you if you want to save the text as an AutoText entry.
- It will have a textbox on the top labelled Name where you can enter text-shortcut.
- Keep Gallery to AutoText and Category to General so that you can see all AutoText entries
- Click OK
This too works as AutoCorrect. You can start typing text-shortcut and when the AutoText appears in a bubble, press the Enter key to insert the text. Alternatively, you can type the text shortcut and hit the spacebar to fill in the related AutoText.
When saving AutoText using ALT+F3, make sure you save it to the normal.dot template. AutoTexts are stored in the normal.dot template. It is selected by default in the drop-down menu labelled Save in.
That’s all! I hope this guide helped you.
Read: How to rotate Text in Word
How do I save text as AutoText in Word?

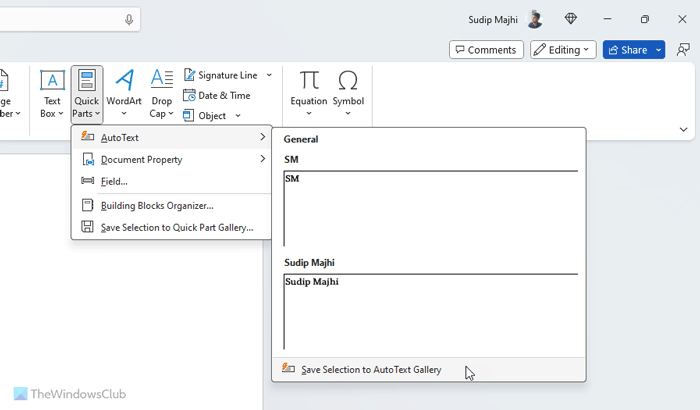
To save text as AutoText in Word, you need to write down the entire text first. Then, select the entire text and go to the Insert tab. Find the Quick Parts option and choose the AutoText > Save Selection to AutoText Gallery option. Next, you can enter a name, category, description, etc. Finally, click on the OK button to save the AutoText.
Leave a Reply