If you want to create a new Local Account in Windows 11, here is how you can do that. There are three ways to create an offline account in Windows 11 when you are already signed in, and all of them are equally handy at times.
There are two ways to use Windows 11 on your hardware – with and without a Microsoft account. If you want to use a Microsoft account, you can synchronize most of the data across multiple computers. However, if you use an offline or local account, you cannot do that. It is the main difference between a Microsoft account and Local account on Windows 11.
All these following guides will help you create a new standard local account. If you want to convert it to an administrator account, you need to follow this guide to create a local administrator account. However, it is possible to convert any of the following accounts into an administrator account in the future.
How to create new Local Account in Windows 11 using Windows Settings
To create a new Local Account in Windows 11 using Windows Settings, follow these steps:
- Press Win+I to open Windows Settings.
- Switch to the Accounts tab.
- Click on the Family & other users.
- Click the Add account button under Other users.
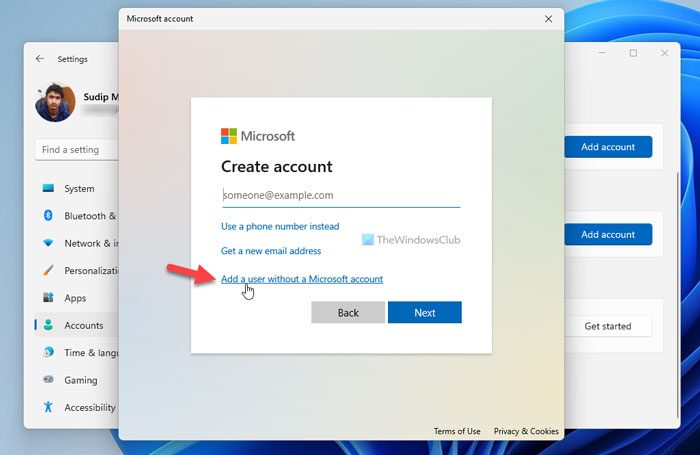
- Click the I don’t have this person’s sign-in information option.
- Select the Add a user without a Microsoft account.
- Enter username, password and click the Next button.
To learn more about these steps, continue reading.
At first, you need to open Windows Settings by pressing the Win+I button. Then, switch to the Accounts tab on the left side and click on the Family & other users menu on the right side.
Here you can find a label called Other users. You need to click on the corresponding Add account button.
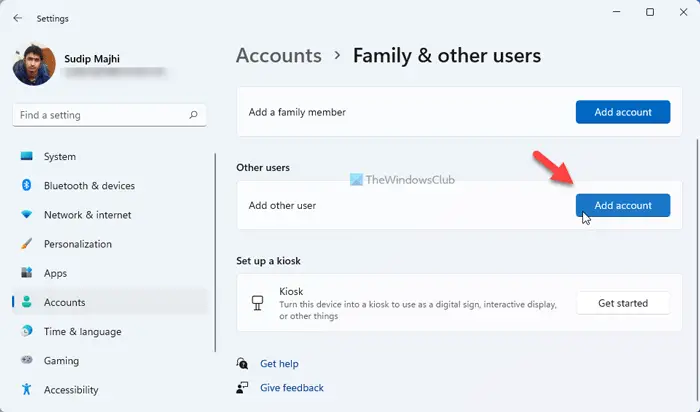
Then, click on the I don’t have this person’s sign-in information option and select the Add a user without a Microsoft account option.
Next, you need to enter the desired username and password.
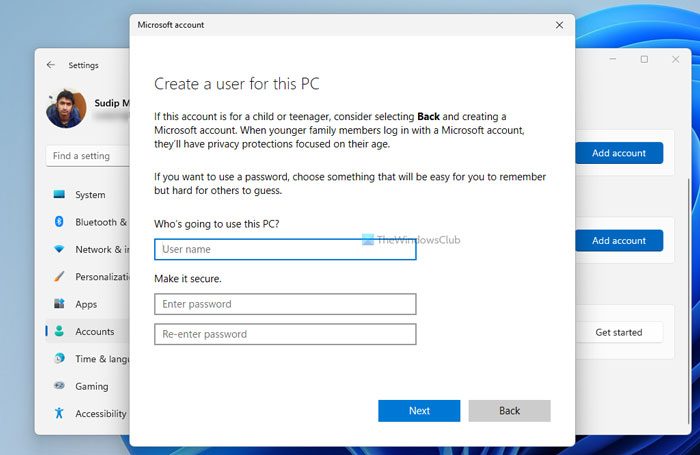
Once done, click the Next button.
Your account will be created immediately, and you can start managing it from the Windows Settings panel.
The next method is all about using the Command Prompt or the Command Prompt instance in Windows Terminal. For that, you must have signed into an administrator account. For your information, you can use Command Prompt as well as Windows Terminal – as per your choice. For this example, we are about to use the Command Prompt instance in Windows Terminal.
Create Local Account in Windows 11 using Command Prompt
To create a Local Account in Windows 11 using Command Prompt, follow these steps:
- Press Win+Xto open the WinX menu.
- Select the Windows Terminal (Admin) option.
- Select the Yes button.
- Type this command: net user /add username password
- Press the Enter button.
Let’s delve into these steps in detail.
At first, you need to open an elevated prompt of Windows Terminal or Command Prompt. As we are using Windows Terminal, it is comparatively easy to get things done. You need to press Win+X to open the WinX menu, and select the Windows Terminal (Admin) option.
Then, click on the Yes button to open the Windows Terminal with administrator privilege. If it has opened a Command Prompt instance, you can enter the following command:
net user /add username password
Otherwise, you need to open a Command Prompt instance after opening Windows Terminal. For your information, don’t forget to replace the username and password with the desired username and password.
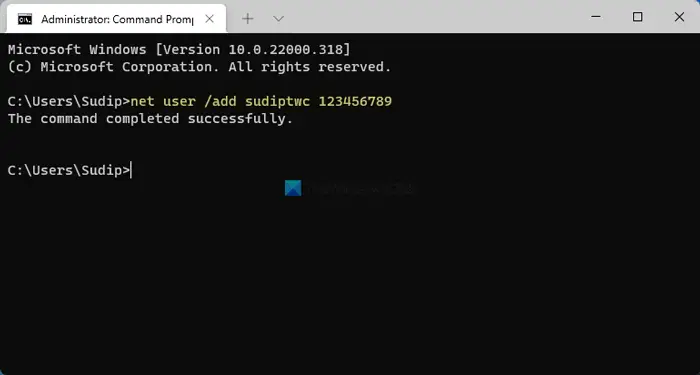
Once done, you can find a message saying The command completed successfully.
Read: How to create Local User Account using PowerShell.
How to create an Offline Account in Windows 11
To create an offline account in Windows 11, follow these steps:
- Press Win+R to open the Run prompt.
- Type msc and press the Enter button.
- Right-click on the Users and select New User.
- Enter the user name, Full name, description, password, and click the Create button.
To know more about these steps, keep reading.
This method is all about using the Local Users and Groups. Therefore, press Win+R to open the Run prompt, type lusrmgr.msc, and press the Enter button.
Next, right-click on the Users and select the New User option.
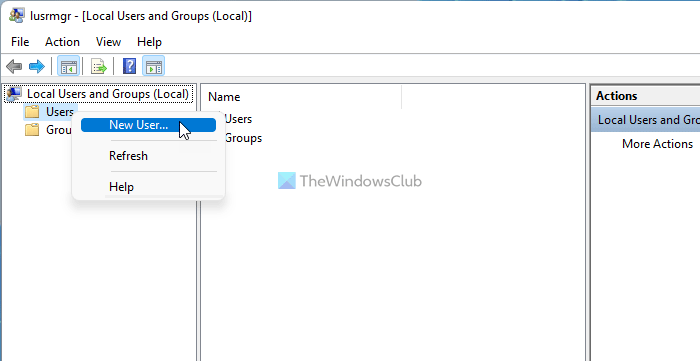
Then, you need to type the username, Full name, description (optional), password, etc., and click the Create button.
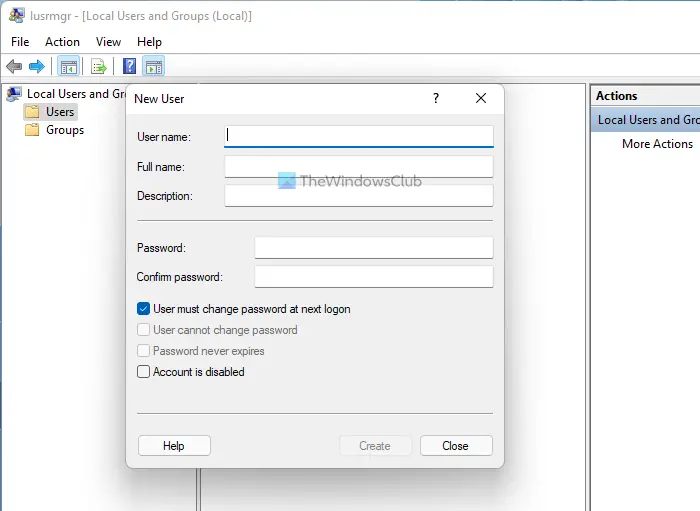
Once done, your offline account will be created.
How do I create a new User in Windows 11?
To create a new user in Windows 11, you have three options. For example, you can use Windows Settings, Local Users and Groups panel, and Command Prompt. If you need the greatest number of options, you must use the Local Users and Groups method instead of Command Prompt or Windows Settings.
How do I create a Local Account in Windows 11/10?
To create a local account in Windows 11/10, you need to use Windows Settings or Command Prompt, or some other utility mentioned in the article. In Windows Settings, go to the Accounts > Family & other users > click the Add account button. Then, you need to select the offline mode and enter the username and password to get the job done.
That’s all! Hope this guide helped.
Read: How to change a Standard user to Administrator account & vice versa in Windows.