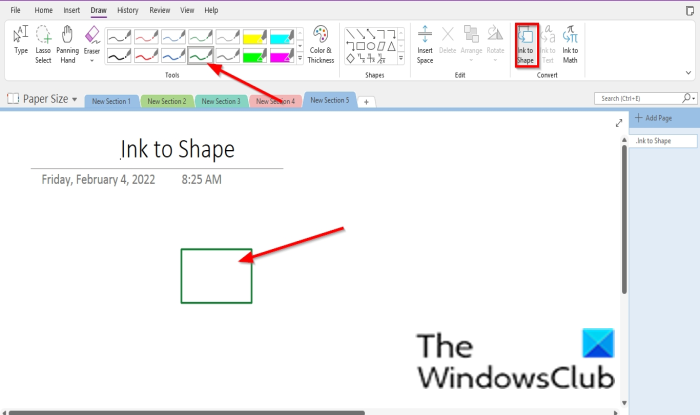
The Draw tab consists of many features that let you draw, sketch or write notes with your fingers, pen, or mouse. You can choose different shapes to add to your notebook, add various inks to your notebook, convert ink to math, ink to shape, and also covert ink to shape.
How to create Shapes in OneNote using Ink to Shape feature

Follow the steps below to use the Ink to shape feature in OneNote:
- Launch OneNote.
- Click the Draw tab.
- Click the Ink to Shape button.
- Choose a Pen from the Pen Gallery.
- Draw a shape into the notebook.
- It will convert to a shape.
First, launch the OneNote app and then click on the Draw tab.
Next, click the Ink to Shape button and choose a Pen from the Pen Gallery.
Use this pen to draw a shape into the notebook. It will convert to a shape.
That is all there is to it!
Read: OneNote Productivity Tips to help you get the best out of it.
How do I add a favorite pen to OneNote?
If you want to add a particular pen to the favorite section in the Pen Gallery, follow the steps below:
- Click the color and thickness button and select a color or thickness.
- Then click OK.
- That pen color or thickness will be added to the favorite section in the Pen Gallery.
Why can’t I do Ink to text in OneNote?
The Ink to Shape feature allows users to convert ink to shape, while Ink to Text converts ink to text. The reason why ink to text is grayed out in OneNote is that the ink text is not selected. To use the ink to text feature, follow the steps below.
- Click the Draw tab and select a Pen.
- Write a text.
- Select the text.
- The Ink to Text button is now enabled.
- Click the Ink to Text button.
- The ink will be converted to text.
We hope this tutorial helps you understand how to use the ink to shape feature in OneNote; if you have questions about the tutorial, let us know in the comments.
Leave a Reply