Microsoft Bookings is an extension to Microsoft Teams. This app in Microsoft Teams offers a simple way to schedule virtual appointments. It can be used for financial consultations, healthcare visits, or office hours at an educational institute. Microsoft bookings page lets the schedulers manage multiple department and staff calendars. They can also communicate with internal and external attendees, from a single app. The Bookings app creates virtual appointments via Microsoft Teams Meetings, which further offers an efficient videoconference experience.
If you are already using the Microsoft Bookings app, then here are steps to learn how to customize and publish a Microsoft Bookings page.

How to customize a Microsoft Bookings page
Once you have created a Microsoft Bookings page, you can publish it to the public or your contacts. Before you publish, you can change the settings of the page and customize it as per your requirements. Read on to know what kind of customization can be done.
To make these changes follow the next steps:
- Go to Teams or select the app launcher in Microsoft 365. Now select Bookings.
- Now, click on Calendar.
- Now in the left navigation pane, select Booking page.
You will see different settings in the right side pane. They look as follows:
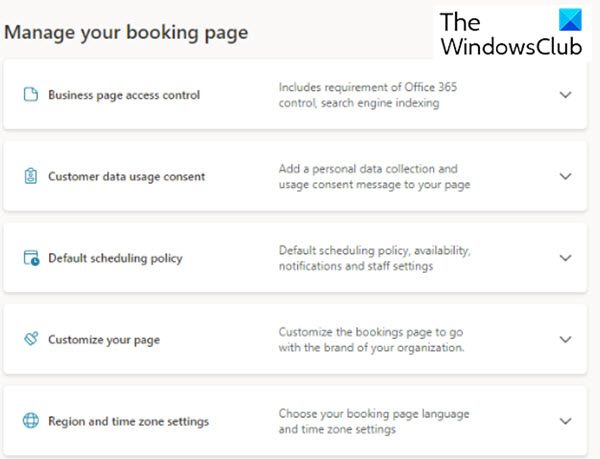
Following are some of the settings with which you can customize and publish a Microsoft Bookings page.
- Configure Bookings page
- Business page access control
- Customer data usage consent
- Default scheduling policy
- Customize your page
- Region and time zone settings
Read further to know how to perform these settings.
1] Configure the Bookings page
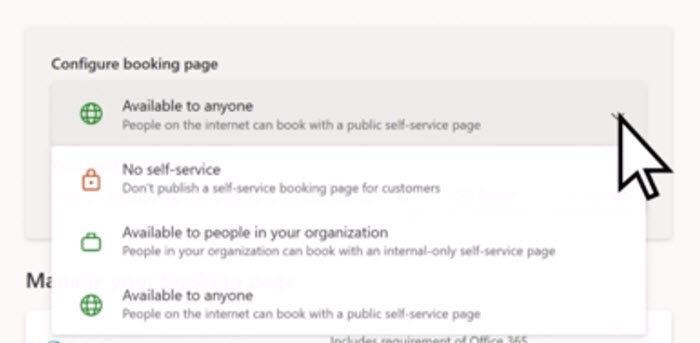
This setting lets you choose who can book appointments with you. Follow the next steps for the configuration:
- Go to the Bookings page and then on the right side pane, you can see this option.
- By default, you will see the option “Available to anyone”.
- Click on the drop-down arrow on the right side of this option.
- You will now see 3 options: No self-service, Available to people in your organization and Available to anyone.
- Choose the option that suits your requirements.
2] Booking page access control

This setting is an extension of the previous settings. It lets you control who can access your bookings page within your organization. The person with this access can view your bookings page or book any services. On the backend, this access is checked via credentials. Credentials ensure that the visitor belongs to an account within the tenant.
When you check the box of Disable direct search engine indexing of booking page, you can prevent your page from appearing in the search results for the search engines such as Google and Bing. This way, you can ensure that access to the page is limited.
3] Customer data usage consent
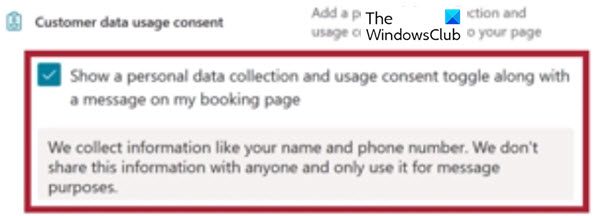
When you click on the drop-down arrow of this setting, you can see a check box. Check this box and you can text request the user’s or customer’s consent for your organization to use their data will appear on the Self-Service page. This is a mandatory step; hence it has to be checked to complete the booking.
4] Default scheduling policy
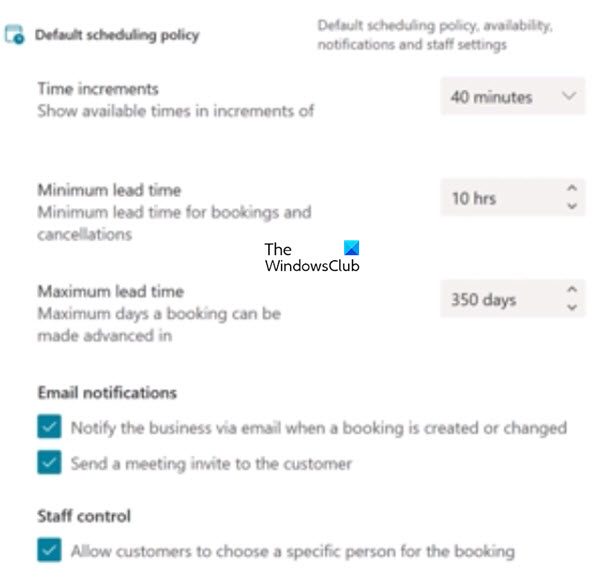
This is the section where you can define parameters for the Scheduling policy, notifications for emails, and also the staff.
You can also set the Availability for the booking service. This setting defines the time and date ranges of availability for your service. If this is not set, Bookings will be set to your business hours by default. This option is especially helpful when you are on holiday.
5] Customize your page
This is something to do with your likes and taste. In this setting, you can choose colors and logos on the Self-Service page that match your brand.
6] Region and time zone settings
As the name suggests, you can set the time zone and language for your Bookings page. As a recommended option set the time zone to local time. Microsoft Bookings has a feature that detects the time zone of the visitors and reflects their local time when booking your services. This is exactly like setting up a meeting in Outlook or Teams, where the receiver sees the meeting in their local time zone.
Read: How to connect Microsoft Bookings and Facebook Page
How to publish Microsoft Bookings page
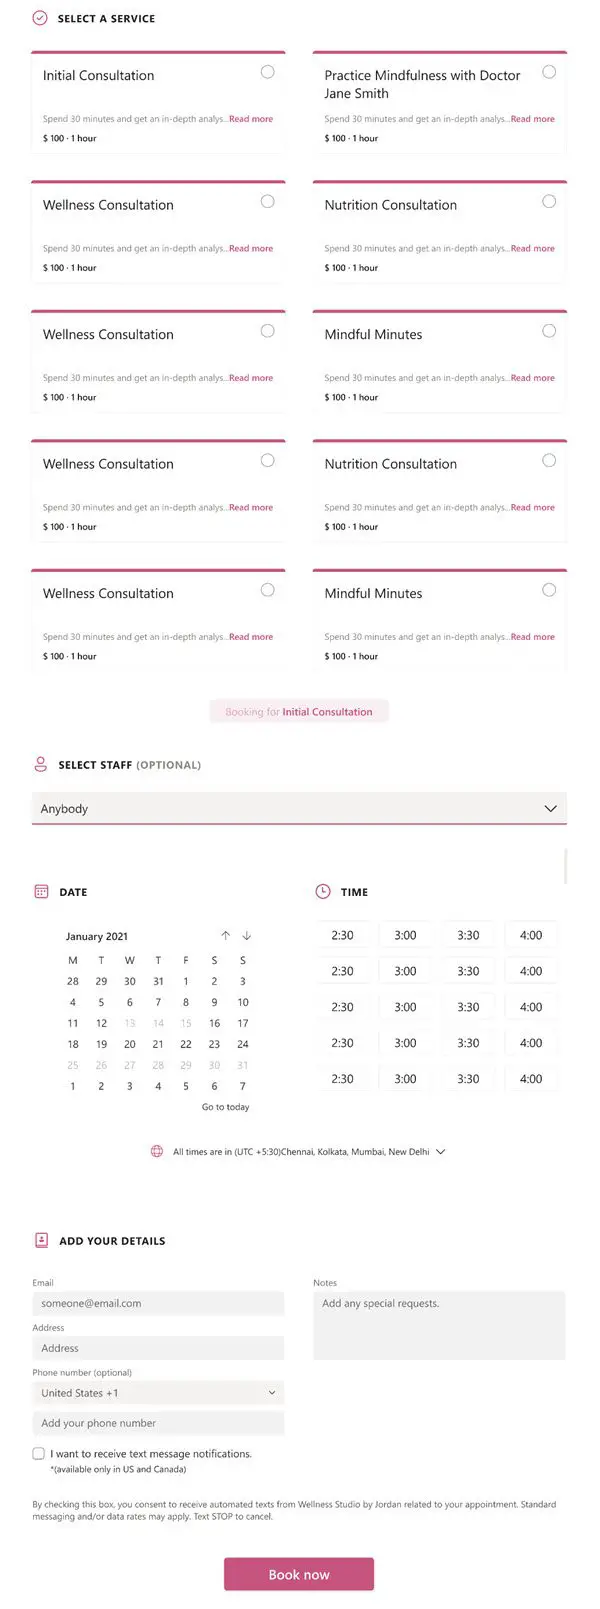
Once you are done with all these settings, scroll up to the start of the page and Save the changes. A link to your Booking page is created under the Configure booking page option. This link can be sent to your contacts via email. You can also copy this URL and place it in your advertisement. Once you publish your booking page, customers will see your booking page where they can book appointments with you. One example of a customer-facing booking page is as follows:
Read: How to enter Business Information in Microsoft Bookings Business Page
Can I create more than one Microsoft booking page?
Yes, it is possible. You can have one account and use it to create multiple Booking pages and calendars.
Can I use Microsoft Bookings with my Teams account?
Yes, it is possible, because Microsoft Bookings easily syncs with Teams. When a booking is scheduled, a Microsoft Teams Meeting link is automatically added to the email sent to attendees and staff. Since Microsoft Bookings syncs well with Teams, you can also set Teams video meetings with Bookings where attendees can join from any computer or mobile device, whether or not they have a Teams account.
Read: How to manage Microsoft Bookings from your mobile device
Is it possible for Microsoft Bookings to sync with multiple calendars?
Microsoft Bookings is a flexible app that can sync with multiple Microsoft apps such as Teams and Calendar. Hence, it is possible to manage bookings for multiple departments and staff calendars. The calendar can also be managed with attendees of internal and external communication.
Leave a Reply