People who use their Windows 11/10 computer as a professional resort must know what an important role the Task Scheduler can play. Deploying your efforts in work may require you to perform certain tasks daily, and you can create and automate these tasks with the help of the Task Scheduler. Today, I am going to be guiding you through the steps you need to take to delay a scheduled task in Windows 11/10.
It’s possible that this title may have caught you off-guard, but there’s a good chance some of you were looking for this. There is one drawback to using Task Scheduler to schedule tasks on Startup. This isn’t explicitly addressed very often, but having a lot of tasks set up to take place on Startup can delay or set back your PC’s startup time. If you are experiencing similar issues, then you always have the choice of eliminating some of the tasks, but that really beats the purpose of having a service perform your tasks for you.
Read: How to Import or Export Tasks from Task Scheduler.
What you can do here to improve your startup time while keeping all your tasks intact is, disable a few startup items using your Task Manager and use the Task Scheduler to schedule those tasks with a bit of delay after Startup. This will allow your PC to startup at a quicker pace, while still making sure that all the tasks you wanted to happen would happen. This is just one case. A change in your working schedule could warrant you to move a few tasks up or down to maximize your efficiency, or you may just be putting something off too. Anyway, let’s begin with the tutorial.
How to delay a Scheduled Task in Windows 11/10
You can delay a scheduled task in Windows 10 using the Task Scheduler in these steps:
- Open the Task Scheduler
- Create a task
- Set a new trigger
- Go to Advanced Settings
- Select Delay task
- Close Task Scheduler.
The option to delay a task isn’t available upfront, and can only be accessed via the normal Task creation wizard. Here’s what you have to do for that:
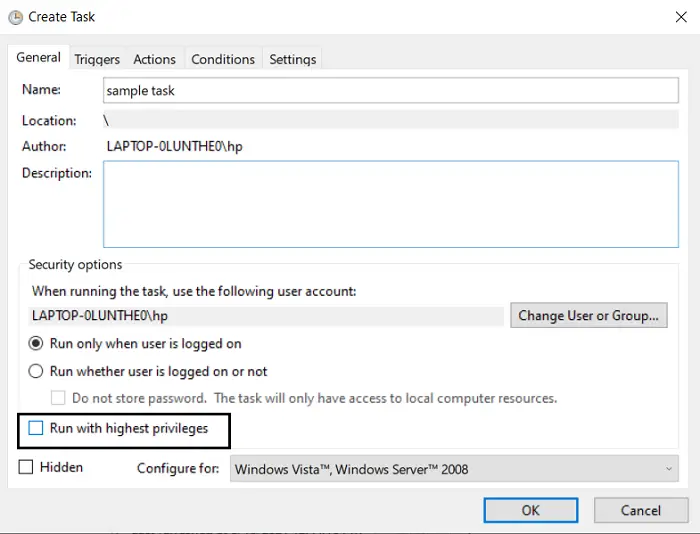
Search for and open the Task Scheduler on your PC (simply search for it from the search pane on the taskbar), and under the Actions head to your right, click on ‘Create task’. This will open the create task widget. Next to the ‘Name:’ blank space, name the task that you want to initiate with a delay. You can also describe the task here. Press Ok so you can get on with setting the trigger for this task.

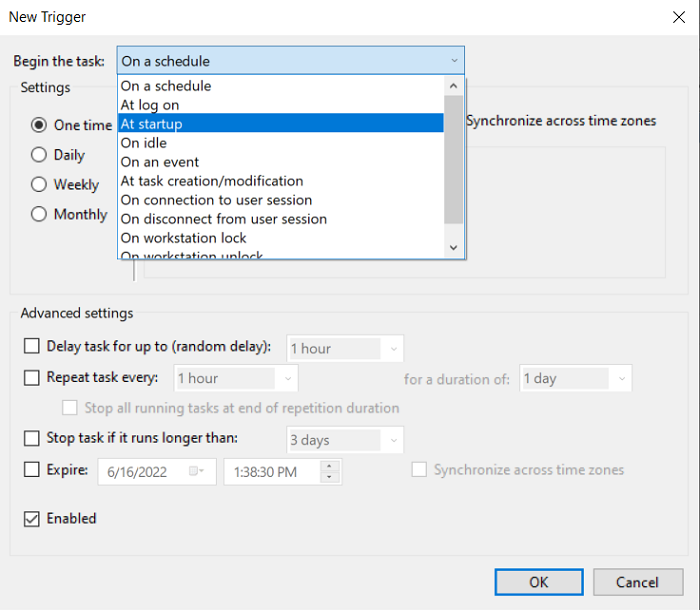
The trigger tells your PC when it is you want the task to be initiated. Click on the Triggers head and on the bottom, you’ll find a ‘New’ button. This will allow you to set a new trigger. Open the drop-down and from the list of options, select ‘At Startup’.

Once you have set up a new trigger, you can adjust the advanced settings of this task, one of them being a delay in this task.
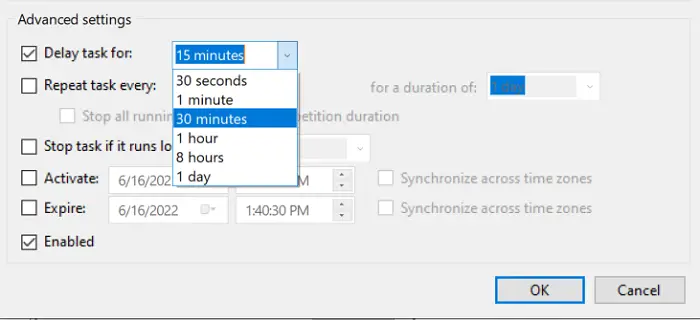
Check the ‘delay task for:’ box and from the drop-down, choose the most suitable delay for you. As you can see, it can range anywhere between 30 seconds and a day. Click on ‘Ok’ once you’re done.

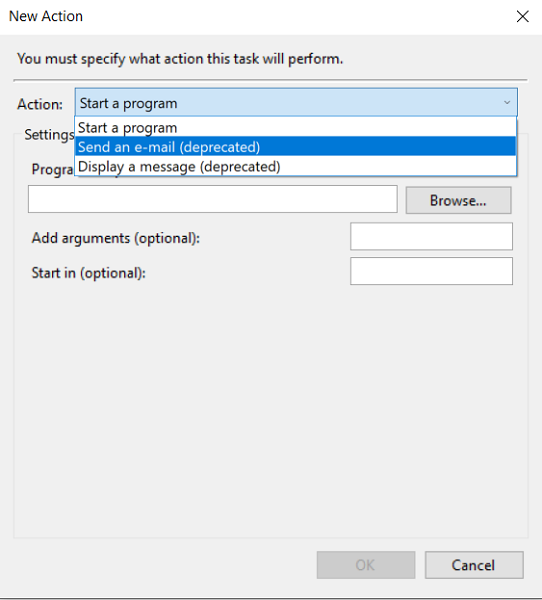
Now, click on the ‘Actions’ tab and press ‘New’ again. Here, you get to set the action you want this task to perform; the three options offered are starting a program, sending an e-mail, or broadcasting a message. Using these options, you can play a song, send an email (deprecated now), Run Enhanced Disk Cleanup Too, schedule a Batch File, wake up PC from Sleep, update Windows Defender, make Windows speak out, etc.
Browse for the program that you want to execute (add any additional arguments, if necessary) and click on Ok to proceed.

You have some additional settings on offer here too, like initiating the task only if your computer is idle for some preset time, or starting the task only if your computer is running on AC power.
Once you’ve configured the task to your desired specifications, press ‘Ok’ to save it. Both the Conditions and Settings tabs are optional and you can move on without changing or enabling anything there.
Now that you have created your choice, it’s best to verify that the task is running properly. You can do that by opening the main Task Scheduler window, right-clicking on the task that you’ve just created, and clicking on run. Hereon out, every time you turn your PC on, this particular task will execute itself with a delay.
Read: How to delay startup programs in Windows using Freeware or Task Scheduler
I hope I had made the process convenient for you and that you will now be able to manage your scheduled tasks the way you find most convenient.
Related: How to rename scheduled task in Windows Task Scheduler.
Leave a Reply