The Windows Service is a computer process that runs in the background without user interaction. It usually gets active when you start your computer, and it executes tasks silently until you shut down the device. It may start automatically, manually on demand or get triggered by another action.
Sometimes, you may need to delete a Windows Service. This could happen if a program you uninstalled left a Service behind. In this guide, we show you methods that will help you delete a Service in Windows 11 or Windows 10.
Where is Services in Windows 11?
In Windows 11, you can find Windows Services Manager by opening the Start menu, typing “Services” into the search bar, and selecting the “Services” app from the results. This allows you to manage and configure system services.
How to delete a Service in Windows 11/10
You can remove or delete a Service in Windows 11/10 using any one of these methods:
- Through Registry Editor
- Using Command Prompt
- Using PowerShell
- Using Terminal
- Using AutoRuns.
If it is a third-party Service, uninstalling the software usually removes the Service; but if it does not, you may follow these methods.
1] Delete a Service through Registry Editor
First of all, you need to find the name of the Service you want to delete.
To do this, click on the Start button and type Services. From the best match result, click on the Services application to open it.
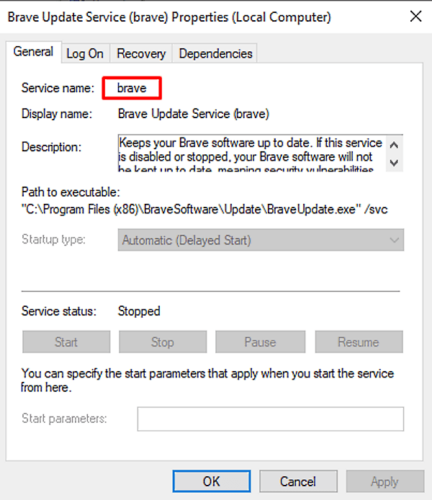
In the Services Manager window, scroll down and look for the service you have to delete. Once you find, right-click on it and select the Properties option.
On the General tab of the Properties window, you will get the name of that Service.
Note down the Service name or you can remember it as well so that you will have it on hand when it would be needed.

Once you get the Service name, simply close the properties window and the Services window as well.
Now, it is time to open the Registry Editor and then go ahead to delete the Service.
But before you begin, make sure to export a backup of your Windows Services list.
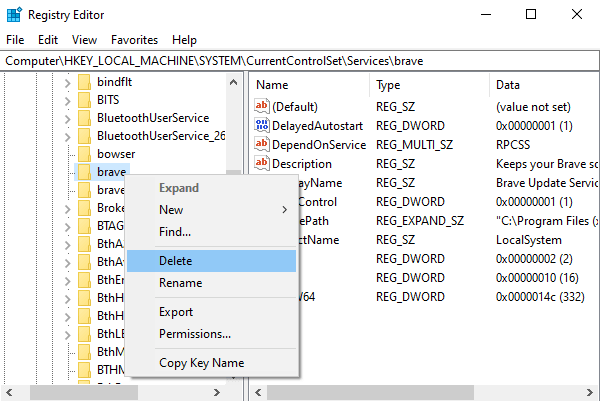
In the Registry window, locate the Service Name you identified earlier.
Once you find, right-click on it and then select the Delete option.

Click on the Yes button when asked for confirmation.
After that, close the Registry window and reboot your PC to apply the changes.
Read: How to restore missing or deleted Windows Service.
2] Delete a Service using the Command Prompt
If you don’t feel comfortable editing the Registry, then you can use the Command Prompt to delete the Service.
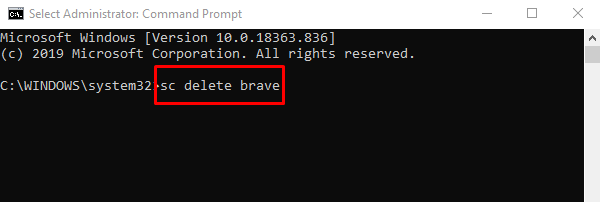
Open an elevated Command Prompt with admin rights.
When UAC prompts on the screen, click on the Yes button to grant the administrative privileges.

In the Command Prompt window, type the below commands and hit Enter:
sc delete <service_name>
Note: In the above command name, replace service_name with the service you identified earlier.
Once it completes the process, close the elevated command prompt, and restart your device.
3] Using PowerShell
Run Terminal as administrator.
Type the following command and press Enter:
Get-Service
This will list all services on your system.
Locate the Service name you want to delete. Let us say it is the brave Service.
To delete the brave service, type the following command and press Enter:
sc delete name
4] Using Terminal
Run Terminal as administrator.
Type the following command and press Enter:
Get-Service
This will list all services on your system.
Locate the Service name you want to delete. Let us say it is the brave Service.
To delete the brave service, type the following command and press Enter:
Remove-Service -name "brave"
5] Using AutoRuns

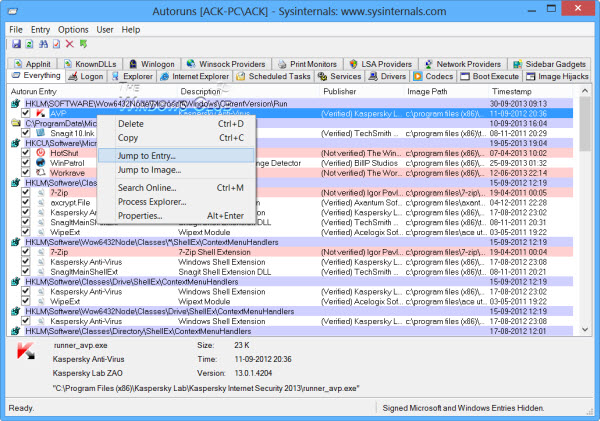
You can also use Microsoft Autoruns to locate and delete a Service using the right-click context menu.
How do I remove unwanted services in Windows?
To remove unwanted services in Windows, you can use ‘Services.msc’ to disable services. To remove or uninstall Services you will have to use the Registry Edfitor or the Command line as explained in this post. Never delete the Windows Services.
Leave a Reply