A Feature update or an In-place upgrade allows you to update the version of your operating system without altering the server settings, roles, and data. In this guide, we will explain how to deploy a Feature Update on a Windows Server.
Deploy Feature Update on Windows Server
Before we go ahead and deploy feature updates, it is important to meet the following prerequisites.
- First, check the version of Windows Server you need to install as part of the update.
- Get your hands on a genuine product key and activation method.
- Ensure that you meet the hardware requirement of that server.
- Review Upgrade and migrate roles and features in Windows Server.
- Review Microsoft server applications compatibility.
- You’ll need the setup media for the specific Windows Server version you want to upgrade to. You can obtain it from OEM, Retail, Visual Studio Subscriptions, or VLSC channels.
- You need to take a full backup of your computer beforehand. This backup should include OS data, apps, VMs, and other data.
Once you have met the aforementioned prerequisites, let us show you how to perform a feature update. To perform a feature update, follow the steps mentioned below.
- Collect system information
- Get your Active Directory ready
- Perform In-Place Update
Let us discuss them in detail.
1] Collect system information

Before starting the update, it’s important to gather information from your devices for diagnostic and troubleshooting purposes in case the Feature Update fails. We advise you to store this information in a place you can access even if you can’t access your device.
To do so, you need to follow the steps mentioned below.
- Open PowerShell as an administrator.
- Then, go to the location you want to store the system information in. You can use the CD or Change Directory command to do so. So, for example, you need to go to the Download folder and run cd C:\Users\<username>\Downloads. You can also save the files in the default location if you don’t want to go to any other location.
- Then, execute the following command.
Get-ComputerInfo -Property WindowsBuildLabEx,WindowsEditionID | Out-File -FilePath .\computerinfo.txt systeminfo.exe | Out-File -FilePath systeminfo.txt ipconfig /all | Out-File -FilePath ipconfig.txt
This will create three files, computerinfo.txt, systeminfo.txt, and ipconfig.txt in the location you specified.
After gathering your Windows Server-related information, back up your server’s operating system, apps and VMs, and shut down or migrate any running VMs before the Feature Update.
2] Get your Active Directory ready
Even though the steps would be similar, we will update Windows Server 2016 to Windows Server 2022 in this tutorial.
First, we must see what domain controllers are attached to your forest. For that, open Server Manager. Go to Tools > Active Directory Users and Computers. Navigate to your domain forest, expand it, and go to Domain Controllers. There, you can see all your domain controllers.

Before performing the upgrade, we need to have the latest active directory schema. To do so, open PowerShell as an administrator, and run the following command to get the Active Directory Schema version.
Get-ADObject (Get-ADRootDSE).schemaNamingContext -Property objectVersion
As you can see in the attached screenshot, the object version is 87, which is associated with the Windows Server 2016. Since we will update the OS, we need to object version to be 88.
To upgrade the schema, you need to be logged in with an account with adequate permissions. It should be a member of Schema Admin, Enterprise Admin, and the Domain Admin groups of the domain that hosts schema master.

You have to navigate to the directory which has the Windows Server source image on your domain controller. Then, run the following command to go to the adprep location and run the command to get your Active Directory ready.
cd .\support\adprep\
.\adprep.exe /forestprep
Follow the on-screen instructions to complete the procedure.
3] Perform In-Place Upgrade

Now that we have everything in place, we can start the upgrade. For that, follow the steps mentioned below.
- Open File Explorer.
- Go to This PC and double-click on the ISO image to start the process.
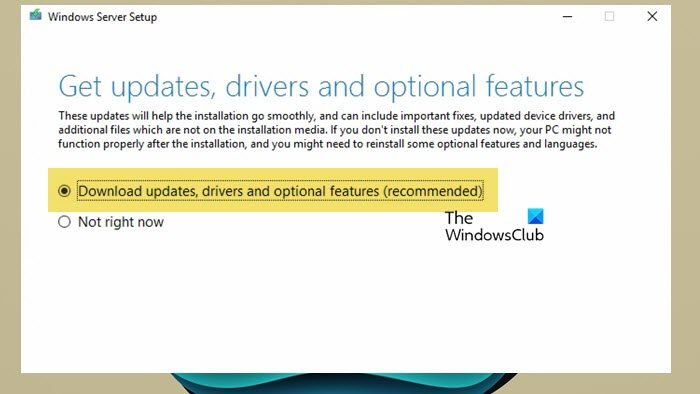
- Once the setup interface appears, click on Check how setup automatically updates.
- Make sure that the Download updates, drivers and optional features (recommended) option is checked. Click on Next.
- Wait for a few seconds as Windows checks the available update and your PC hardware.
Finally, follow the on-screen instructions to complete the process.
You can run the following command to ensure the feature update is successful.
Get-ComputerInfo -Property WindowsProductName
Make sure all your applications are running and that your client connections to the applications are successful.
Read: Windows Update keeps disabling itself automatically
How do I deploy a Windows Update server?
To deploy WSUS updates using the WSUS Administration Console, follow these steps:
- Open the Console and click on Updates.
- Click Updates needed by computers in the All Updates section.
- Select the updates you want to approve for installation in your test computer group.
- Right-click the selection and then click Approve.
- In the “Approve Updates” dialog box, select your test group, click Approved for Install, then click “OK”.
- When the approval process is complete, click “Close”.
That is how you can deploy WSUS updates.
Read: Using Windows Server Update Services in Enterprise environment
How do I run Windows feature update?
To run Windows feature updates on Windows Server, you need to mount the server’s ISO file and then double-click on it. However, you need to check and configure a few things before running the update. On Windows client operating systems, you can check for updates from Windows Settings.
Also Read: Delete Downloaded, Failed & Pending Windows Updates.
Leave a Reply