Even when we choose to connect our PC to a home wireless network, Windows automatically scans for other wireless networks in range. The scanning helps users stay connected to the strongest network, but it can be distracting when it continues for an extended period of time. Fortunately, there is a setting that lets you disable background WiFi scanning in Windows 11/10.
Disable Background WiFi Scanning in Windows 11/10
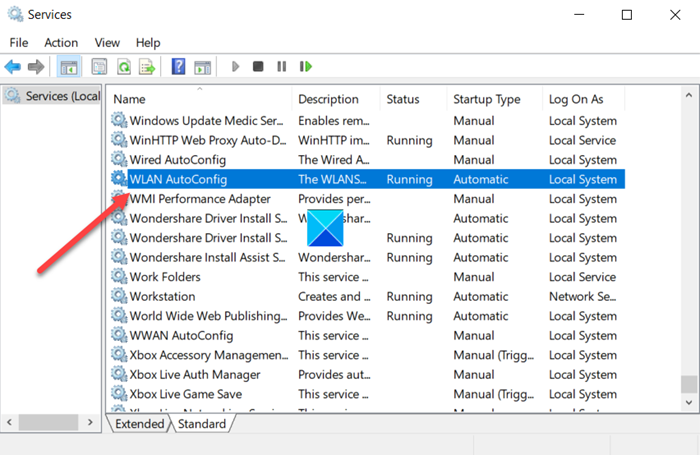
You can stop the background Wi-Fi scanning in Windows by disabling the WLAN AutoConfig Service. It is this service that enables Windows to connect or disconnect from a Wireless Local Area Network (WLAN). It is also equipped with the capability to turn your PC into a software access point so that other devices can connect to your PC wirelessly using a WLAN adapter.
- Open the Run dialog box.
- Type ‘services.msc’ in the box and hit Enter.
- Find WLAN AutoConfig entry.
- Right-click the entry and choose the Properties option.
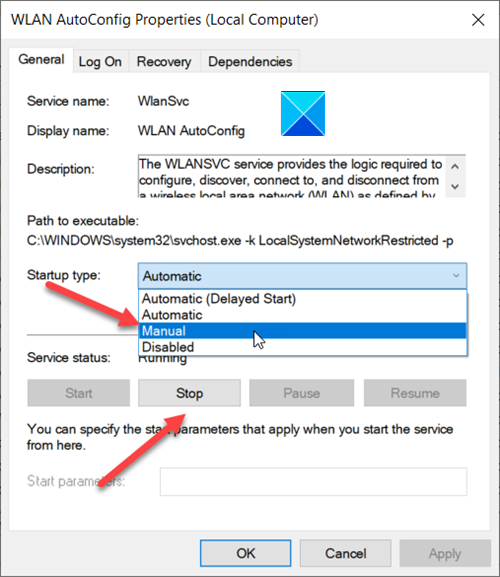
- In the Properties window that opens, go to Startup type.
- Hit the Drop-down menu button, choose Manual.
- Under the Service Status heading, hit the Stop button.
- Exit Local Service Editor.
- Restart your PC.
It is important to note that stopping or disabling the WLANSVC service will make all WLAN adapters on your computer inaccessible from the Windows Networking User Interface. Microsoft recommends users keep the WLANSVC service running if the computer has a WLAN adapter.
Press Win+R in combination to open the Run dialog box.
Type ‘services.msc‘ in the empty field of the box and hit the Enter key.

In the Local Service Editor window that opens, find the entry by the following name – WLAN AutoConfig.
Right-click the entry and select the Properties option.
Read: How to disable WiFi using CMD or Powershell.
Next, in the Properties window that shows up, go to the Startup Type option.

Hit the drop-down button adjacent to the above option and select Manual.
Next, under the Service Status heading, hit the Stop button.
When done, the process will disable background WiFi scanning in Windows.
That’s all there is to it!
Related:
How do I stop my Wi-Fi from scanning in the background?
To stop your Wi-Fi from scanning in the background, access the WLAN settings you wish to adjust. Find the ‘Edit’ option, go to ‘Advanced Options’ > ‘Radio Control,’ and check ‘Disable Background Scanning’. Confirm to save changes and halt background scanning on your network.
How do I turn off Wi-Fi scanning?
To disable Wi-Fi scanning on your Android, open “Settings,” go to “Security & Location,” tap on “Location,” then click on “Wi-Fi and Bluetooth scanning.” Here, you can toggle off “Wi-Fi scanning” to stop your device from searching for networks even when Wi-Fi is turned off.
Leave a Reply