Microsoft has introduced one of the most polarizing features in Windows 11/10, Inactive Scrolling. Before the introduction of this feature, you would have to select a window to activate it, and then only could you scroll through the content. However, with this feature enabled, you can scroll through the content, even without activating the window. You just need to hover your mouse over it.
This feature may sound cool, but it is not for everyone. Many Windows users have experienced the accidental scrolling problem. Therefore, they wish to disable this feature, which is enabled by default in Windows 11/10.
Disable Inactive Scrolling in Windows 11/10
There are two methods to enable or disable Inactive Scrolling in Windows 11/10. They are:
- Disable Inactive Scrolling from Settings
- Disable Inactive Scrolling from Registry Editor
Let us talk about them in detail.
1] Disable Inactive Scrolling from Settings

To disable Inactive Scrolling from settings, you need to follow the prescribed steps:
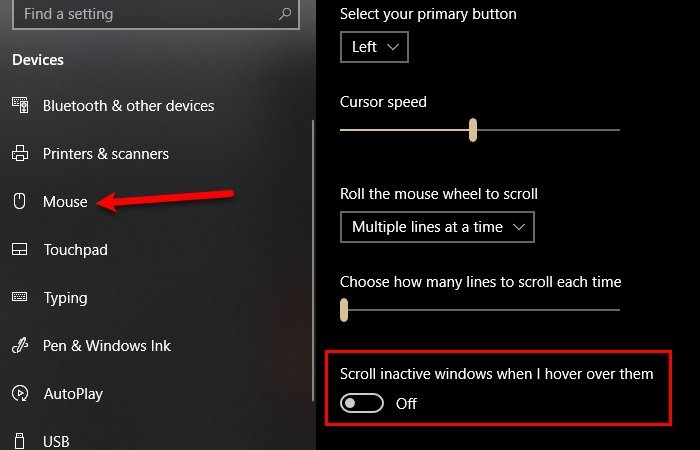
- Launch Settings by Win + X > Settings.
- Click Devices from the Settings window.
- Go to the Mouse tab
- Use the toggle to disable “Scroll inactive window when I hover over them”.
Inactive Scrolling will have been disabled.
Read: Windows 10 mouse scrolling automatically up or down.
2] Disable Inactive Scrolling from Registry Editor

You can also use the Registry in order to disable Inactive Scrolling in Windows 10.
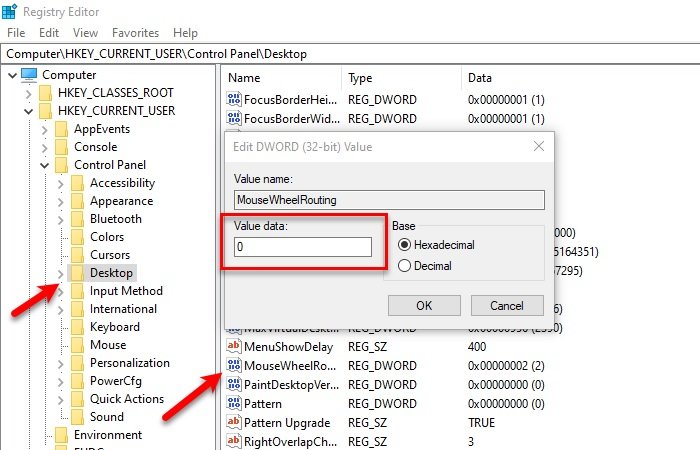
To do that launch Registry Editor by searching it out of the Start Menu and go to the following location:
Computer\HKEY_CURRENT_USER\Control Panel\Desktop
Now, look for “MouseWheelRouting”, double-click on it to open, change the Value data to 0, and click OK.
This way, Inactive Scrolling will be disabled.
Hopefully, this has helped you in disabling Inactive Scrolling in Windows 11/10.
Read Next: Cursor jumps or moves randomly while typing.
How do I turn off scrolling in inactive windows?
To turn off scrolling in inactive windows in Windows 11, navigate to Settings > Bluetooth & devices > Touchpad. Under the “Scroll & Zoom” section, toggle off “Scroll inactive windows when hovering over them.”
How do I stop automatic scrolling in Windows 11?
To stop automatic scrolling in Windows 11, go to Settings, select Devices, then Mouse. Turn off “Scroll inactive windows when I hover over them.” You could also update your mouse driver or reset your touchpad settings if you feel the need.