The Facial Recognition feature is one of the coolest features of any online platform that deals with people and their memories – i.e. in the form of photos and videos. This software automatically picks up people’s faces on the images, tags them, searches for photos by specific people’s names, and automatically organizes pictures based on people’s faces.
Many of you may associate the facial recognition feature unique to Facebook, but like this social media platform, Face Recognition is also an in-built feature for Google Photos. In fact, Google has used face recognition to identify people in photos for years.
Building on this, let us learn how to enable or disable the facial recognition feature in Google Photos.
How does Facial Recognition feature in Google Photos work?
The Facial Recognition feature in Google Photos uses biometrics and a facial map to recognize and match details of a human face appearing on different images. Further, it tags people on the images. This feature organizes the pictures for the users and assigns names to each face as recognized by its intelligent software – All this makes identifying people easy.
Facial recognition is available in Android, iPhone, and the web version of Google Photos.
The ‘not-so-good’ side of this feature
The face recognition feature presents several complex and hypothetically worrisome problems that force us to question and consider disabling it. Two of the most motivating reasons are:
- Unintentional penalties of being recognized in images
- How this technology could be used in the future?
Users may not want to be tagged in photos, but the software would not know that. Also, we have no idea how these facial impressions would be used with third parties. And the most significant one, we don’t know how Google intends to capitalize on this ability to identify us almost anywhere in this highly connected world.
Enable or Disable Google Photos Facial Recognition
The choice of enabling or disabling the facial recognition feature in Google Photos is yours. Also, despite being a built-in feature, it may not be turned on by default. If you wish to enable it, follow the below steps.
1] Go to your web browser and open Google Photos.

2] Now on the main page, click on ‘Go to Google Photos’
3] On the top left side, click the ‘Settings’ option that looks like a little gear icon.

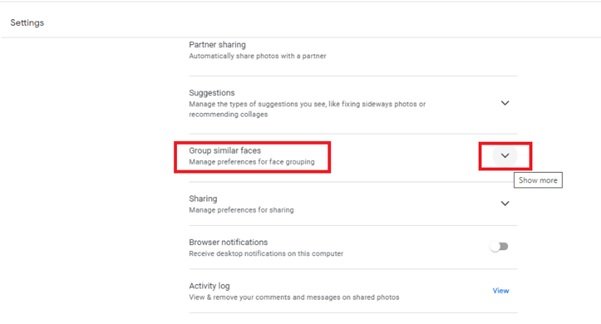
4] When on the ‘Settings’ page, scroll down and look for the option ‘Group Similar Faces’ and click the down arrow appearing on the right side.

5] Toggle on the ‘Face Grouping’ option to turn the facial recognition feature on.

To disable the facial recognition feature, toggle off the ‘Face Grouping’ option.
We cannot prohibit these tech giants from scanning the photos we share with them, but we can use their pre-built features to limit how our data is collected and used.
We hope this guide helped you manage the facial recognition feature.
If you know any similar tricks around Google Photos that can help us protect our data better, do share them with us in the comments section below.
Read: How to enable or disable Facebook Face recognition.