The Spell Checker feature in Office 365 helps users with their grammar and is available in Outlook, Word, PowerPoint, and Excel, so if your writing is not superior, this feature available in your Microsoft Office programs is helpful. When opening the spelling dialog box or pane, it consists of options to change, ignore, and add words to the Office dictionary. Sometimes users may not want to see the redlines all the time, which indicates that there is an error due to having an add-in grammar checker, for example, Grammarly, and they don’t want to see the Spell-checker red line along with the Grammarly Correctness checker and they want it to be disabled.
How to disable Spell Check in Office 365 apps
Disable spell check in Word and PowerPoint
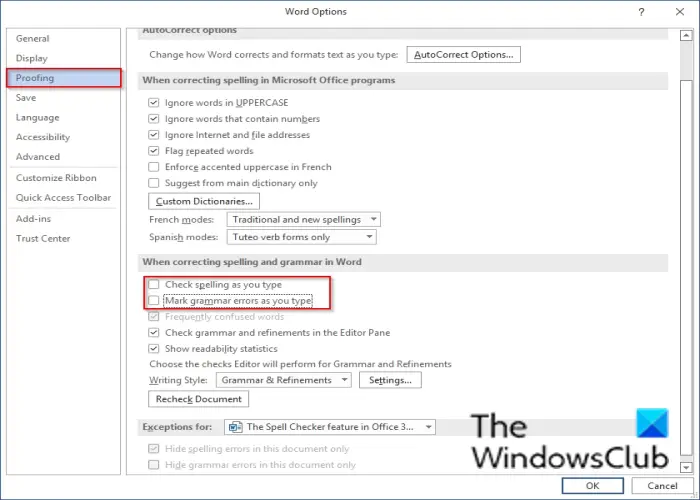
The Word and PowerPoint Spell check settings are similar. Follow the steps below to disable the spell check in Word or PowerPoint.
Launch Microsoft Word or PowerPoint.
Click the File tab.
Click Options in the Backstage view.

A Word Options dialog box will open.
On the left pane, click Proofing.
On the right, Under the section, ‘When correcting Spelling in Word, uncheck the checkboxes for both Check spelling as you type and Mark grammar errors as you type.
Then click OK.
In Microsoft Excel, you will see limited settings there in the same place.
Disable spell check in Outlook
Click File.
Click Options on the backstage view.

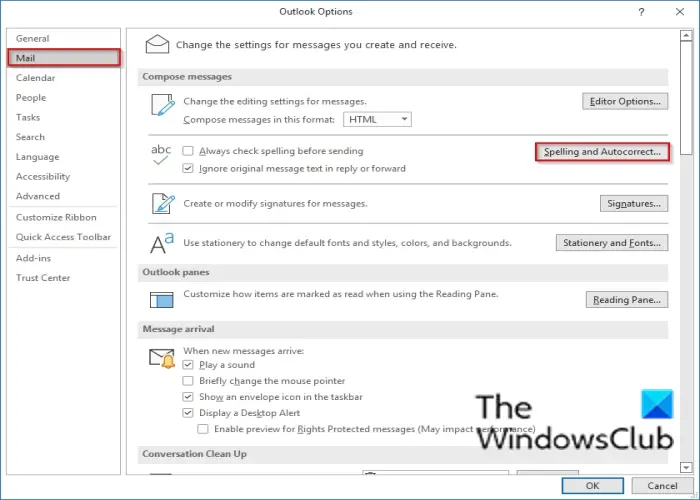
Click Mail on the left pane.
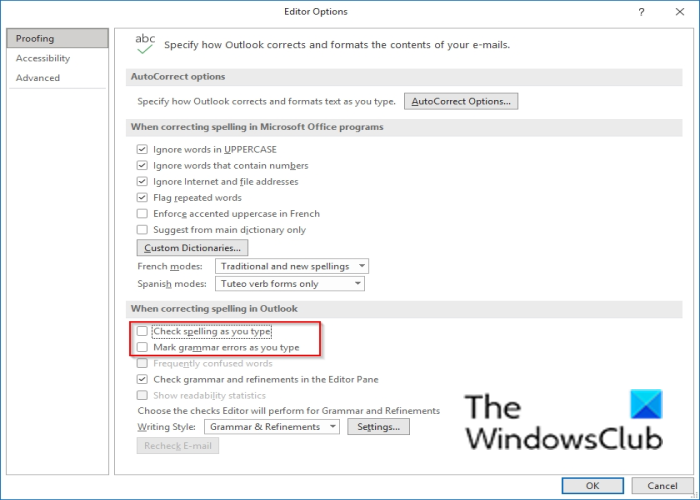
Under the Compose messages section, click the Spelling and Autocorrect button.

On the Editor Options interface, under the section “ When correction spelling Outlook” ensure to check the checkbox for “Check spelling as you type” and “Mark grammar errors as you type.”
Where is the spell checker in Outlook 365?
Finding the spell checker settings is a little different in Outlook 365 from the other Office programs. The Spell Check settings are in the Mail category, not the Proofing category like the other programs.
What do red blue and green lines mean in spell check?
In Microsoft Office 365, whenever there is an error, you will see a red, green, or blue line under your text; each line has a different meaning. The red line indicates a misspelled word, the green line indicates a grammatical error, and the blue line indicates a contextual spelling error.
Then click OK.
We hope this tutorial helps you understand how to disable Spell Check in Office 365; if you have questions about the tutorial, let us know in the comments.
Leave a Reply