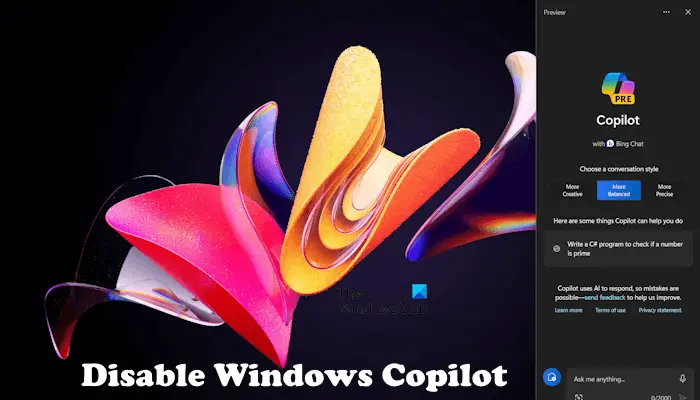
Microsoft has released Windows Copilot for the stable version of Windows 11. It is available on the Windows 11 Taskbar. If you do not see Windows Copilot on the Taskbar, update Windows 11 to the latest OS build. You can view your current Windows 11 build by using the winver.exe tool. If you do not want to use Windows Copilot, you can remove Copilot. In this article, we will show you how to uninstall or disable Copilot in Windows 11.
How to disable Copilot in Windows 11
In Windows 11, you can deactivate, turn off, or permanently disable Windows Copilot by using Settings, Group Policy, or Registry Editor. Let’s examine each method in detail.
1] Remove Copilot in Windows 11 via the Settings app
This is the easiest method to disable Windows Copilot in Windows 11. The following instructions will guide you on this.
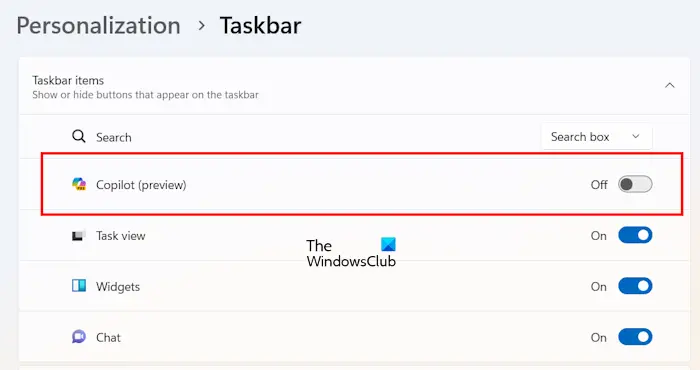
- Open Windows 11 Settings.
- Go to Personalization > Taskbar.
- Expand the Taskbar items section.
- Turn off the Copilot (preview) button.
When you turn off the Copilot button, the Copilot icon will disappear automatically from the Taskbar.
Disabling Windows 11 Copilot from Windows 11 Settings is the easiest method. But it has a disadvantage for you if you have a shared computer. This is because another user can enable it through Windows 11 Settings. Hence, if you want to disable Windows Copilot permanently, you can use the Local Group Policy Editor or the Registry Editor.
Related: Windows 11 Copilot Download, Install, Features, Settings, Remove
2] Get rid of Copilot in Windows 11 by using the Local Group Policy Editor
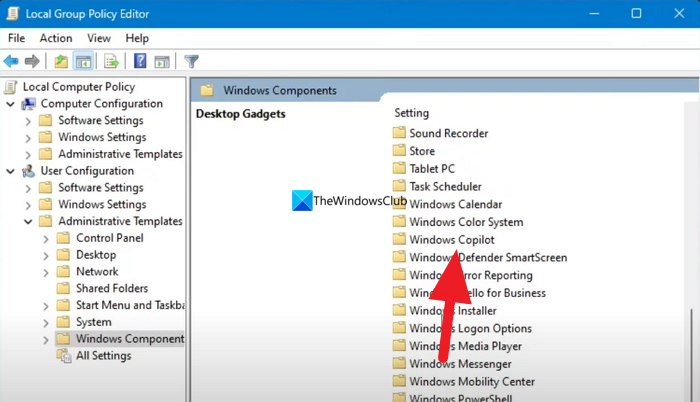
This method will completely disable Windows Copilot in Windows 11. The Local Group Policy Editor is not available in Windows 11 Home editions. Therefore, Windows 11 Home users can skip this method.
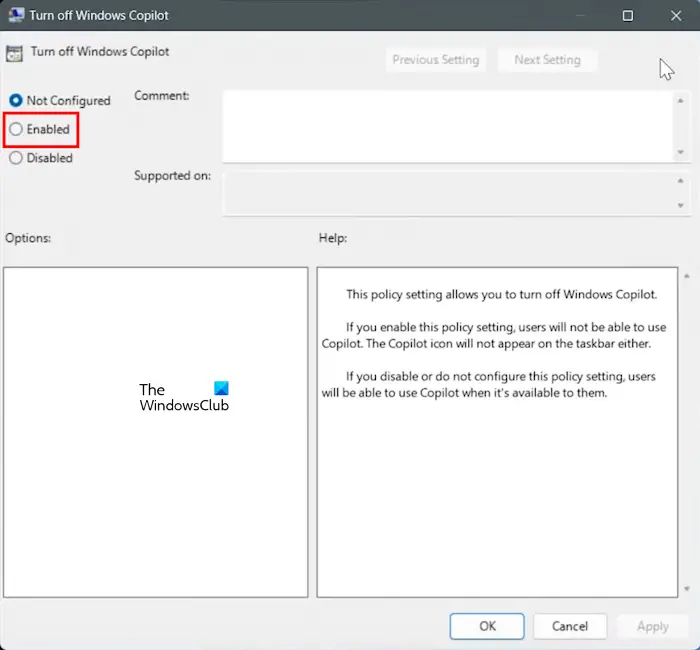
The steps to disable Copilot in Windows 11 by using the Local Group Policy Editor are explained below:
- Open the Run command box by pressing the Win + R keys.
- Type gpedit.msc and click OK.
- When the Local Group Policy Editor appears on your screen, navigate to the following path.
User Configuration > Administrative Templates > Windows Components
Expand the Windows Components folder and look for Windows Copilot. Once you find it, select it. Now, double-click on the “Turn off Windows Copilot” setting on the right side. By default, it is set to Not Configured. You need to select the Enabled option. When you are done, click Apply and then click OK.
As you apply changes, you will see that the Windows Copilot icon disappears immediately from the Taskbar. If Copilot does not disappear from the Taskbar, restart your computer. Open Windows 11 Settings and go to “Personalization > Taskbar.” You will see that the Copilot (preview) option has also gone from there.
If you want to bring Windows Copilot again, change the Turn off Windows Copilot setting in the Group Policy Editor to either Disabled or Not configured. After that, click Apply and then click OK to save the changes.
3] Disable Windows Copilot by using the Registry Editor
This method will work on all editions of Windows 11. Therefore, if you are a Windows 11 Home user, you can use this method to permanently disable Copilot. You have to make modifications in the Windows Registry. Therefore, follow all the instructions provided below carefully. Any incorrect entry in the Registry Editor can make your system unstable.
Before you proceed, we recommend you create a System Restore Point and backup your registry.
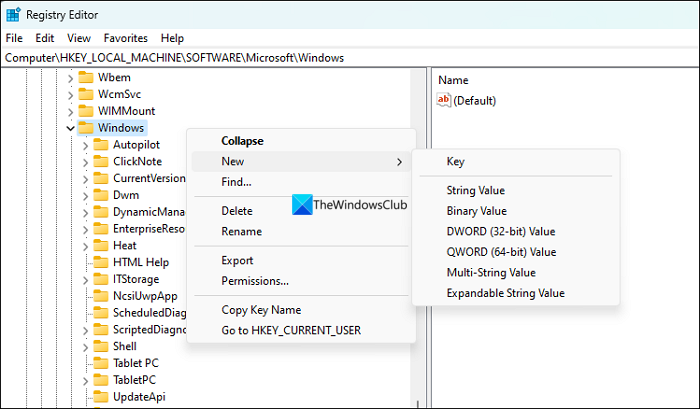
Open the Registry Editor. Copy the following path and paste it into the address bar of the Registry Editor. After that, hit Enter.
HKEY_CURRENT_USER\Software\Policies\Microsoft\Windows
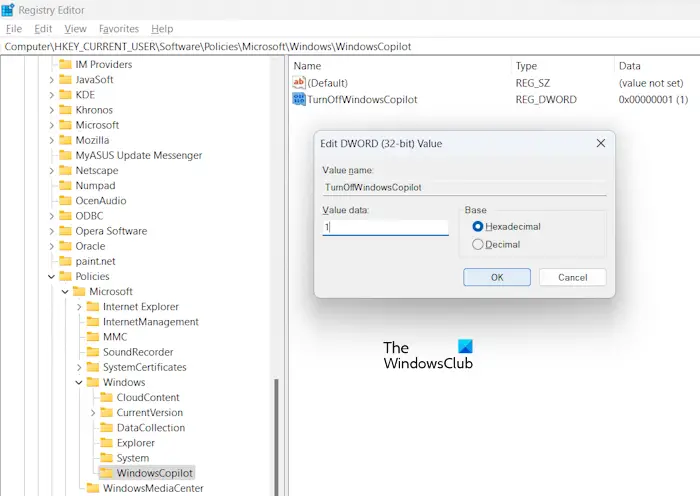
Make sure that you have selected the Windows key on the left side. Now, expand the Windows key and select the WindowsCopilot subkey under it. If the WindowsCopilot subkey is not present under the Windows key, you have to create it manually.
To manually create the WindowsCopilot key, right-click on the Windows key and select New > Key. Name this newly created key as WindowsCopilot. Now, select the WindowsCopilot key and right-click in the empty space on the right side. Select “New > DWORD (32-bit) Value.” Name this newly created value as TurnOffWindowsCopilot.
Right-click on the TurnOffWindowsCopilot value and select Modify. Enter 1 in its Value data. Click OK to save the changes.
If you want to revert changes, change the Value data of the TurnOffWindowsCopilot value to 0 in the Registry and restart your computer. If this does not work, delete the TurnOffWindowsCopilot value and restart your computer.
Alternatively, to disable Copilot, open CMD as administrator and copy and paste in the command below and press Enter:
reg add HKCU\Software\Policies\Microsoft\Windows\WindowsCopilot /v TurnOffWindowsCopilot /t REG_DWORD /d 1 /f
To enable Copilot, use the command:
reg delete HKCU\Software\Policies\Microsoft\Windows\WindowsCopilot /f
Unlike the Group Policy Editor, changes will not take effect immediately after modifying the Registry Value. You have to restart Windows Explorer. If this does not work, restart your computer.
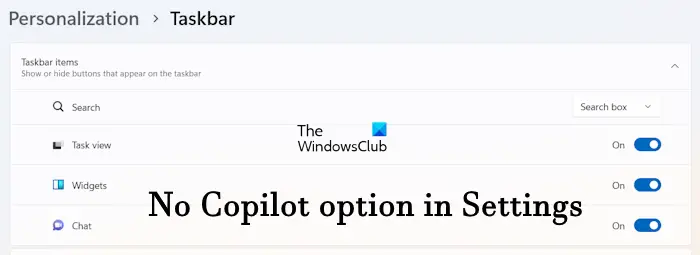
After restarting your computer, you will see that Windows Copilot has gone from the Taskbar and there is no option to enable it in Windows 11 Settings.
How to uninstall Copilot in Windows 11?
Earlier, Copilot (an AI-powered digital assistant) was an integral part of Windows 11 OS. Because of this, completing removing Copilot from Windows 11 PC wasn’t possible at that time. But now, with the latest updates, Microsoft Copilot is available as a standalone app on the Microsoft Store. That means we can now completely uninstall Copilot from a Windows 11 PC or laptop. Before proceeding further, you must update your Windows 11 system if you haven’t already done so.
Here are the different ways to remove or uninstall Copilot app from Windows 11:
- Completely uninstall Copilot in Windows 11 using the Settings app
- Uninstall the Copilot app from the Start menu
- Remove Copilot using the Search box
- Remove the Copilot app from the Edge browser for the current user
- Uninstall the Copilot app using Windows Terminal.
Let’s check each option one by one.
1] Completely uninstall Copilot in Windows 11 using the Settings app
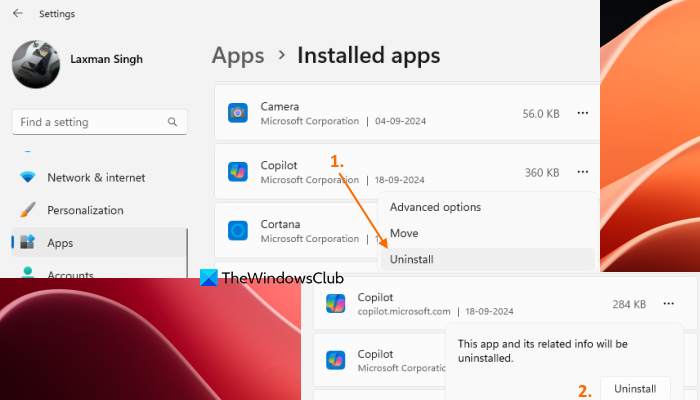
Use the following steps to uninstall Copilot using the Settings app of Windows 11 completely:
- Press the Win+I hotkey to open the Settings app
- Select the Apps category
- Access the Installed apps page
- Look for the Copilot app in the list
- Click on the More options (three horizontal dots) available for the Copilot app
- Select the Uninstall option
- Press the Uninstall button in the confirmation pop-up and it will remove the app completely.
2] Uninstall the Copilot app from the Start menu
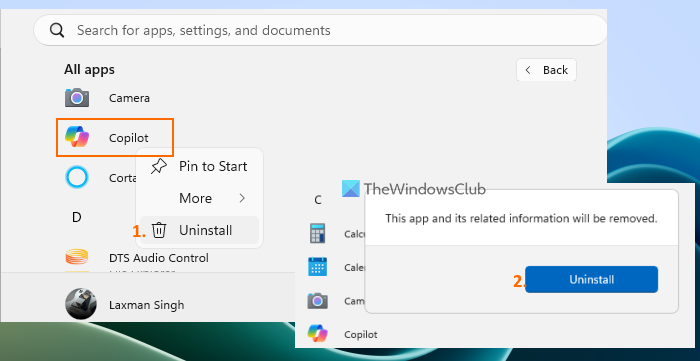
The steps are as follows:
- Click on the Start button to open the Start menu
- Press the All apps button
- Scroll down the list and right-click on the Copilot option
- Select the Uninstall option
- A confirmation box will pop up. Press the Uninstall button there.
This will uninstall the Copilot app and delete its related information from your PC.
Related: How to remove Copilot from Taskbar in Windows 11
3] Remove Copilot using the Search box
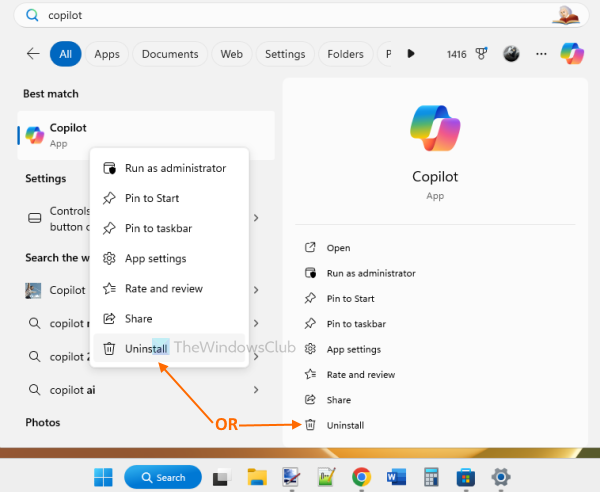
These are the steps:
- Click on the Search box of Windows 11
- Type copilot and the search result will appear in the Search home
- Right-click on the Copilot option and use the Uninstall option
- Confirm your action by pressing the Uninstall button visible in the pop-up. Alternatively, if you don’t want to use the right-click menu for uninstallation, then use the Uninstall option present on the right section of the search result to remove the Copilot app.
4] Remove the Copilot app from the Edge browser for the current user
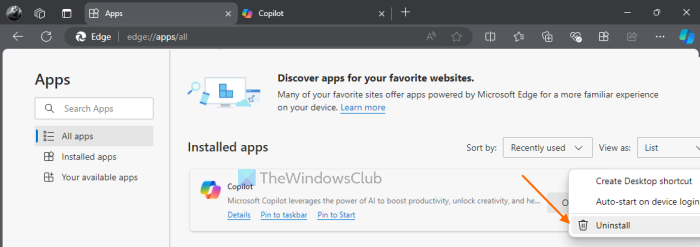
We already know that a supported site or webpage can be installed as an app in the Microsoft Edge browser. And, so is the case with the Copilot web app. If you have installed the Copilot app in the Edge browser, then you can uninstall it for the current user with the steps given below:
- Open the Edge browser
- Type
edge://appsin the Omnibox or address bar and press the Enter key. This will open the Apps page of Microsoft Edge - Select the Installed apps option from the left sidebar
- Now you will see the Copilot app on the right section
- Click on the three horizontal dots (More options) for the app and select the Uninstall option
- In the confirmation, press the Remove button. You can even select the Also clear data from Microsoft Edge option in the confirmation box and then hit the Remove button to wipe off all the data related to the Copilot app.
Also read: Copilot not working in Windows 11
5] Uninstall the Copilot app using Windows Terminal
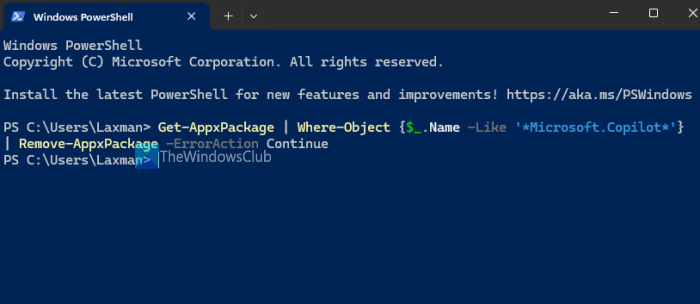
Open the Windows Terminal app using the Search box and then launch the Windows PowerShell profile there. Now, to uninstall the Copilot app for the current user on your Windows 11 computer, execute the following command:
Get-AppxPackage | Where-Object {$_.Name -Like '*Microsoft.Copilot*'} | Remove-AppxPackage -ErrorAction Continue
It will take a few seconds to complete the command and Copilot will be removed.
In case you want to remove the Copilot app for all users on your Windows 11 system, then first, open Windows Terminal as administrator, and launch the PowerShell profile in a tab. Now, use this command:
Get-AppxPackage -AllUsers | Where-Object {$_.Name -Like '*Microsoft.Copilot*'} | Remove-AppxPackage -AllUsers -ErrorAction Continue
I tried this command, but it failed. You can check if this works for you.
How to Reinstall the Copilot app in Windows 11?
In case you want to reinstall the Copilot app in Windows 11, then it can be done in two ways:
- Reinstall the Copilot app from the Microsoft Store
- Reinstall the Copilot app using Microsoft Copilot Installer.
1] Reinstall the Copilot app from the Microsoft Store
Open the Microsoft Store app, search for the Copilot app, and access its homepage. Press the Install button, and the Microsoft Copilot app will download and install automatically.
2] Reinstall the Copilot app using Microsoft Copilot Installer
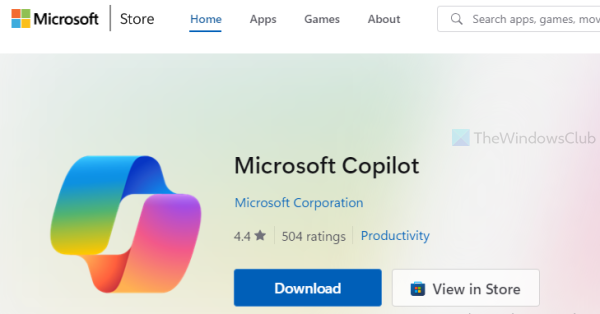
Open the Microsoft Copilot Installer page from apps.microsoft.com. Press the Download button to grab the EXE file of the installer and launch it. Execute the installer file or executable and it will download and install the app.
That’s it. I hope this helps.
How do I turn off Windows 11 features?
Windows 11 has some optional features that you can enable or disable as per your requirements. If you want to turn off some Windows 11 optional features, you need to open the Windows Features via the Control Panel. Alternatively, type Turn Windows features on or off in Windows 11 Search and select the best-matched result.
How do I change my Windows 11 back to 10?
If you have upgraded from Windows 10 to Windows 11, you will have an option to roll back to Windows 10 again. But you have to make your decision within 10 days after upgrading to Windows 11. After 10 days, the rollback to Windows 10 option will disappear. If you have made a clean installation of Windows 11, you cannot go back to Windows 10. In this case, if you want to use Windows 10, you need to perform a clean installation of Windows 10.
Read next: How to use Microsoft Copilot in Word.