Windows Mobility Centre is a built-in feature for Windows 11/10 available for laptops using which you can set volume, check the remaining battery percentage, access Power options, and more. Some users access this feature on a time-to-time basis, others use it occasionally or never. If you are one of those users who don’t find this feature useful and don’t use it, then you can simply disable Windows Mobility Centre in Windows 11/10 with a couple of easy options. No third-party tool is needed for that.

Though there are multiple ways to open Windows Mobility Centre, once you’ve disabled this feature, it won’t open using any such ways. Not to worry as you can also enable Windows Mobility Centre anytime.
Disable Windows Mobility Centre in Windows 11/10
This post covers two built-in features of Windows 11/10 to prevent access to Windows Mobility Centre. These are:
- Using Group Policy Editor
- Using Registry Editor.
Let’s check these options.
1] Using Group Policy Editor
Before you try this option, make sure you’re using the Pro or Enterprise edition of Windows 11/10 because Group Policy Editor is a native feature available in those editions. If you are using Home edition, then first install Group Policy Editor to Home Edition of Windows so that you can use it. Here are the steps:
- Open Group Policy Editor
- Access Windows Mobility Center folder
- Open Turn off Windows Mobility Center setting
- Use the Enabled option.
In the first step, you need to open Group Policy Editor windows. Type gpedit in the Search box and use Enter key to open it.
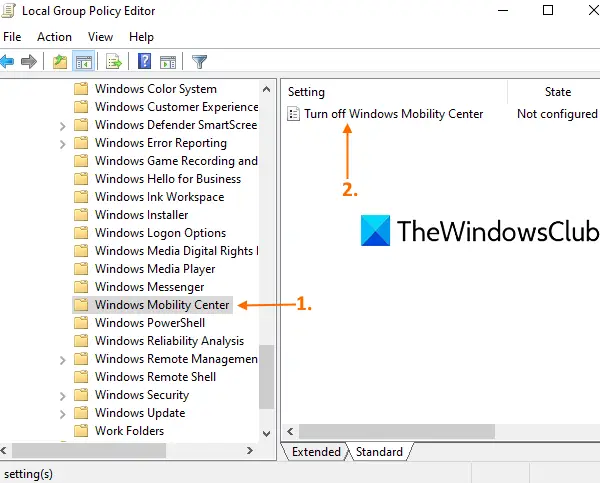
After that, access the Windows Mobility Center folder. The path is:
Computer Configuration > Administrative Templates > Windows Components > Windows Mobility Center

On the right-hand section of that folder, open Turn off Windows Mobility Center setting by double-clicking on it.
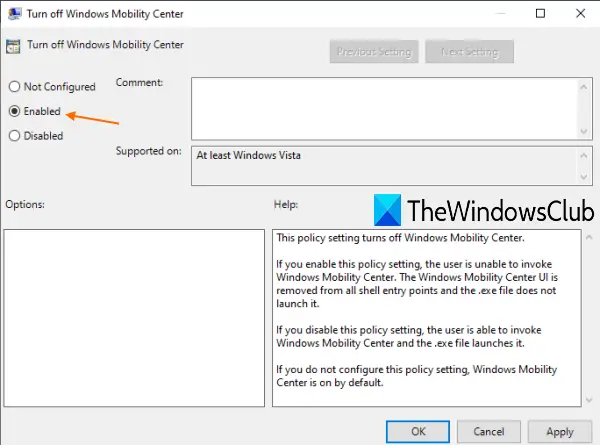
A new window will pop up. There, select the Enabled option, and press the OK button.

This will turn off Windows Mobility Centre immediately.
To enable Windows Mobility Centre again, just repeat the above steps, use the Not Configured option in the last step, and press the OK button.
If Windows Mobility Centre doesn’t open after re-enabling, then you need to restart your PC.
2] Using Registry Editor
You should take a backup of Registry Editor before trying this option. If something went wrong, then you will be able to restore the Registry to undo any changes made by you. So, backup Registry, and then follow these steps:
- Launch Registry Editor window
- Access the Policies Registry key
- Create MobilityCenter key
- Create NoMobilityCenter DWORD value
- Set its Value data to 1.
In the first step, launch Registry Editor by typing regedit and using Enter key. Or else, you can use some other ways to open Registry Editor.
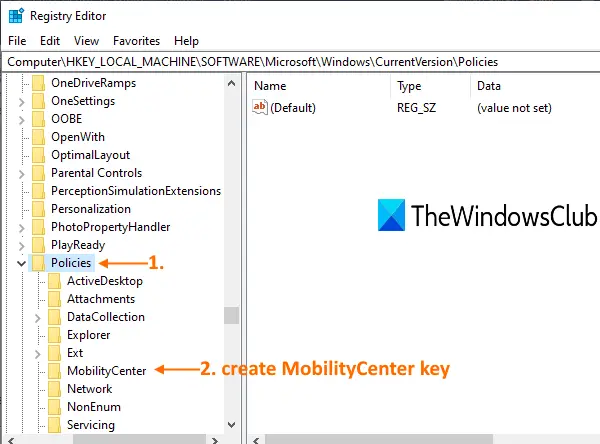
In the Registry Editor window, access the Policies Registry key. The path is:
HKEY_LOCAL_MACHINE\SOFTWARE\Microsoft\Windows\CurrentVersion\Policies

Under that Policies key, create a Registry key, and name it MobilityCenter, just like visible in the screenshot above.
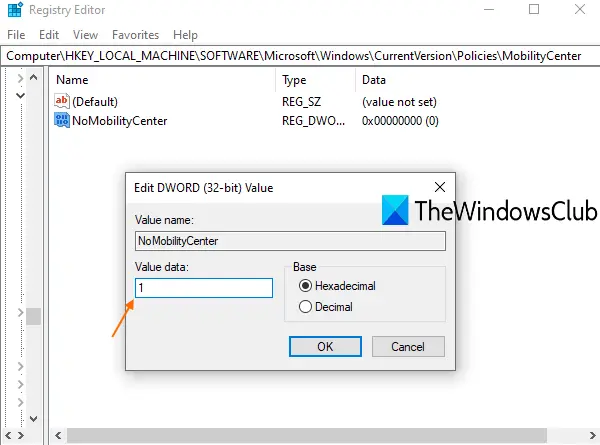
After that, on the right-hand part of the MobilityCenter key, create a DWORD value. To create that value, right-click on an empty area, use the New menu, and click on DWORD (32-bit) Value. When the new value is created, rename it as NoMobilityCenter.

Now double-click on the value you just created and a small window will pop up. There, put 1 in the Value data and use the OK button.

Windows Mobility Centre is disabled.
Read next: How to enable Windows Mobility Centre on a desktop computer.
To enable it again, follow the above steps and delete the MobilityCenter key. If Windows Mobility Centre doesn’t open after re-enabling it, restart your PC.
Hope you find it useful.
Leave a Reply