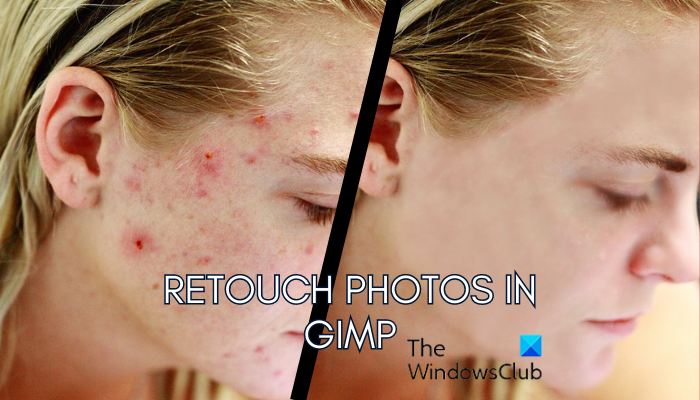
If you want to beautify your photos in GIMP, here is a complete tutorial to do so. In this post, we are going to show you how you can apply photo retouching in GIMP.
GIMP aka GNU Image Manipulation Program is a popular free and open source image editing software for Windows and other platforms. It can be used for a lot of image editing tasks including sharpening an image, resizing photos, removing the background from a Photo, making Stencils, and doing much more. Apart from these and more picture editing tasks, you can also remove acne, blemishes, and spots from your pictures and make them beautiful with this software. It allows you to retouch your photos. However, there are no direct options to do that. You need to use the available tools in such a way that your pictures are beautified. How? Let us find out in this post.
Does GIMP have a blemish tool?
GIMP doesn’t have a direct blemish tool that eliminates blemishes from an image. However, it offers a Healing tool that can be used for removing and fixing blemishes in photos. You can select the tool, choose the area on the image to duplicate its pixel on blemishes by pressing and holding the CTRL key, and then click on the blemish to remove it.
How do I fix blemishes in GIMP?
You can easily fix blemishes in GIMP by using paint tools like Healing or Clone. These two tools can be used for removing blemishes from a picture. You can select one of these two, adjust the brush properties, press and hold the CTRL key, select a clear part, and then click on the blemishes that you want to remove. Besides that, you can also select a blemish on your photo using the free selection tool and then apply Gaussian blur to it to clear it up. We have discussed these steps in detail, so check out below.
How to do Photo Retouching in GIMP?
GIMP offers several tools that you can use in order to retouch your photos and beautify them. The two widely used tools to retouch photos in GIMP include the Healing and Clone tools. On top of that, you can also use the Gaussian Blur to further retouch your photos. Here are the steps we are going to use to retouch and beautify our images in GIMP:
- Remove acne or spots from your photos in GIMP using the Heal tool.
- Touch up your photos in GIMP using the Clone tool.
- Select the face and apply the Gaussian blur to reduce noise in the image.
1] Remove acne or spots from your photos in GIMP using the Heal tool
GIMP provides a healing tool that can be used to remove spots from a picture. It can be used in beautifying images in a lot of ways. You can use it to get rid of spots in pictures, photo refixing, repair photos, remove wrinkles, etc. To retouch your photos and remove acne and pimple marks from a picture using this tool, here are the steps you can follow:
- Download and install GIMP.
- Open GIMP and import the source image.
- Duplicate the image and rename the layers.
- Select the heal tool.
- Set up the brush properties including size, hardness, force, spacing, etc.
- Press and hold the CTRL button and click on the clear part of the image.
- Click on the spot in the photo to remove it.
Firstly, you need to make sure that GIMP is installed on your computer. So, download the program from its official website and install it on your PC. Then, open the main GUI of this software and import the source image that you want to retouch.
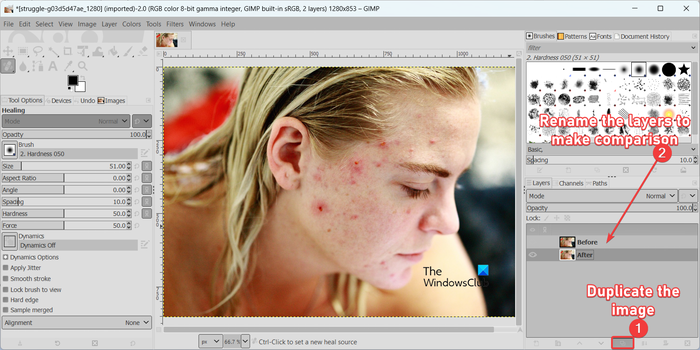
Now, create a duplicate of the image you imported and add it as a new layer. This is to make a comparison between the before and after pictures. So, click on the Create a duplicate of the layer… button to add a duplicate image. And then, rename both the layers as Before and After or Original and Edited, or whatever you prefer.
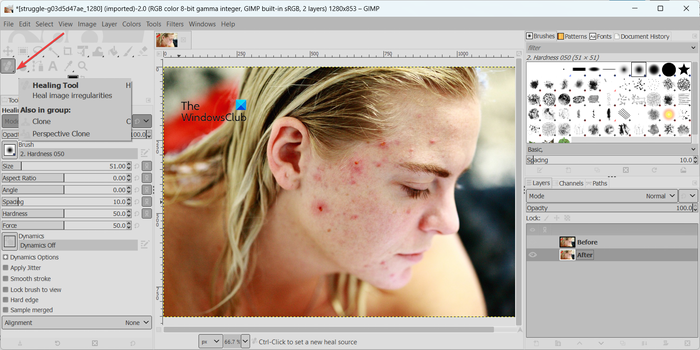
Next, select the Healing Tool from the toolbox section present at the top-left side of the window.
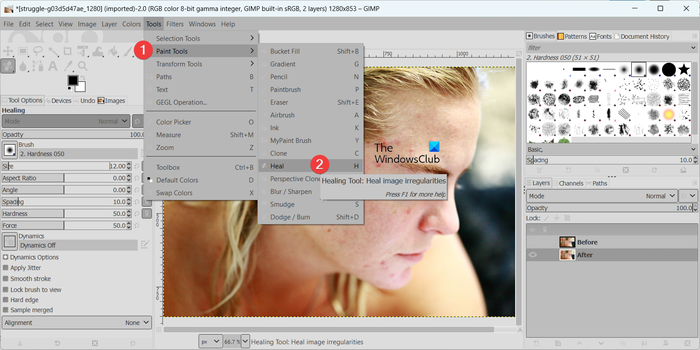
You can also go to the Tools menu and click on the Paint Tools > Heal option to select the tool. Or, you can press the H hotkey to choose the Heal tool.
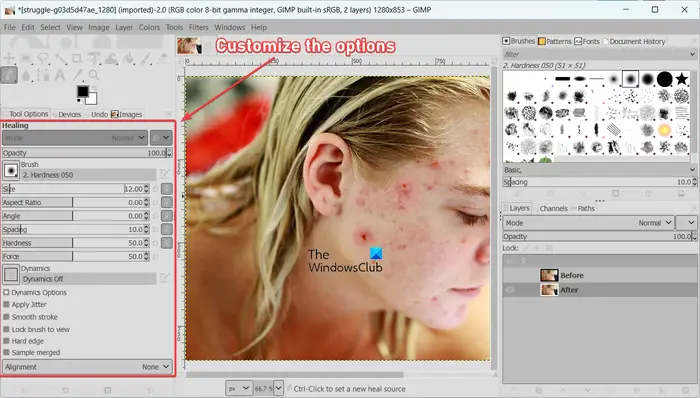
After that, you can adjust the properties of the healing tool to customize it from the Tool Options tab from the left-side pane according to your requirements. You first need to set up the brush size. If the spots are of small size, keep the brush size lower. Else, you can increase the healing brush size as per your need.
Besides that, you can also configure properties like opacity, aspect ratio, angle, spacing, hardness, and force. It also provides features like Apply jitter, Smooth stroke, Lock brush to view, Hard edge, etc., that you can enable or disable to achieve accurate results.
Once you are done with setting up the tool options, you need to select the clear part of the image that you want to use to heal the spots. For that, press and hold the CTRL key and then click on the part of the face that contains no spot. The pixels from the selected part will be pulled by GIMP to heal and eliminate the spot from the image. So, select this area carefully.
Read: How to Edit Frames of an Animated GIF using GIMP in Windows?
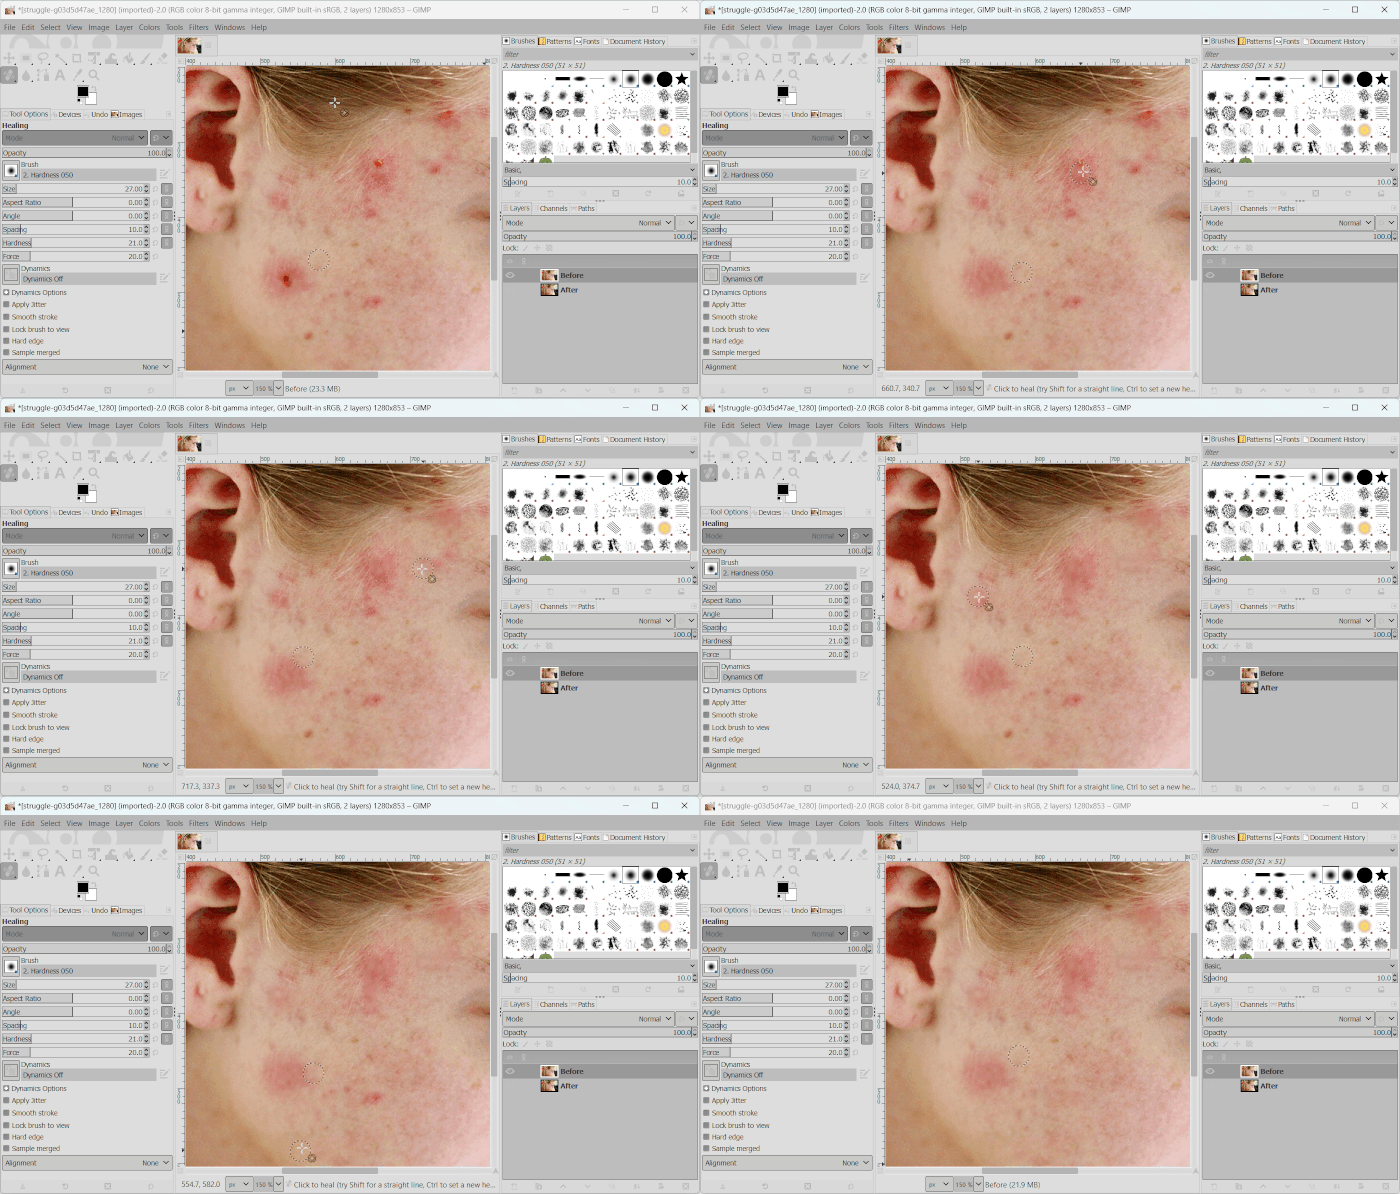
Now, click on the spots, pimples, or acne on your image using the healing tool and you will see the spots getting removed. See the above GIF for reference.
You need to repeat the above procedure until you get the desired results. Apply the healing tool on all the acne, blemishes, and spots to remove them.
The healing tool will remove the acne, but the redness or the original color is likely to remain. Hence, we are going to use another GIMP tool to achieve accurate and better results. Let’s check out the tool below.
See: How to crop, rotate, and change Image size in GIMP?
2] Touch up your photos in GIMP using the Clone tool
To achieve a better result, the next thing you can do is do photo retouching with the help of the Clone tool once you are done using the healing tool. The Clone tool is used to copy pixels from one area to another area on photos. It is primarily used to repair photos and fix problematic areas in an image.
Here are the steps to use the Clone tool for photo retouching in GIMP:
- Select the Clone tool.
- Adjust its size and other properties.
- Press and hold the CTRL key.
- Click on the clear area of your photo.
- Tap on the spots to clear them up.
Firstly, you need to select the clone tool by selecting the Tools menu > Paint Tools > Clone option.
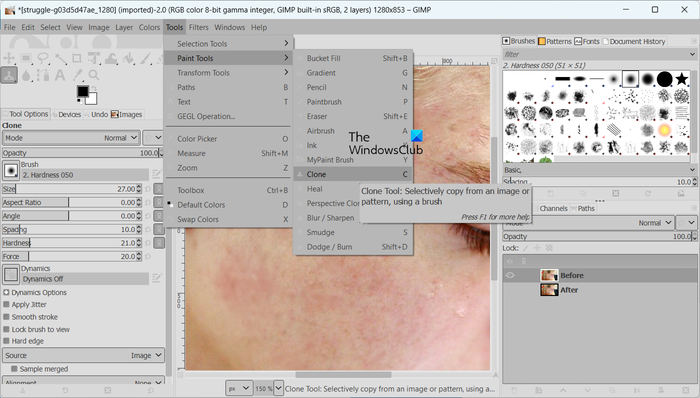
Or, you can hit the C key on your keyboard to quickly select the clone tool.
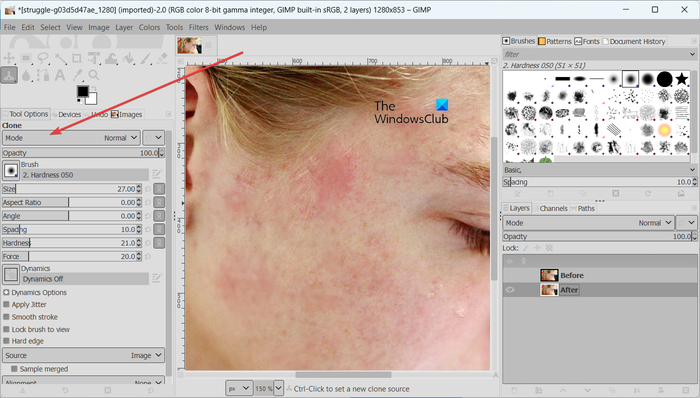
Next, you can set up the brush size for the clone tool from the Tool Options tab present on the left side. Furthermore, you can customize clone tool properties including spacing, angle, force, hardness, apply jitter, smooth stroke, and more.
Now, just like the healing tool, we need to select the clean part of the image that we want to clone over the spots to clear them up. So, press and hold the CTRL key and click on the clear part of the image that you want to clone.
Read: How to zoom an image in or out in GIMP?
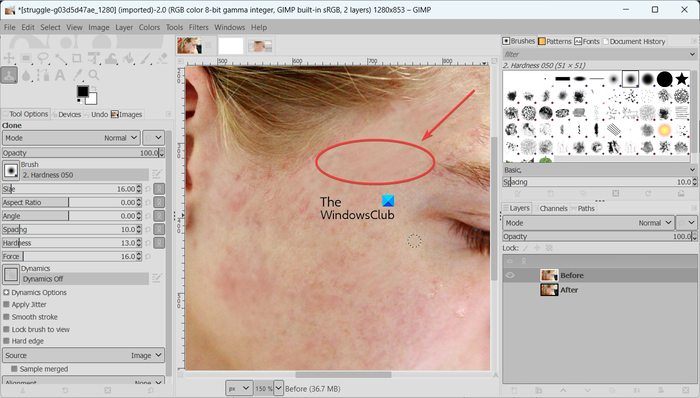
Then, click on the spots that you want to remove and you will see the spots getting cleared. You can customize and use this tool accordingly to accurately retouch your photos in GIMP.
See: How to create an animated GIF from a video file using GIMP?
3] Select the face and apply the Gaussian blur to reduce noise in the image
After using the above two tools, you can use a Gaussian blur filter to smoothen the face and further beautify it. Here’s how:
- Click on the Free Select Tool.
- Draw edges around the face to select it.
- Go to the Filters > Blur menu.
- Choose the Gaussian Blur.
- Set up the blur properties.
To start with, click on the Free Select Tool from the toolbox.
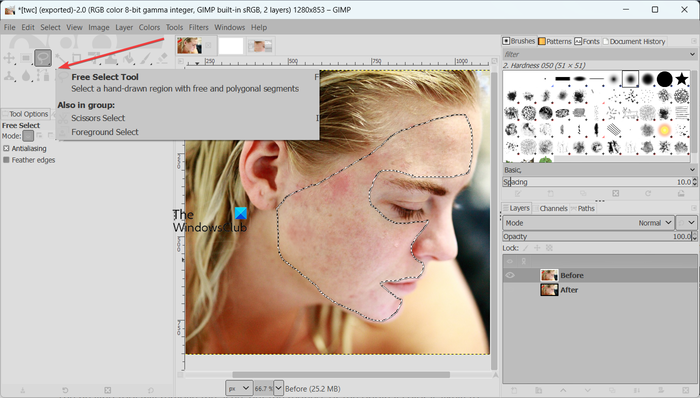
After selecting the tool, draw edges around the face to select it for beautification.
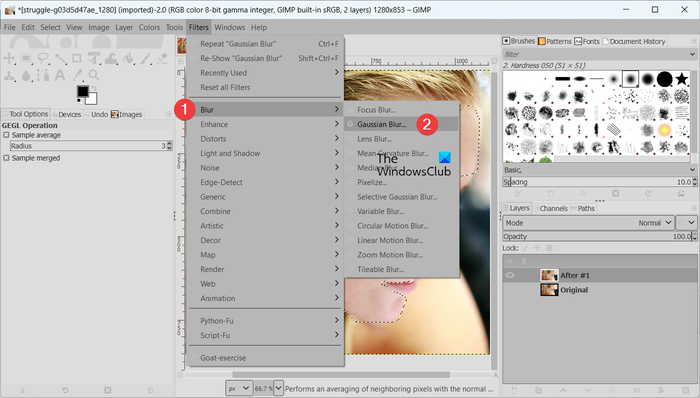
Now, go to the Filters menu and move to the Blur category. Then, choose the Gaussian Blur option.
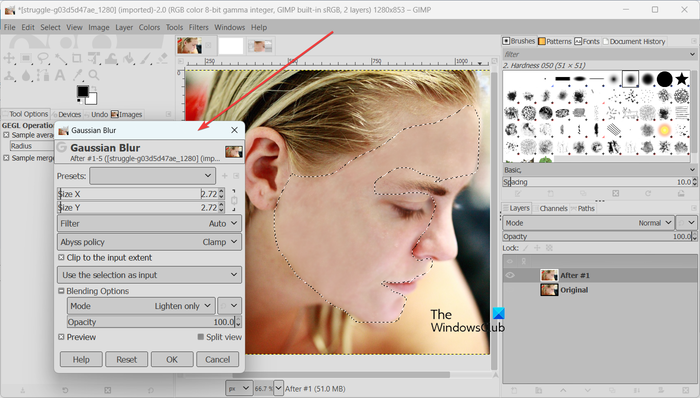
In the appeared Gaussian Blur dialog window, you can set up the intensity of the blur filter (keep it low to give a realistic touch), blending mode (lighten only or some other related mode), opacity, and more. It shows the real-time preview as you change these properties. So, you can apply accurate settings accordingly. Once done, press the OK button to apply and save the filter.
Similarly, you can select other remaining parts of the face and apply Gaussian blur to them.
So, this is how you can apply photo retouching and beautify your photos in GIMP. Hope this tutorial helps.
Now read: How to resize images without losing quality with GIMP image editor?