By default, Windows Terminal automatically goes behind the Task Manager and other active programs’ windows. However, if you want to keep it on the top all the time, here is how you can do that. This tutorial will help you enable or turn on the Always on top feature for Windows Terminal in Windows 11 or Windows 10.
Many times, you might want to show the Windows Terminal on top of all other opened programs on your screen. Let’s assume that you want to copy the command from a browser window and paste it into the Windows Terminal. However, the default setting won’t let you do that since you need to use your mouse to click on the Windows Terminal window first. The default setting always places the active window on the top of other programs – no matter how many apps are opened on your screen.
As Windows Terminal is often used to execute various commands copied from other programs, it would help if you could place it on top of all the other programs. The best thing about it is that you do not need to use any Registry tweak since it comes with an in-built setting that allows you to do so.
How to enable Always on top for Windows Terminal
To enable Always on top for Windows Terminal in Windows 11 or Windows 10, follow these steps:
- Press Win+X to open the WinX menu on Windows PC.
- Select the Windows Terminal option from the menu.
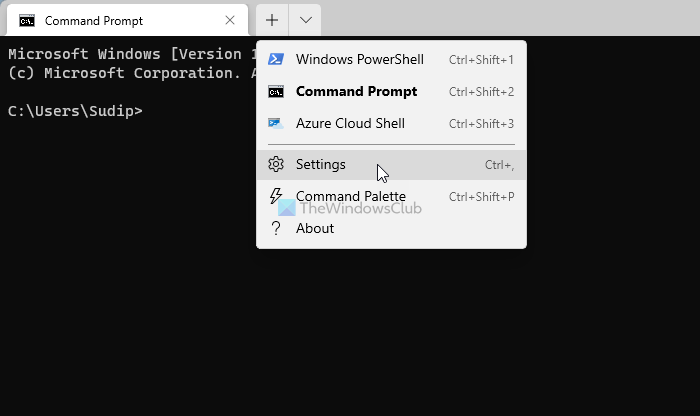
- Click on the arrow icon and select the Settings option.
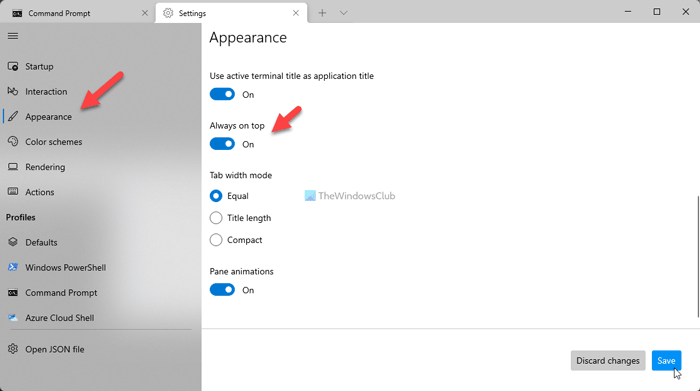
- Switch to the Appearance tab.
- Find out the Always on top option.
- Toggle the corresponding button to turn it on.
- Click the Save button.
To learn more about these steps, continue reading.
At first, you need to open the Windows Terminal on your computer. You can open a normal or elevated window of the Windows Terminal. Either way, it does the same thing. Therefore, to get started, press Win+X to open the WinX menu on your Windows 11 computer and select the Windows Terminal or Windows Terminal (Admin) option.
After opening Windows Terminal on your computer, you need to open the Settings panel. There are two ways to open it in the Windows Terminal. You can click on the arrow icon in the title bar and select the Settings option.

Alternatively, you can press Ctrl+, (comma) to open the same. After that, switch to the Appearance tab on the left side. Here you can find an option called Always on top. You need to toggle the corresponding button to turn it on.

Click the Save button to save the change.
Once done, you can use your mouse to move the Windows Terminal window on other programs to check. As said earlier, it will stay on top of all the other opened programs and Taskbar.
How do I keep the Command Prompt always on top?
Currently, there is no in-built option in the Command Prompt on Windows 11 and Windows 10 that allows users to keep the window on top of other programs. However, if you are using Command Prompt in the Windows Terminal app, you can keep it on the top. You need to open the Settings panel and toggle the Always on top option.
How do I force a window to stay on top?
Some apps like Task Manager come with an option to keep the window always on top. However, if you want to force a window to stay on top that doesn’t come with an in-built option, you can use third-party apps such as TurboTop, OnTopReplica, PinWin, etc. This feature allows you to keep a specific window visible at all times, even if you switch to another window or open a new window. That said, some windows, such as system dialogs and certain types of full-screen windows, may not allow you to keep them on top of other windows.
That’s all! I hope this guide helped.
Related: