Zoom not only enables a virtual face-to-face meeting but also allows participants to annotate screens and make drawings to help them have a thorough understanding of the subject. The best part is that even attendees can use annotation tools, but only with the host’s permission. So, let’s learn how to enable annotation for Zoom meetings.
Enable Annotation for Zoom meetings
- Login to your Zoom web portal.
- Go to Settings.
- Switch to the Meeting tab.
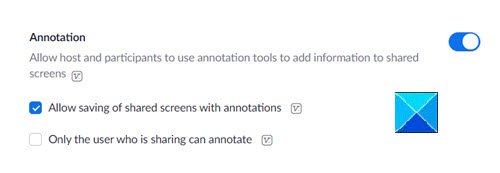
- Scroll down to In Meeting (Basic)
- Enable the toggle for Annotation.
- Launch Zoom app.
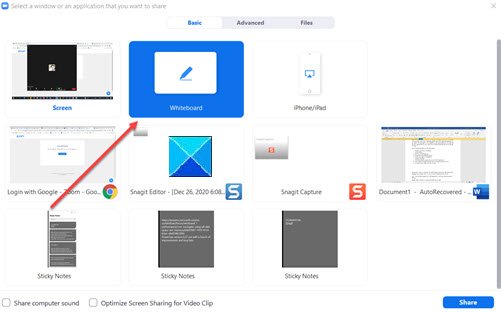
- Click the Share Screen option and choose the Whiteboard option.
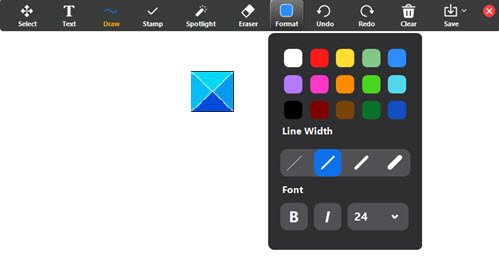
- Select the Annotate option from the menu bar displayed on the screen.
- Doodle on your screen, the way you like.
The video-conferencing app supports 2 lesser-known but interactive tools namely, Annotate & Whiteboard. While Annotation allows you to sketch on a shared screen, Whiteboard lets you add texts to a blank screen that everyone in a meeting can see.
To enable the Annotation feature for Zoom meetings, you will first need to log in to your web portal.
Then, go to Settings.
When the Settings window opens, switch to the Meeting tab and scroll down to In Meeting (Basic) option.

Here, simply enable the toggle for the Annotation feature. This option will bring up a new toolbar with a variety of ways to doodle on your screen. It will also allow participants to use annotation tools to add information to shared screens.
So, to get started, open your Zoom app and click the Share Screen button.

Simply select a window (Whiteboard) on the screen to get immediate access to annotation tools.
![]()
Once you’re on the screen you intend to share, click on the ‘Annotate’ button on the floating toolbar.

The annotation bar will become visible and appear on top of the screen you’re sharing.
That’s all there is to it!
How do I turn on Annotate in Zoom?
To enable the annotation feature in Zoom, navigate to the “In Meeting (Basic)” section in your Zoom settings. Scroll to find the Annotation option and click the gray slider. Once enabled, the slider will turn blue, allowing you to use the annotation tools during meetings.
How do I allow participants to Annotate in a team?
Access the meeting settings in your team’s software to allow participants to annotate in a team. Navigate to the “Permissions” section and enable the “Annotation” feature for participants. This will allow them to use annotation tools during meetings, enhancing collaboration and interactivity among team members.
Take a look at these posts now:
Leave a Reply