HDR or High Dynamic Range allows one to experience an increased range of color and luminance (the intensity of light emitted from a surface per unit area), which is especially useful when it comes to gaming and watching movies. Many games and movies support it, but even if your monitor supported it, Windows did not have it until now. This post will share how you can enable Auto HDR in Windows 11/10 for seamless switching when it is available.

What is Auto HDR, and How does it affect the Gaming Experience?
HDR enables techniques that enabled more detailing, delivering an immersive, realistic experience. It is important to understand that these are already there; HDR enables it on supported hardware and makes it visible to you. For example, it is impressive to see details in Dark which was earlier only dark, and what was already visible more radiant.
Auto HDR makes it possible to enable it if the video or the apps such as games support it. However, HDR also takes one more step. Even if the games or videos don’t support it, it digitally enhances the content and delivers a better experience over regular SDR.
Hardware Requirement for HDR in Windows 11/10
Apart from checking in the Windows Settings, before buying a monitor, check if there is a mention of HDR10 on the official website listing. Along with that it the Display Port should be 1.4 or HDMI is 2.0. The display brightness should be 300 nits or more. Of course, it goes without saying that support from GPU is essential.
How to enable Auto HDR in Window 11/10
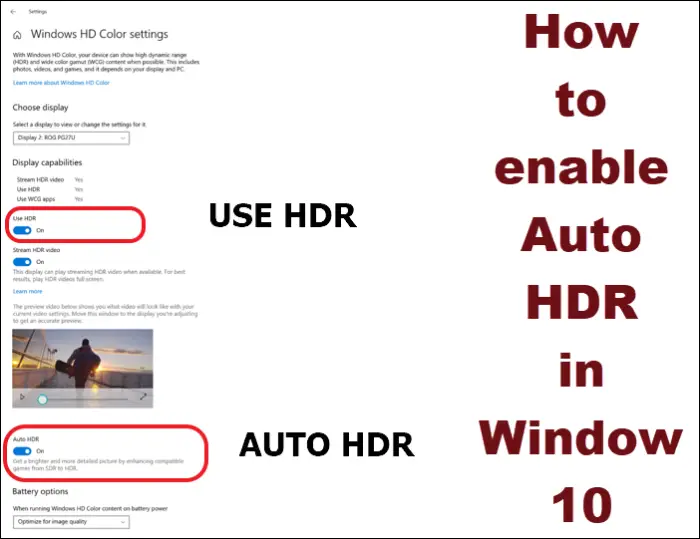
- Open Settings (Win + I), and navigate to System > Display
- Click the Windows HD Color Settings link
- Scroll down, locate, and set Use HDR toggle to On
- When you scroll further, you can find the Auto HDR toggle.
- Click to set this to On as well, and that’s it.
If you wish to disable it, come back to the same settings, and toggle it off.
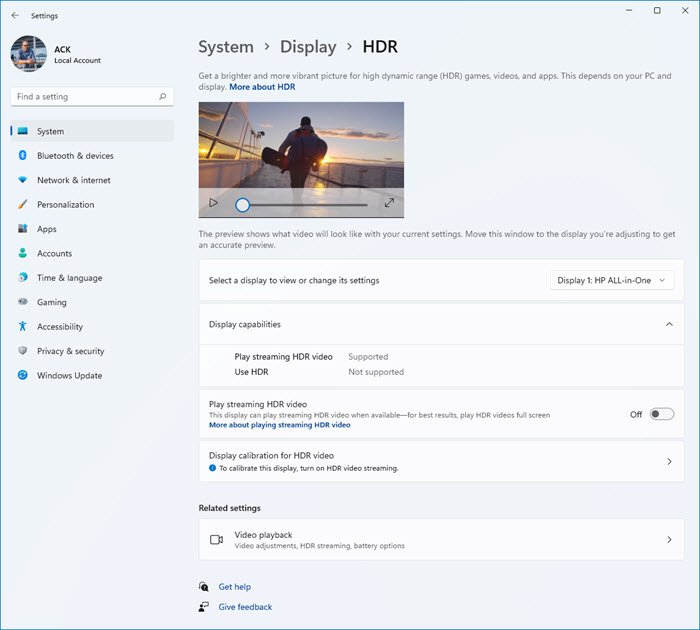
In Windows 11, you will find the settings here:

How to View HDR and SDR on the same screen?
Microsoft has included a nifty trick that allows you to see both HDR and SDR content side but side. It’s called split-screen mode. The steps include modifying Registry files, so make sure to backup the same or create a restore point. Also, you will need to
- Open Command Prompt by typing CMD in the Start screen
- Once it appears in the list, choose to run as administrator
- To enable split-screen, run the following command:
reg add HKLM\SYSTEM\CurrentControlSet\Control\GraphicsDrivers /v AutoHDR.ScreenSplit /t REG_DWORD /d 1
- Now open a video that has HDR content, and you should see the difference.
- To disable split-screen, run the following command:
reg delete HKLM\SYSTEM\CurrentControlSet\Control\GraphicsDrivers /v AutoHDR.ScreenSplit /f
I hope the post was easy to follow, and you were able to enable Auto HDR support in Windows.
If you don’t see it and are sure the hardware supports it, then the update may still be rolling out for you.
Read next: Change Screen Resolution, Color Calibration, Calibrate ClearType Text in Windows.
Leave a Reply