When it comes to .NET Framework updates, IT admins always need to be careful about if they should be deployed or not. However, the other side of the coin is that businesses also want the updates to be available on all the servers as soon as they are available. Microsoft is making these available as automatic update options, i.e., the Windows admin can now allow automatic updates for .NET Framework and .NET Core via Microsoft Update (MU) on Windows Server systems. Some consumers asked for an option to install .NET updates on Windows client platforms but without using a deployment tool. This post will share details on how you can enable the .NET automatic updates on Windows Server.

How to enable Automatic .NET Updates in Windows Server
This option is available for NET Core 3.1, .NET 5.0, and .NET 6.0 and will be rolled out through the Automatic updates channel and Windows Server Update Services (WSUS), and Microsoft Update Catalog. It can be done via Registry or Group Policy method.
Apart from enabling the policies and adding registry keys, you don’t need to make any changes. These updates are part of the Windows Update package but are installed only if you allow them.
Said Microsoft, We’re excited to start delivering updates for modern .NET to server operating systems via Microsoft Update on an opt-in basis and look forward to your feedback on this experience. If you do not want to have your server operating systems updated automatically for you no action is required.
Using Registry Method
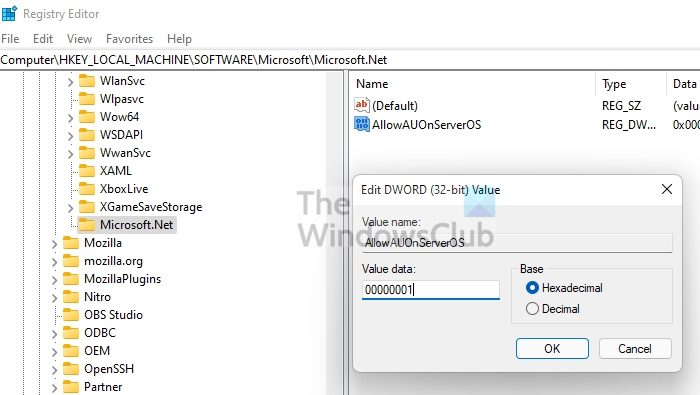
Open the Registry editor with admin permission, and navigate to the given paths. If you can’t see these paths, you can create the respective keys and DWORD.

- All .NET version
- Registry Key: HKEY_LOCAL_MACHINE\SOFTWARE\Microsoft.NET
- Name: AllowAUOnServerOS
- Value: dword:00000001
- .Net 6.0
- HKEY_LOCAL_MACHINE\SOFTWARE\Microsoft.NET\6.0
- AllowAUOnServerOS
- dword:00000001
- .Net 5.0
- HKEY_LOCAL_MACHINE\SOFTWARE\Microsoft.NET\5.0
- AllowAUOnServerOS
- dword:00000001
- .Net 3.1
- HKEY_LOCAL_MACHINE\SOFTWARE\Microsoft.NET\3.1
- AllowAUOnServerOS
- dword:00000001
Using Group Policy
While the group policies are still not available to download, Microsoft does recommend deploying the registry key to many computers at once. You can create a text file with REG extension with respective values and execute them on the computers. Below is an example:
Windows Registry Editor Version 5.00
[HKEY_LOCAL_MACHINE\SOFTWARE\Microsoft.NET\6.0]
“AllowAUOnServerOS”=dword:00000001
Once you enable this on your client servers, they will get the updates when they are available. However, ensure to take a backup before changing anything if you accidentally delete something that could break the system. You can read more on this at the official announcement.
Read:
- Recommended Windows Update policies Admins should be using
- Group Policy settings you should NOT be using on your Windows computer
What are the deployment tools used for managing Windows Update?
Microsoft Endpoint Manager (MEP), System Center Config Manager (SCCM), Access Management Platforms, Configuration Management Databases, or Windows Server Update Services (WSUS) are some of the ways that IT admins use to control and deploy Windows updates on Enterprise PCs. If your company is not using any of the tools, each PC will update as per the configured group policy.
Read: Configure Windows Updates using Registry in Windows Server
How to Block Automatic Windows Update?
To completely stop or disable automatic Windows Updates in Windows 11/10, you will have to:
- Disable Windows Update & Windows Update Medic Services
- Change WU settings using the Group Policy Editor
- Set your network connection to ‘Metered’
- Use a free tool that lets you disable automatic updates.
Hope this helps.
Leave a Reply