In Windows 11/10, there is a dedicated Cellular feature to connect to a cellular data network. Now, if your device has eSIM or a SIM card in it or you have an external cellular device with a SIM card in it, then you can turn on or enable the Cellular option in Windows 11/10. This tutorial will help you with that. Once the Cellular option is enabled or turned on, you can connect your Windows PC to a cellular plan of your mobile account by adding a SIM profile.
How to enable the Cellular option in Windows 11/10
There are multiple ways to turn on or enable the Cellular option in Windows 11/10 PC. These are:
- Enable the Cellular option in Windows 11/10 using the Settings app
- Enable the Cellular option using Quick Settings Panel in Windows 11
- Turn on the Cellular option in Windows 11/10 using the Airplane mode Setting.
Let’s check all these options.
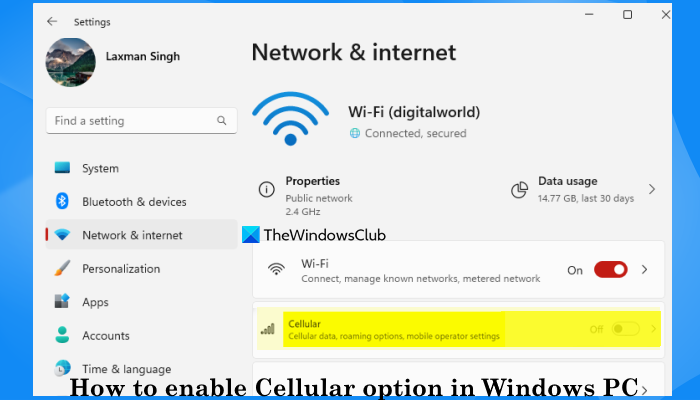
1] Enable the Cellular option in Windows 11/10 using the Settings app

- Use the Win+I shortcut key to open the Settings app of Windows 11/10
- Select the Network & internet setting
- Turn on the Cellular button to enable the option. If you are using Windows 10, then click on the Cellular page from the left section, and then select a SIM for cellular data.
Related: How to connect to a Cellular Network on Windows in S Mode
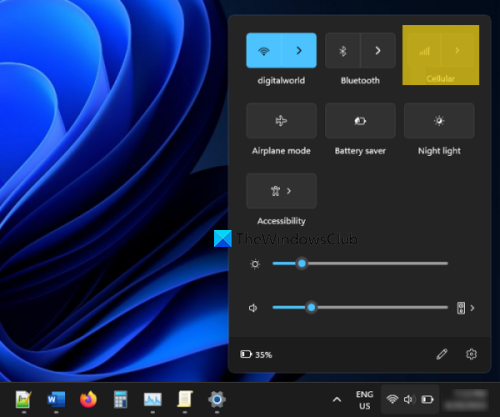
2] Enable the Cellular option using Quick Settings Panel in Windows 11

The steps are as follows:
- Click on the Network, Volume, or Battery icon in the taskbar system tray to open the Quick Settings panel
- Click on the Cellular quick setting icon to enable it
- Connect to a profile or add a new profile to connect to a cellular data network
- Use the same Cellular quick setting to turn it off or disable it.
TIP: In Windows 10, there is no Quick Settings panel. Instead, you can open the Action Center (Win+A), and then expand the quick actions. Look for the Cellular option and tap or click to enable the feature.
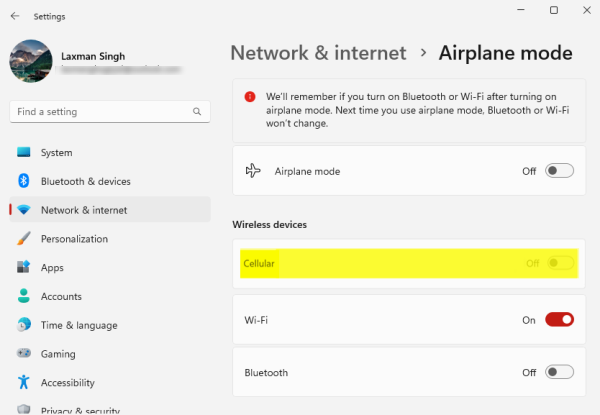
3] Turn on the Cellular option in Windows 11/10 using the Airplane mode Setting

The Settings app of Windows 11/10 has an Airplane mode setting. You can access that setting to turn on the Cellular option. For this, use the following steps:
- Right-click on the Start button and select the Settings option to open the Settings app
- Access the Network & internet category
- Select the Airplane mode option. Do not turn on the Airplane mode. You only have to access it
- Use the Cellular toggle (under the Wireless devices section) to enable or disable it.
Read: How to Enable or Disable Cellular Data Roaming in Windows 11
How to fix Windows 11 cellular missing?
If the Cellular option is missing from the Windows 11 Settings app, then check if the cellular adapter is connected and cellular drivers are installed or up-to-date. Also, use Network and Internet troubleshooter in the Get Help app of Windows 11 to find and fix the issues. In addition, make sure that the cellular adapter is not disabled. For this type network connections in the Search box and hit the Enter key. In the Network Connections window, right-click on the Cellular adapter, and select the Enable option (if it is disabled).
Where to download Windows 11 Cellular driver?
In Windows 11, open the Settings app > Windows Update > Advanced options > Optional updates. Check if cellular driver-related updates are available. If yes, select it, and then download and install the cellular driver. Alternatively, open the official website of the device manufacturer (say HP, Dell, etc.), and access the Support page. There, look for the Drivers & Downloads section or something similar. Now you can manually find the cellular driver by selecting the download type (Drivers), and category (like Communications), and download the driver for your device.
Hope this helps.
Read next: How to Disable or Enable Mobile Hotspot in Windows PC.
Leave a Reply