We know that whatever printer we purchase from the market, it prints in black & white or color. Color ink cartridge normally has cyan, yellow, and magenta inks. It uses these inks to mix the user’s desired colors for printing. On the other hand, a black ink cartridge only prints black and grey on a document. When you print any of your papers, you set your printer to black &white, but if you want to print images, you will need to set your printer to color. Changing your printer setting to color isn’t a difficult task. With the right steps, you’ll be able to print your documents in color. In this article, we will guide you on how to Enable Color Printing on Printer on Windows11/10 computers.

Is your Printer printing in Black & White? This post will show you how to enable Color Printing on Printer on Windows computers.
How to Enable Color Printing on Windows 11

If you are using Windows 11 and want to enable color printing on your printer, then follow the below steps.
- Click on the Window icon and open Settings
- In the setting click on Bluetooth&devices on the left pane.
- Click on the Printers&scanners
- From the list of installed printers, click the name of the printer you want to set up
- In my case, I have selected AnyDesk Printer
- Click on the Printing Preferences
- AnyDesk Printer Printing Preference named box will open
- Click on the Advanced option
- A new box will open named AnyDesk v4 printer Driver Advanced Options
- Click on the Color Printing Mode
- Choose the True Color (24bpp) option
- Click OK
Now, color printing is enabled on your printer.
Read:
How to Enable Color Printing on Windows 10

If you are using Windows 10 and want to enable color printing on your printer, then follow the below steps.
- Click on the Windows icon and open Settings
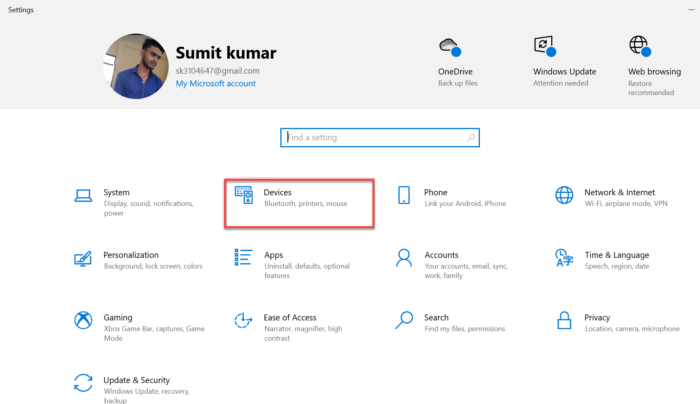
- On the settings menu, click on the Devices option
- Click on the Printers & scanners
- From the list of installed printers, choose the name of the printer you want to set up.
- This expands the listing to give more choices, now click on Manage
- On the Manage your device window, click on the Printing preferences option
- A new window will open, go to the Paper/Quality section
- Now, check the Color option to enable color printing
- Click OK
I hope, the above steps will enable color printing on your printer.
Read: Printer not printing Black on Windows computer
Why is my printer printing in black and white instead of color?
If your printer print only black and white instead of color, then you need to check your printer settings. Suppose your page is set up to print in grayscale, then it will only print in black and white. Follow the below steps to check the printer settings.
- Click on the Window icon and go to the Settings option
- Click on the Bluetooth&devices and then click on Printers&scanners
- Select your printer in which you want to check the color preferences
- Click on Printing Preferences and then click on the Advanced option
- Now, see if the Color Printing Mode is set on the Color option, in case this option is set on the grayscale change this option and set it on the True Color(24bpp).
- Then Click OK
I expect your printer will print in color now.
Read: How to fix Slow printing in Windows PC?
Why is my Canon printer not printing in color?
In case your Canon printer is not printing in color. So, Firstly check if the canon cartridge is installed in your printer or not. In most cases, this problem has arrived due to the empty cartridge. You should check whether your cartridge still has ink. First, open the printer’s front door and remove the cartridge slowly and carefully. Look out for its ink level. If there is little or no ink left, you need to replace the cartridge with a new one. After that, your Canon printer will print in color.
That’s it!