DNS over TLS or DoT is an encrypted DNS protocol. It is considered an alternative to DNS over HTTPS (DoH). In this post, we will see how you can enable DNS over TLS in Windows 11 and what this technology actually is.
What is DNS over TLS?
DNS over TLS (DoT) is nothing but an encrypted DNS protocol. It is considered an alternative to DNS over HTTPS (DoH). In DoH, the DNS traffic is nothing but another HTTS data stream over port 443. On the other hand, DNS over TLS specifies the port number 853 for the purpose of encrypting DNS traffic allowing it to run over a TLS tunnel without the need for HTTP layering underneath. This makes DoT more superior and an improvement over DoH.
It has TLS encryption over UDP or Use Datagram Protocol, UDP is a communication protocol used for low-latency communication. Not only that, it ensures that there is no unwanted alteration in the DNS requests due to the on-path attacks.
Microsoft is well aware of the capability of DoT and is trying to incorporate it into its Operating System. Because of this, Windows 11 has allowed its user to try DoT, so let’s see how you can enable it.
It is currently available in Windows Insider Builds but is expected to roll out to Windows Stable versions soon.
Enable DNS over TLS in Windows 11
Enabling DNS over TLS in Windows 11 is a two-step process:
- Set DoT-providing DNS resolver as the main and the sole resolver.
- Run CMD Commands to enable DoT.
Let us talk about each of these steps.
1] Set DoT-providing DNS resolver as the main and the sole resolver
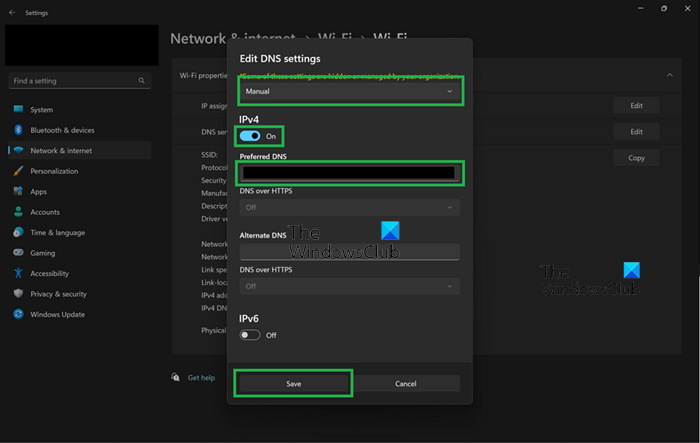
First of all, we need to configure Windows settings to set DoT-providing DNS resolver as the primary one. To do the same, follow these steps.
- Open Settings by Win + I.
- Go to Network & internet.
- Select WiFi or Ethernet, whatever you are currently using.
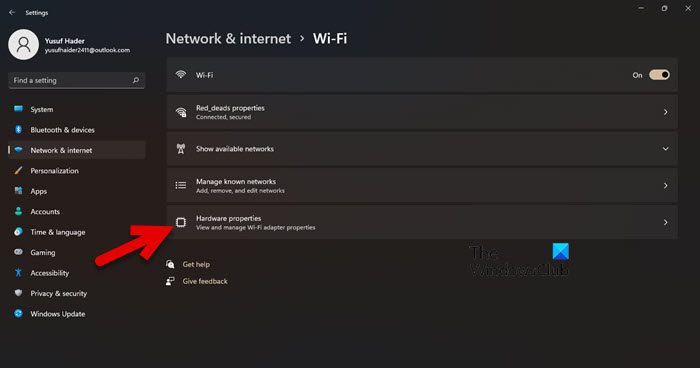
- Click on Hardware properties.
- Go to DNS server assignment and click on Edit.
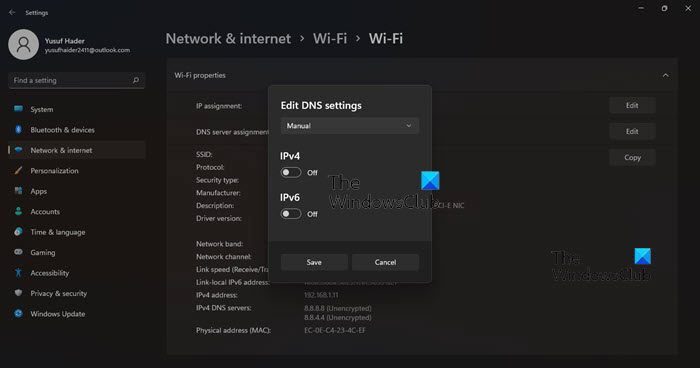
- Select Manual in the drop-down menu and enable IPv4 and/or IPv6.
- In the Preferred DNS box, enter the IP of the DoT server.
- Make sure that <resolver-IP-address> (Unencrypted) appears on the “IPv4 DNS servers:” row.
After making the required changes in your settings, let us move to the next and final step.
2] Run CMD Commands to enable DoT
After checking the resolver IP address, let us enable DoT using some commands. For that, launch Command Prompt as an administrator and run the following commands.
netsh dns add global dot=yes
netsh dns add encryption server=<DNS-resolver-IP> dothost=: autoupgrade=yes
ipconfig /flushdns
This way, DoT or DNS over TLS will be enabled.
How to check if DNS over TLS is working or not?
To check whether DNS over TLS is working or not, we need to run a few commands. So, open Command Prompt in elevated or admin mode and run the following command.
netsh dns show global
The output should say that DoT is enabled. If it’s not saying anything like that, try running the following command.
netsh dns add global dot=yes
Now, run the command mentioned below.
netsh dns show encryption
If the Output for your resolver IP says that auto-upgrade is set to yes, and UDP fallback is set to no, your DoT is working. If not, you need to review your configuration. Do that, and DoT should start working. Remember that it is in the Insider Build not the stable one.
Read: Enable DNS over HTTPS in Firefox, Chrome, Edge, Opera, Android, iPhone.
How do I enable encrypted DNS in Windows 11?
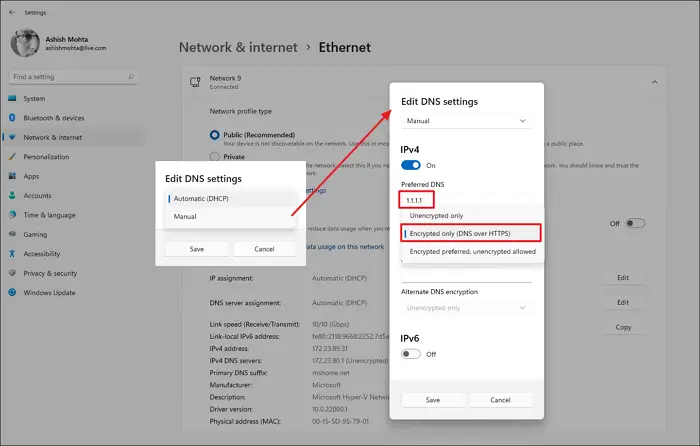
Encrypted DNS in Windows 11 can be enabled by enabling DNS over HTTPS. It is a security feature in Windows and can be enabled from its Settings. If you want to do the same, follow these steps.
- Open Settings by Win + I.
- Go to Network & internet.
- Select WiFi or Ethernet, the one you are using.
- Go to on Hardware properties.
- Look for the DNS server assignment and click on Edit.
- Select Manual in the drop-down menu and enable IPv4 and/or IPv6.
- Enter the DoH server IP address and then in Preferred DNS, select Encrypted only (DNS over HTTPS).
If you want to know more about DoH, check our guides:
- How to enable DNS over HTTPS in Windows 11/10
- How to use the DNS over HTTPS privacy feature in Windows 11
Hopefully, you will find the guides useful.
How do you set up Google DNS on Windows 11?
Setting Google Public DNS on your Windows computer is quite easy and beneficial. It can eliminate some very common network issues and also improves your network.