If you want to enable Hyper-V Enhanced Session in Windows 11, here is how you can do that. If you are using Hyper-V on the latest version of Windows, you can undoubtedly follow this step-by-step guide to turn on Enhanced Session mode in Hyper-V. Even if it is grayed out, you can make things right with the help of this guide.

What is Hyper-V Enhanced Session?
The Enhanced Session helps you turn on RDP or Remote Desktop Protocol on Hyper-V virtual machines. At times, you might need to connect your virtual machine to a remote computer to get assistance in various things or to help fix different things on a virtual machine. If so, you must enable the Enhanced Session in Hyper-V.
How to enable Hyper-V Enhanced Session in Windows 11
To enable Hyper-V Enhanced Session in Windows 11, follow these steps:
- Open the Hyper-V app on your PC.
- Select the virtual machine.
- Click on the Hyper-V Settings option.
- Go to the Enhanced Session Mode tab.
- Tick the Use enhanced session mode checkbox.
- Click the OK button.
- Restart the virtual machine.
- Click on the View button.
- Select the Enhanced session option.
To learn more about these steps, continue reading.
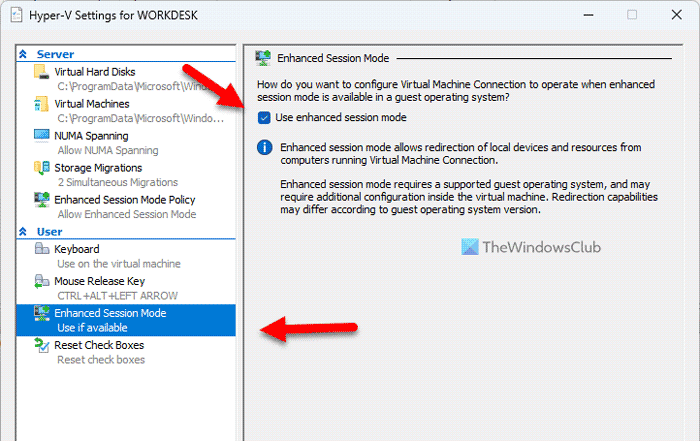
To get started, you need to enable the Enhanced Session mode for the specific virtual machine. For that, open the Hyper-V app first on your computer and select a virtual machine for that you want to enable the Enhanced Session mode. Then, click on the Hyper-V Settings option visible on the right-hand side.
It opens the Hyper-V Settings wizard on your screen. For your information, this panel is specific to the selected virtual machine. Here you can find a tab called Enhanced Session Mode.
You need to switch to the selected tab and find the Use enhanced session mode option. Next, tick the respective checkbox and click the OK button.

Once done, you can restart your virtual machine and click on the View button. Then, tick the Enhanced session option.
Your virtual machine may restart again.
Note: If you want to enable Enhanced Session for all virtual machines installed on Hyper-V, you need to repeat the same steps for all of them one at a time.
If you want to enable it for the Server, you need to open the Hyper-V Settings wizard and go to the Enhanced Session Mode Policy tab. Then, tick the Allow enhanced session mode checkbox and click the OK button.
Read: How to Install Windows 11 using Hyper-V in Windows 10
Why is Enhanced Session grayed out?
If the Enhanced Session option is grayed out and you are unable to turn it on, you need to enable it from the settings panel first. In other words, you need to follow the first part of this guide. That said, close the running virtual machine and open the settings panel of the corresponding virtual machine. Then, switch to the Enhanced Session Mode tab and tick the Use Enhanced Session mode checkbox. Finally, click the OK button and restart your virtual machine.
Read: Hyper-V Enhanced Session Login option is missing in Windows 11
How do I enable Hyper-V virtualization in Windows 11?
To enable Hyper-V virtualization in Windows 11, you need to open the Windows Features panel first. Search for turn windows features on or off and click on the search result. Then, find the Hyper-V option and tick the checkbox. Click the OK button and let it finish. Once done, you will be able to use Hyper-V without any problem.
Leave a Reply