This post will show you how to enable or disable AutoEndTasks in Windows 11/10. If the AutoEndTasks is turned on or enabled, Windows automatically closes an unresponsive program or app while shutting down, restarting, or signing out without waiting for the user’s response or action. This way, it helps to disable This app is preventing shutdown message (or End Task Dialog) that appears when you try to shut down, restart, or sign out, but some unresponsive program(s) prevent that action triggered by you.
On the other hand, if AutoEndTasks is disabled in your system, then the End Task Dialog is visible for some time so that you can either Cancel the action and return to the desktop and forcefully close an unresponsive program or you can Shutdown anyway or Restart anyway using the available option.
What is AutoEndTasks in Windows 11/10?
AutoEndTasks is a feature or Registry entry in Windows 11/10 to force-close apps or programs automatically, which prevents Windows from shutting down, restarting, or signing out. If some application (Word, Notepad, etc.) and/or its processes are not closing while restarting, shutting down, or signing out, then AutoEndTasks (if enabled) can be helpful to close the such application(s) and associated processes properly for a smooth restart, sign out, or restart action.
AutoEndTasks entry should be present in Windows Registry by default. However, if this entry is not present there, then you can add it manually and then keep it enabled or disabled.
This post covers a step-by-step guide for it. Before proceeding further, we recommend you back up the Windows Registry or create a system restore point in case it is needed later.
How to Enable or Disable AutoEndTasks in Windows 11/10

The steps to enable or disable AutoEndTasks in Windows 11/10 are as follows:
- Type regedit in the Search box of Windows 11/10
- Press the Enter key. The Registry Editor window will open
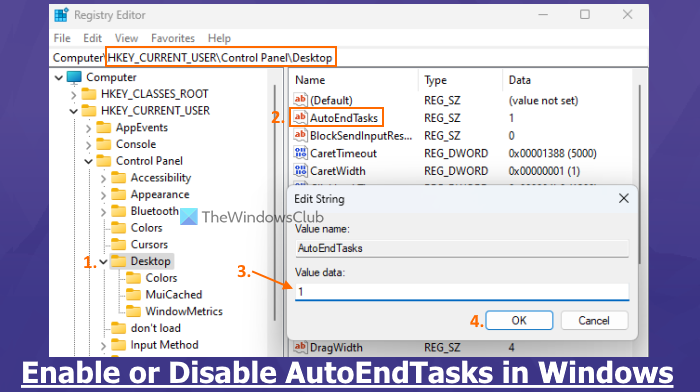
- Jump to the Desktop Registry key using the path given below:
HKEY_CURRENT_USER\Control Panel\Desktop
- Now create a new String value on the right section of the Desktop key
- Rename that String value to AutoEndTasks
- Double-click that String value and a box will pop up
- To enable AutoEndTasks, add 1 in the Value data of that box. If you need to keep the AutoEndTasks feature disabled, then put 0 in the Value data
- Press the OK button and close the Registry Editor window
- Restart the File Explorer.
Now any program that hangs or becomes unresponsive and prevents Windows restart or shut down action will be closed automatically.
Related: Change how long Windows waits before closing apps at Shutdown or Restart
The above steps help to enable or disable AutoEndTasks for the current user only. If you want to enable/disable AutoEndTasks for all users in your Windows 11/10 computer, then open the Registry Editor window and access the following path:
HKEY_USERS\.DEFAULT\Control Panel\Desktop
Here, create AutoEndTasks String value (if not present already) under the Desktop key, and set its Value data to 1 or 0 to enable or disable it.
Auto Close Unresponsive Programs using Ultimate Windows Tweaker

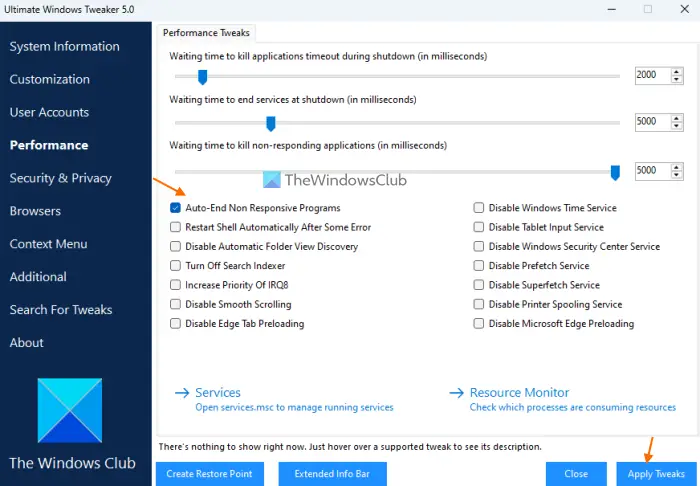
If you don’t want to tweak the Windows Registry by yourself, use our free Ultimate Windows Tweaker tool to close unresponsive programs automatically. Here are the steps:
- Run the EXE file of the Ultimate Windows Tweaker tool to open its interface
- Switch to the Performance section
- Select the Auto-End Non Responsive Programs option
- You can also set or change the waiting time to kill non-responding applications using the available slider. Move the slider left to right to set the time in milliseconds (between 1000 and 5000)
- Uncheck the other available options if you don’t want to enable them
- Press the Apply Tweaks button.
Finally, you need to restart File Explorer to apply the changes.
In addition, you can enable or disable the option to automatically terminate applications at shut down, restart, and sign out using this tool. For this, access the Additional section, and use the Turn Off Automatic Applications Termination option. Press the Apply Tweaks button, and restart File Explorer for the changes.
I hope this is helpful.
How do I stop Windows 11/10 from restarting automatically?
If Windows restart automatically after Windows Update, then you can turn on the Notify me when a restart is required option in the Settings app and also set Active hours that prevent system restart. But, if Windows PC restarts without warning automatically, then you should monitor CPU and/or GPU temperature as overheating can cause unexpected shutdown or restart. You should also update the graphics driver, perform an antivirus scan, and check if the power supply is working fine.
Read next: Force quit a Full-Screen Always-On-Top Program or Game on Windows.
Leave a Reply