One of the things that we can not take for granted is our battery life. If you are using a Windows laptop, you may want to use Battery Saver to extend the battery life of your computer. In this article, we are going to see some easy methods to enable or disable Battery Saver in Windows 11/10.
Enable or Disable Battery Saver in Windows 11
Battery Saver is a great way to increase the longevity of your battery when you are not near a power source. In this post, we will be seeing how to enable or disable Battery Saver in Windows 11. There are three ways by which you can enable or disable Battery Saver in Windows 11. They are.
- From Quick Settings
- From Settings
- Using Command Prompt.
Let us talk about them in detail.
1] From Quick Settings
Quick Settings is like a shortcut to access some of your Windows settings and you can enable or disable Battery Saver from it.
You can click on the Quick Settings icon from the taskbar or hit Win + A to open Quick Settings. Now, click on the Battery Saver icon to enable or disable it.
2] From Settings
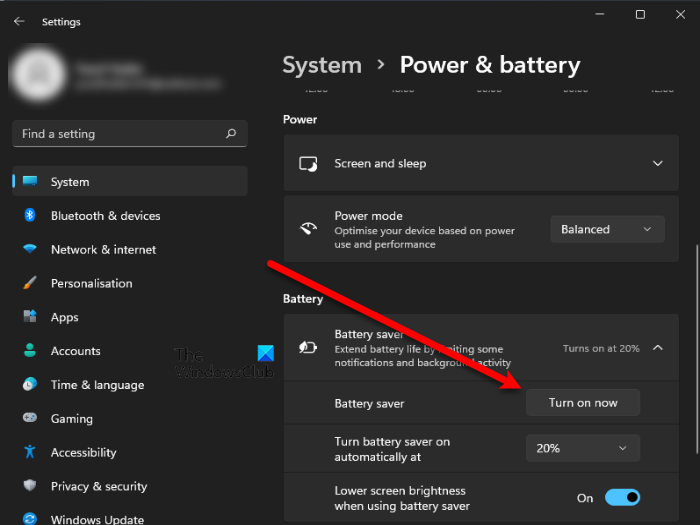
To enable or disable Battery Saver from the Settings, follow the given steps.
- Open Settings from the Start Menu or by Win + I.
- Click System > Power & Battery.
- Then click Battery Saver.
- Now, click Turn on now from the Battery saver section.
3] Using Command Prompt
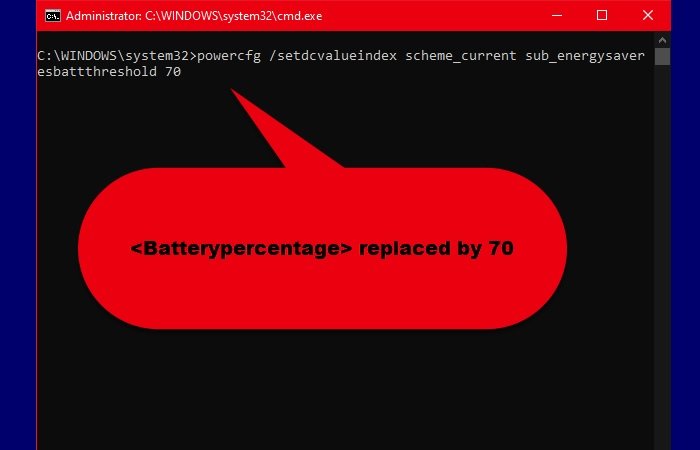
The Command Prompt does not allow you to enable or disable Battery Saver instead you can configure Battery Saver via it. So, launch Command Prompt as an administrator from the Start Menu, type the following command and hit Enter.
powercfg /setdcvalueindex scheme_current sub_energysaver esbattthreshold <Batterypercentage>
Replace, <Batterypercentage> with the percentage after which you want your Battery Saver to be enabled.
This way you can easily Battery Saver on Windows 11 as well as Windows 10 using the command prompt.
Read: Useful PowerCFG commands.
How to automatically enable Battery Saver in Windows 11?
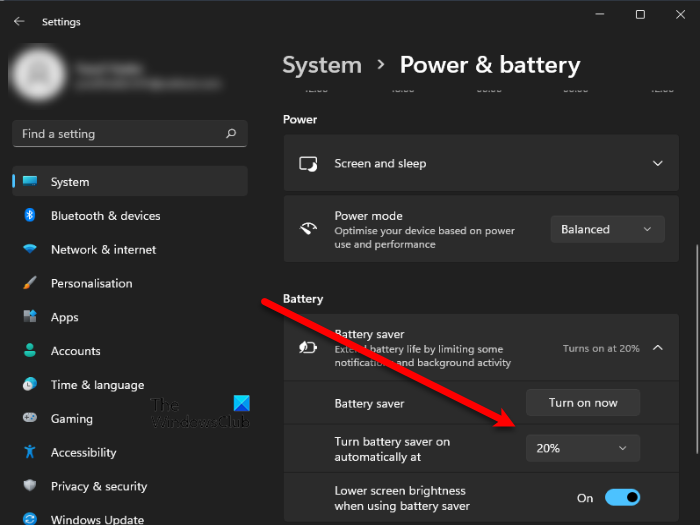
As mentioned earlier, in Windows 11, once your battery percentage reaches 20%, your system automatically enables the Battery Saver. To change the percentage after which you want your Battery Saver to be enabled automatically, follow the given steps.
- Open Settings from the Start Menu or by keyboard shortcut Win + I.
- Click System > Power & Battery.
- Then click Battery Saver.
- Now, from “Turn the battery saver on automatically after” to the percentage of your choice.
If you want the Battery Saver to be enabled all the time, you can select Always from the drop-down menu. But even after setting a percentage of your choice, you can still manually enable or disable the Battery Saver.
Usually, when you enable the Battery Saver, your brightness gets lowered, but if you don’t want this to happen, turn off the toggle “Lower screen brightness when using battery saver”.
Enable or Disable Battery Saver in Windows 10
Battery Saver can really help extend the Battery life of your computer if you have a long day. If you enable Battery Saver in Windows 10, your computer’s settings will be altered to save battery. It will decrease your system’s speed, brightness, and other features to preserve the battery.
These are the ways by which you can enable or disable Battery Saver in Windows 10.
- From Action Center
- From Settings
- From Taskbar Notification icon.
Let us talk about them in detail.
1] From Action Center
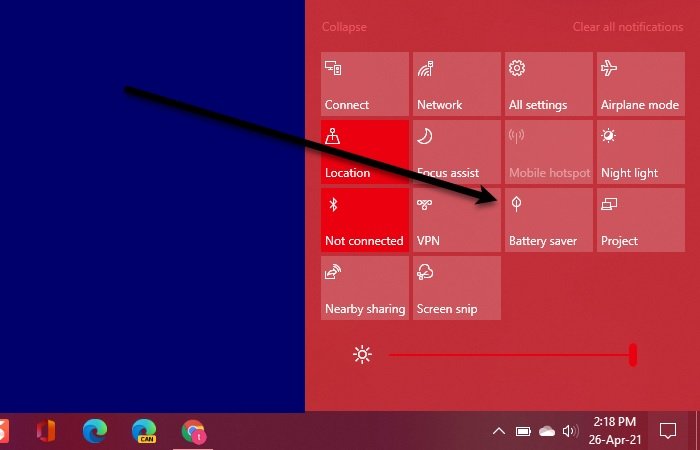
Let us start with the simplest method of them all. Windows 10 Action Center has a shortcut to enable or disable Battery Saver in Windows 10.
So, click on the “Notification” icon from the Taskbar to enter Action Center and click on the Battery Saver icon to enable or disable it. This is the easiest method to enable or disable Battery Saver in Windows 10.
2] From Settings
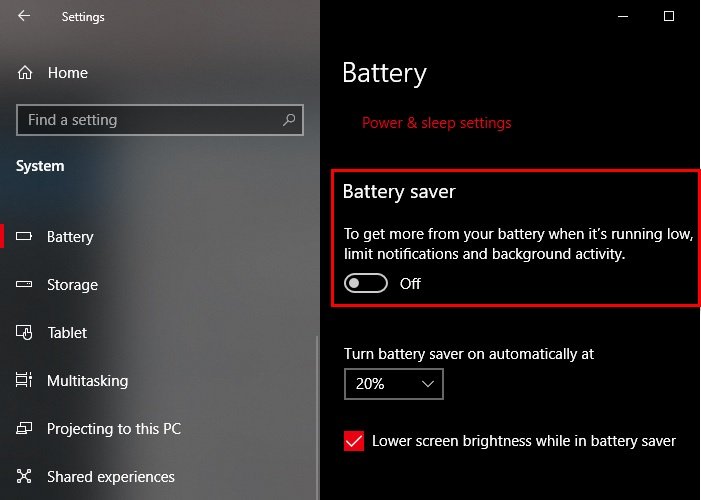
If you are not seeing the Battery Saver icon or Action Center in general you can use Settings to enable Battery Saver. To do that, follow the prescribed steps:
- Launch Settings by Win + X > Settings.
- Click System > Battery.
- Use the toggle from the “Battery Saver” section to enable or disable it.
You can even configure Battery Saver here by setting a percentage after which you want the Battery Saver to enabled from the “Turn battery saver on automatically at”option.
Read: How to fix Battery drain issues in Windows.
3] From Taskbar Notification icon
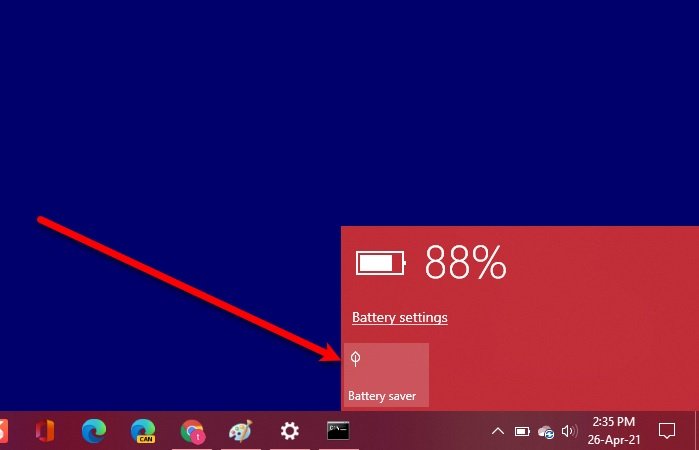
Another easy method to enable Battery Saver is via Taskbar. It is a shortcut and can be a great alternative if the first method didn’t work for you.
So, to enable Battery Saver, click on the Battery icon from the Taskbar and select Battery Saver. This way you can enable or disable Battery Saver instantly.
These were the methods by which you can enable or disable Battery Saver in Windows 10.
How does Battery Saver work in Windows 11?
In Windows 11, the moment your battery percentage reaches 20, your Battery Saver is enabled. This will decrease your computer’s performance, such as its ability to store apps in the background, to increase its life. Of course, you can enable or disable it whenever you want, and in this article, we will see how to do the same.
You might want to also take a look at Tips to extend Battery Life and this Laptop Battery Usage Tips & Optimization Guide.
Leave a Reply