The Desktop search bar in Windows 11 appears on the desktop outside the Widgets panel. It helps you access web search results directly from your desktop without opening a browser.
Enable or Disable Desktop Search Bar in Windows 11
This post will show you how to enable and disable the new Desktop Search Bar in Windows 11.
Enable or Disable Microsoft Edge Desktop Search Bar using Registry Editor in Windows 11
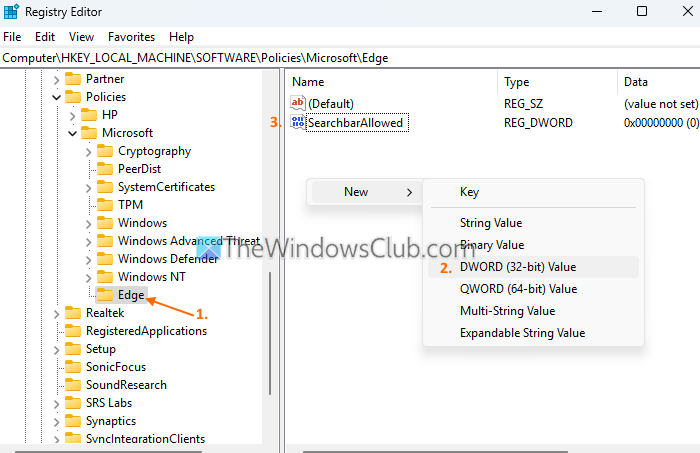
The steps to enable or disable the Microsoft Edge desktop search bar using Registry Editor on a Windows 11 PC are as follows:
- Type regedit and hit Enter to open the Registry Editor
- Select the Edge Registry key using the path given below. If you don’t have an Edge key there, you need to create it first
HKEY_LOCAL_MACHINE\SOFTWARE\Policies\Microsoft\Edge
- Create a new DWORD (32-bit) Value on the right section
- Rename that value to SearchbarAllowed
- Restart the Edge browser.
Now the Launch search bar option will be greyed out in the More tools section of Microsoft Edge. As a result, you won’t be able to use the search bar.
To enable the Microsoft Edge search bar again, follow the above steps, and delete the SearchbarAllowed DWORD (32-bit) Value.
How to launch Microsoft Edge Desktop Search Bar in Windows 11

When the search bar option is enabled, you can use the following steps to launch Microsoft Edge Desktop Search Bar in Windows 11:
- Open the Edge browser
- Press the Alt+F hotkey or click on Settings and more option (three horizontal dots) on the top right corner
- Access More tools section
- Click on the Launch search bar option
- The search bar will appear on the desktop screen.
You can close the Edge browser if you want and the search bar will keep running in the system tray and remain open until you close it manually.
Related: Display Edge Bar on Windows 11 Desktop
How to open and close Microsoft Edge Desktop Search Bar in Windows 11
Once you have launched the search bar of the Microsoft Edge browser, you can open and close it in the following different ways:
- Using the shortcut key
- Using Settings and more option in the Search Bar
- Open and close the Microsoft Edge Search Bar using the system tray icon.
Let’s check these options.
1] Using the shortcut key
You can press Win+Shift+F hotkey to hide or show the Microsoft Edge desktop search bar on top of other opened applications. So, if there’s some foreground window and you need to use the search bar, press this shortcut key to show it. Pressing the same hotkey will hide or put the search bar in the background.
2] Using the Settings and more option in the Search Bar
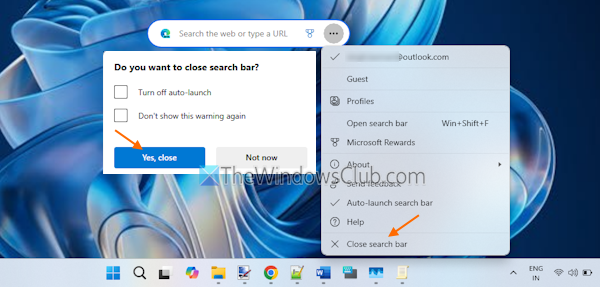
When the search bar is active and visible on the desktop screen, click on the three horizontal dots icon (Settings and more option), and select the Close search bar option to turn it off. In the confirmation, press the Yes, close button.
Before closing, you can select the Turn off auto-launch option if you don’t want the search bar to open automatically at startup.
3] Open and close the Microsoft Edge Search Bar using the system tray icon
![]()
Click on the system tray icon or notification icon of the Microsoft Edge desktop search bar. After that, use the Open search bar option to show it on the desktop screen and use the Quit option to close it.
Disable or Enable Desktop Search Bar in Windows 11 using ViveTool
If you do not see this feature on your Windows 11 build, you will have to download ViveTool and activate it. Here’s the process you can use to do so:
- Download Vivetool from Github.
- Once downloaded, unzip the file.
- Copy the path to the extracted folder.
- Run Command Prompt as an administrator.
- Paste the path of the folder in the Command Prompt, “C:\Users\<username>\Downloads\ViVeTool-v0.2.1”.
- In the above command line, replace the path with the one you copied earlier.
- Press the Enter key to execute the command.
- Restart your computer to take effect.
If you need more explanation of the above steps, please refer to the below section:
To get it started, you first need to download the ViveTool from Github. After the download is complete, press the Windows key + E to open the File Explorer window and browse to the downloaded folder. On this page, you have to right-click the ViveTool ZIP file and then choose Extract All from the context menu.
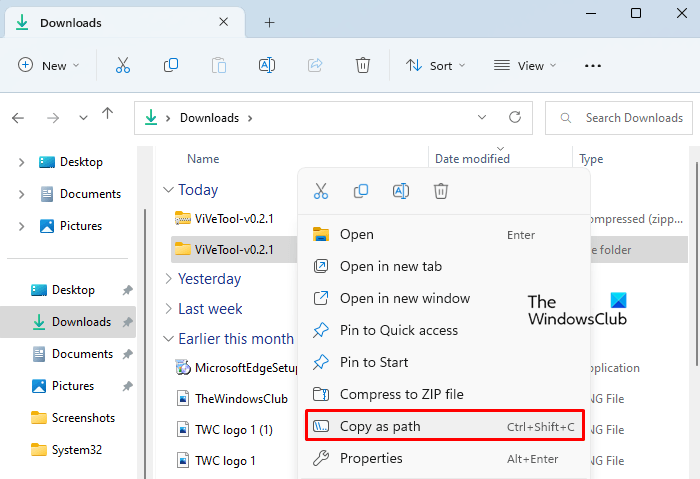
When you extract the folder, right-click on the extracted folder and select the Copy as path option. It is now required to run the Command Prompt as an administrator.
To do so, press the Windows key + R to open the Run dialog box. Next, type cmd in the text box and hit Ctrl+Shift+Enter. If you see the UAC window on the screen, click Yes to proceed.
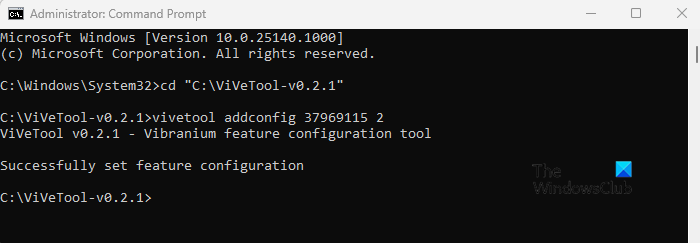
Once the command prompt window appears, type cd <space> and paste the copied path. Now press the Enter key to run the command:
cd "C:\ViVeTool-v0.2.1"
This is what it looks like in my case, as you can see in the above snapshot. Once this is done, execute the following command:
vivetool addconfig 37969115 2
Once it is done, you should close the Command Prompt window and restart the computer.
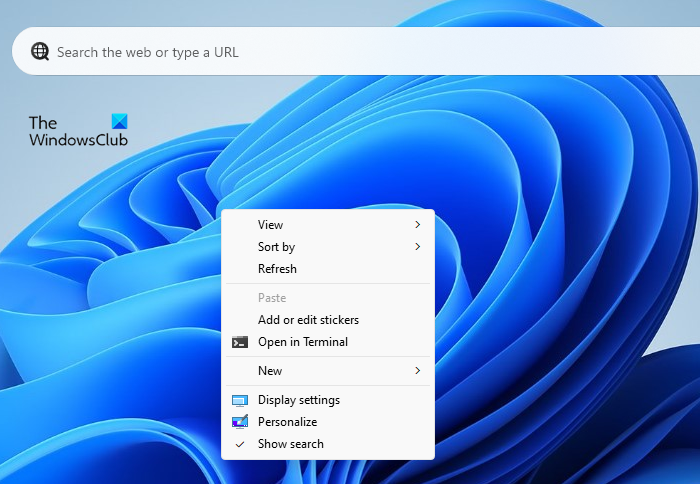
When your computer restarts, right-click on the desktop and select Show more options and then select Show search from the context menu. In the above screenshot, you can see this.
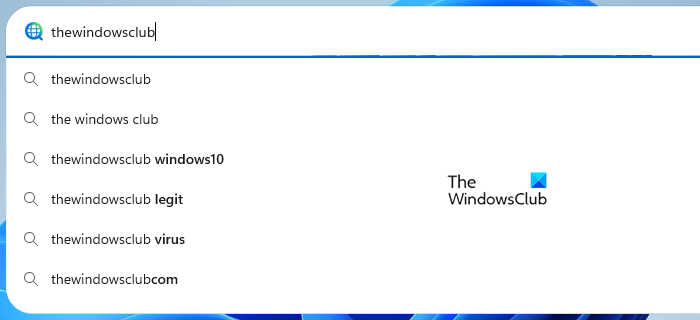
The experimental desktop search bar appears on the desktop of Windows 11 where you can perform any type of search you like, straight from the desktop. There is one thing to keep in mind is that the search bar doesn’t care about your browser settings, and will only search with Bing and Microsoft Edge.
In case you don’t want the desktop search box, Windows 11 gives you the option to turn it off. To do this, you must follow these steps:
- Press the Windows key + E to open the File Explorer window.
- Browse to the location where you saved the extracted ViVeTool folder.
- When you have located the folder, right-click it and choose Copy as Path.
- Now open the command prompt as an administrator.
- Type cd <space> and paste the copied path into the command field. Then hit Enter to run the command.
cd "C:\ViVeTool-v0.2.1"
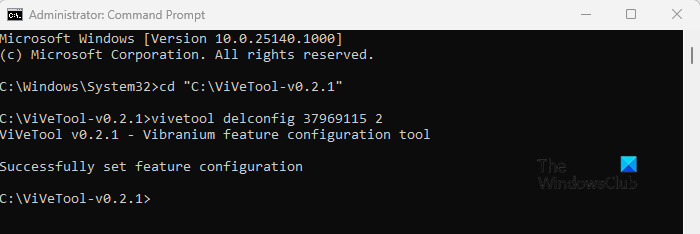
- After this, type the below command and press Enter:
- The above screenshot illustrates the way it appears to me. After that, you should execute the below command:
vivetool delconfig 37969115 2
- Now close the Command Prompt window and restart the computer.
In this way, you can disable the Desktop search bar in Windows 11 when you enabled it earlier and no longer wish to use it.
Read: How to remove Windows Spotlight Learn about this picture Desktop icon in Windows 11
What should I do with Windows Search?
With Windows Search, desktop users can instantly perform searches across a wide range of file formats and kinds of data.
Is there a good search engine for Windows 11?
Windows 11 operating system comes with a handy built-in search function. However, if you’re looking for more options and features, you can check out FileSearchy. This freeware provides a variety of options for finding specific files on your computer.
Related Post: How to configure Indexing Options and Settings for Windows 11 Search.