At times, you might need to select a file to upload on a website. However, if you want to prevent your kids from uploading any file to any website, you can disable the file selection dialogs in the Microsoft Edge browser. This guide explains how you can turn on or off File selection dialogs in the Microsoft Edge browser using the Local Group Policy Editor and the Registry Editor.
Before heading to the Local Group Policy Editor method, you must download and install the Group Policy templates for the Microsoft Edge browser. Otherwise, you will not find the following setting in GPEDIT.
How to enable or disable File selection dialogs in Edge
To enable or disable file selection dialog boxes in the Microsoft Edge browser, follow these steps:
- Press Win+R to open the Run prompt.
- Type gpedit.msc and press the Enter button.
- Navigate to Microsoft Edge in the User Configuration.
- Double-click on the Allow file selection dialogs setting.
- Select the Disabled option.
- Click the OK button.
To learn more about these aforementioned steps, continue reading.
To use the GPEDIT method, you must open the Local Group Policy Editor first. To do that, press Win+R to display the Run dialog, type gpedit.msc, and press the Enter button.
After opening the Local Group Policy Editor, navigate to the following path:
User Configuration > Administrative Templates > Microsoft Edge
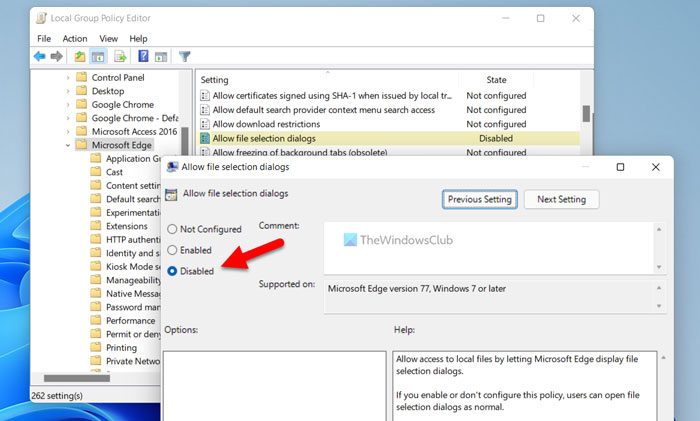
Here you can find a setting called Allow file selection dialogs on the right-hand side. You need to double-click on this setting and choose the Disabled option to disable the file selection dialogs.

Once done, click the OK button to save the change. However, if you want to re-enable the file selection dialogs in the Edge browser, you need to open the same setting and choose either the Not Configured or Enabled option.
How to turn on or off File selection dialogs in Edge
To turn on or off file selection dialogs in Edge, follow these steps:
- Search for regedit in the taskbar search box.
- Click on the individual search result.
- Click the Yes button.
- Navigate to Microsoft in HKCU.
- Right-click on Microsoft > New > Key.
- Set the name as Edge.
- Right-click on Edge > New > DWORD (32-bit) Value.
- Name it as AllowFileSelectionDialogs.
- Keep the Value data as 0 to disable.
- Click the OK button.
- Restart your computer.
Let’s check out these steps in detail.
First, you need to open the Registry Editor on your computer. For that, you can search for regedit in the Taskbar search box and click on the individual search result. Then, click the Yes button in the UAC prompt.
Once the Registry Editor is opened on your computer, you need to navigate to the following path:
HKEY_CURRENT_USER\Software\Policies\Microsoft
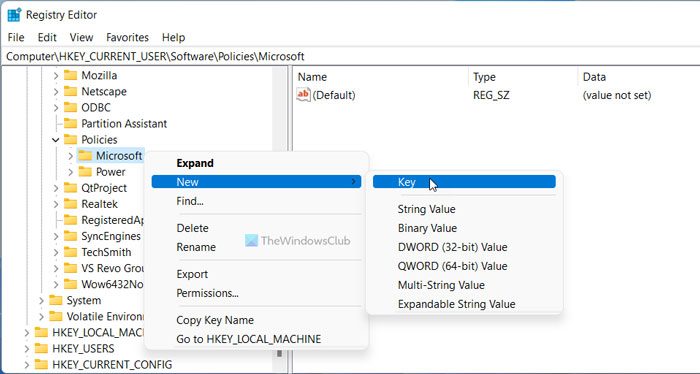
Right-click on Microsoft > New > Key and set the name as Edge.

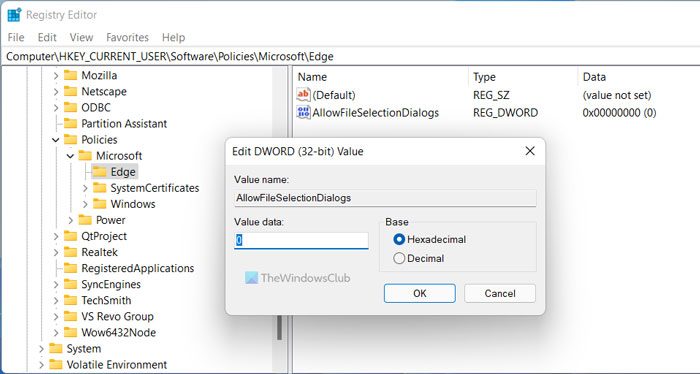
Then, right-click on the Edge key, select New > DWORD (32-bit) Value, and name it as AllowFileSelectionDialogs.
By default, it comes with a Value data of 0. If you want to disable the file selection dialogs, you need to keep that Value data. However, if you want to enable the file selection dialogs, double-click on this REG_DWORD value and set the Value data as 1.

Either way, you need to restart your computer to apply the change.
How do I stop Edge from asking to open this file?
If Microsoft Edge is asking to open a file, you need to know the file first. Following that, if another file viewer is present on your computer, you can use that to open the file. However, if it is happening with a PDF file, you can stop Edge from opening the PDF file using the in-built settings.
How do I enable pop-ups in Microsoft Edge?
You can enable or disable pop-ups in Microsoft Edge for particular websites. For that, open the website, click on the lock icon in the address bar and select the Permissions for this site option. Then, find the Pop-ups and redirects setting and choose the Allow option.
That’s all! Hope this guide helped.
Read: How to Turn on or off Startup Boost in Edge using Registry or Group Policy Editor