If you want to enable or disable SMBv2 on your Windows 11/10 device then this guide will help you do so. But before that, let’s know a brief introduction about this application, however, if you are already familiar with this application, you can directly go to the below section and use the steps to proceed.
SMB (Server Message Block) is a network file sharing protocol that is actually designed for data sharing across computer devices like files, printers, and more. On the SMB client and in computer networking, there are currently three versions that are supported by Windows 10. These are SMB version 1 (SMBv1), SMB version 2 (SMBv2), and SMB version 3 (SMBv3) – in which SMBv1 is the original implementation of SMB. However, SMB2 is a new version of the old Server Message Block communication protocol and this one is more secure. The latest version of the SMBv3
How to enable or disable SMBv2 in Windows 11/10
To enable or disable SMBv2 in Windows 11/10, follow the below suggestions. If you’re going to enable the SMBv2 file transfer protocol on your computer, you first need to check whether your system can install it or not.
To do so, open the Power User Menu using the Windows+X keyboard shortcut
Select Windows PowerShell (Admin) from the menu list.
If the UAC prompt asks you for your approval, click yes and the PowerShell prompt will open.
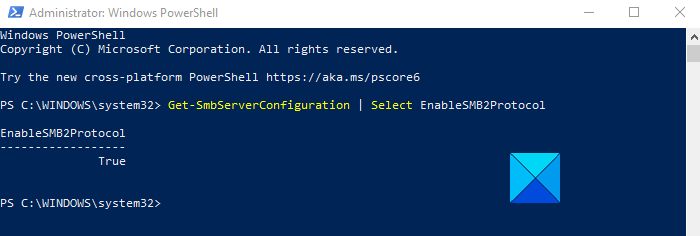
On the next screen, type the following command and press Enter:
Get-SmbServerConfiguration | Select EnableSMB2Protocol

If the above command runs successfully, it means your computer is able to install SMB2. So proceeding with it, now you can enable this feature by running a simple command.
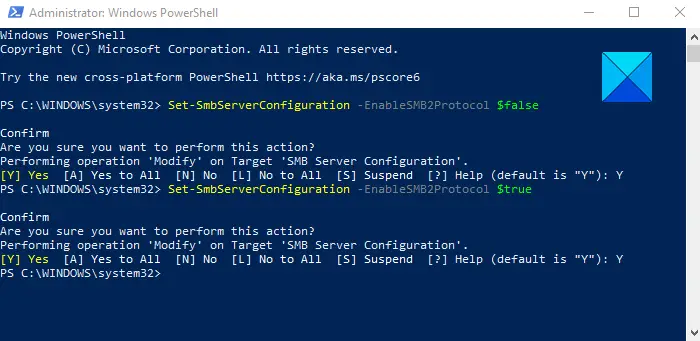
To do this, type the following command and press Enter to enable it:
Set-SmbServerConfiguration -EnableSMB2Protocol $true

Now you will be asked to confirm whether you really want to perform this action. So, press Y and hit Enter. And this will enable the SMB2 protocol on your computer.
Read: How to check SMB version on Windows.
In case the SMB2 protocol is already enabled on your system and now you want to disable it then all you need to run the following command in the elevated PowerShell window:
Set-SmbServerConfiguration -EnableSMB2Protocol $false
Once you run the above command successfully, press Y and hit Enter.
After performing the above process, now SMB2 protocol is disabled on your computer.
Disable SMBv2 or SMBv3 for troubleshooting in Windows 11/10
If both SMBv2 and SMBv3 protocols are already enabled, then it would be helpful for troubleshooting if you disable anyone for a while. However, there are also some consequences of disabling these protocols. It can deactivate the following functionality:
- Transparent Failover – clients reconnect without interruption to cluster nodes during maintenance or failover
- Scale Out – concurrent access to shared data on all file cluster nodes
- Multichannel – aggregation of network bandwidth and fault tolerance if multiple paths are available between client and server
- SMB Direct – adds RDMA networking support for very high performance, with low latency and low CPU utilization
- Encryption – Provides end-to-end encryption and protects from eavesdropping on untrustworthy networks
- Directory Leasing – Improves application response times in branch offices through caching
- Performance Optimizations – optimizations for small random read/write I/O.
Related: How to disable SMB1 on Windows
Leave a Reply