In this post, we will help you enable simplified Quick Settings on Windows 11 computers. Windows 11 lets you access and use Wi-Fi, Project, Mobile hotspot, Nearby sharing, Bluetooth, Cast, Airplane mode, Night light, and other options using its Quick Settings feature and it also lets you add or remove Quick Settings as per your convenience. But, if you want, you can simplify the Quick Settings layout (like visible in the image below) on your Windows 11 computer.
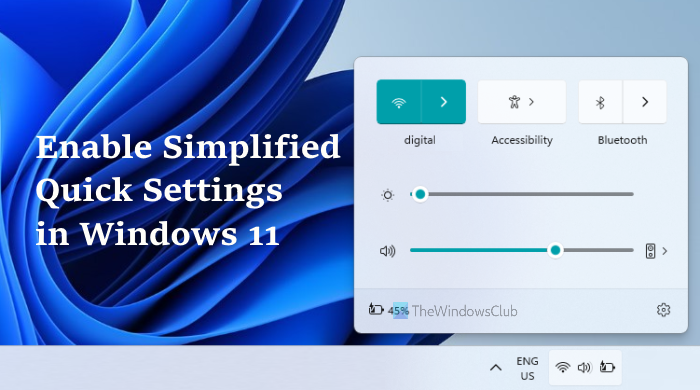
When the Quick Settings layout is simplified, then it is reduced to access and use only Bluetooth, Wi-Fi, Accessibility, and/or VPN icons or buttons. You can continue to use those options including the volume slider, brightness level, and battery indicator. However, you won’t be able to add or remove the Quick Settings options because Edit quick settings option will be removed or vanished. Don’t worry as you can disable the simplified layout of Quick Settings anytime you want.
How to enable Simplified Quick Settings in Windows 11
To enable or turn on simplified Quick Settings in Windows 11, you can use any of the following built-in features:
- Group Policy Editor
- Registry Editor.
You should create a system restore point before you try any of these features to simplify the Quick Settings layout. This will help you restore your Windows 11 computer to an earlier state if something wrong happens.
Now let’s check these two options one by one.
Enable Simplified Quick Settings in Windows 11 using Group Policy Editor
The steps are as follows:
- Open Group Policy Editor
- Select the Start Menu and Taskbar folder
- Access Simplify Quick Settings Layout setting
- Click on the Enabled option
- Press the OK button
- Restart File Explorer.
Let’s have a look at these steps in detail.
Type gpedit.msc in the Search box of Windows 11 and hit the Enter key to open the Group Policy Editor window.
After opening that window, select the Start Menu and Taskbar folder. Here is the path to that folder:
Computer Configuration > Administrator Templates > Start Menu and Taskbar
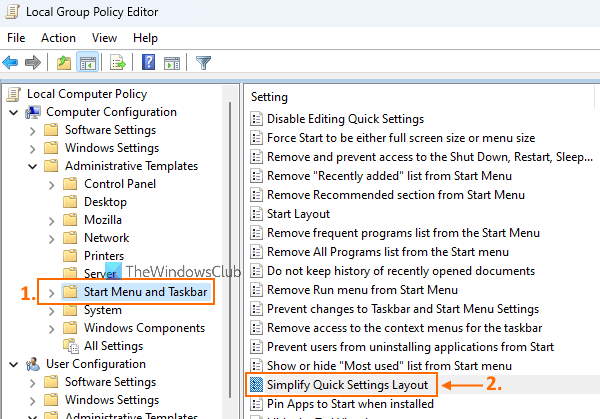
On the right-hand section, access the Simplify Quick Settings Layout setting by double-clicking on it.
Now you will see a separate window. There, click on the Enabled option, and press the OK button.
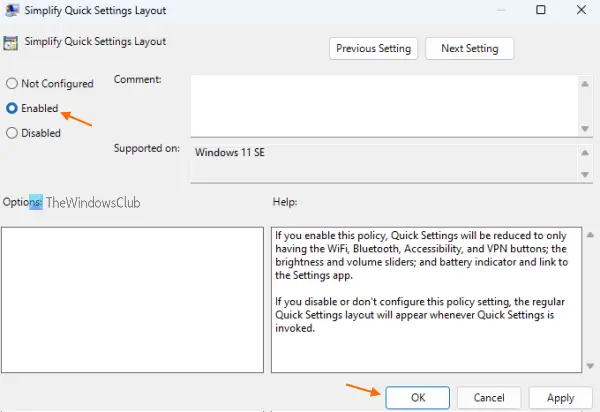
In the final step, simply restart File Explorer. If the changes are not applied for some reason, then restart your computer. After that, when you will click on the volume, Wi-Fi, or battery icon present in the system tray or press the Win+A hotkey to open Quick Settings, you will notice that the Quick Settings layout is simplified.
To disable simplified Quick Settings in Windows 11, just follow the above steps, and click on the Not Configured option available for the Quick Setting Layout setting. Hit the OK button and restart File Explorer to save the changes.
Related: How to prevent editing Quick Settings in Windows 11.
Enable Simplified Quick Settings in Windows 11 using Registry Editor
Here are the steps:
- Open Registry Editor
- Click on the Explorer Registry key
- Create a SimplifyQuickSettings value
- Change its Value data to 1
- Press the OK button
- Restart your computer.
Let’s see the detailed explanation of these steps.
Type regedit in the Search box and use the Enter key to open Registry Editor.
In the Registry Editor window, click on the Explorer key. Here is the path to that key:
HKEY_LOCAL_MACHINE\SOFTWARE\Policies\Microsoft\Windows\Explorer
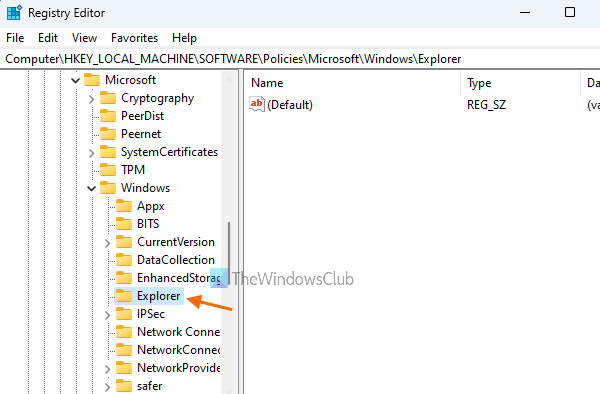
If you don’t find any Explorer key, then first, create a new Registry key, and rename it to Explorer.
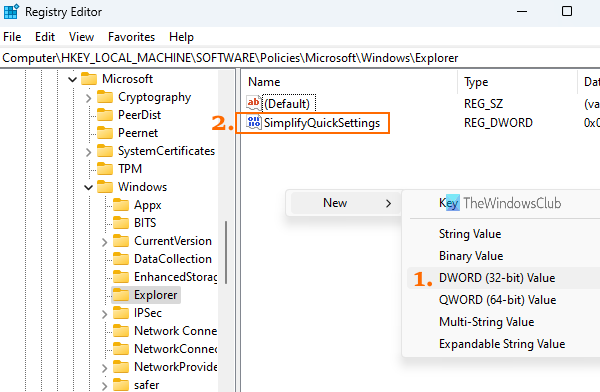
Now you need to create a SimplifyQuickSettings value under the Explorer key. In order to do that, do a right-click on the empty area of the right-hand section, go to the New menu, and then click on DWORD (32-bit) Value. When this new DWORD value is created, rename it with SimplifyQuickSettings.
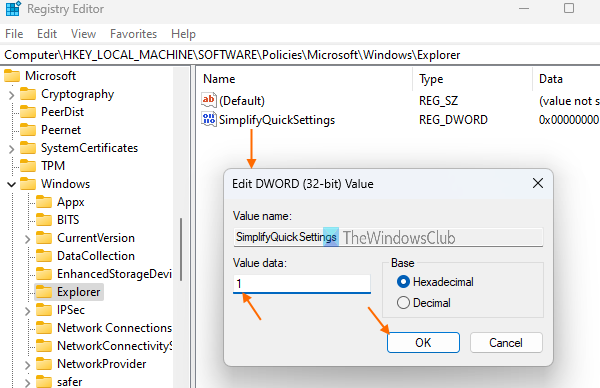
After this, change the Value data of this DWORD value. For doing this, double-click on the SimplifyQuickSettings value, and a small box will pop up. That box includes a Value data field. There, enter 1, and click on the OK button.
Finally, either restart your computer or sign out and sign in back to your Windows 11 computer to save the changes. This will activate a simplified layout for Quick Settings.
To turn off or deactivate or disable simplified Quick Settings, you can repeat the above steps, and then delete the SimplifyQuickSettings value. In the last step, restart your computer to apply the changes done by you.
How do I get to Quick Settings on my computer?
If you want to access or open Quick Settings on your Windows 11 computer, then there are two ways to do it:
- Using Win+A hotkey. This is the quickest way to open the Quick Settings panel
- By clicking on the battery icon, Wi-Fi, or volume icon available in the system tray of the taskbar on the bottom right corner.
How do I enable Quick Settings in Windows 11?
You don’t need to enable Quick Settings in Windows 11 as it remains enabled or turned on by default. You just need to press Win+A hotkey or click on any of the associated icons (WiFi, battery, or volume) to open the Quick Settings panel. Once you have accessed its panel, you can use the available options (like activating Mobile hotspot, access Accessibility to turn on/off Magnifier, Narrator, Sticky keys, Color filters, etc.) and also add or remove icons from the Quick Settings panel.
I hope this helps.
Read next: Windows 11 Quick Settings not working.
Leave a Reply