Microsoft has added a new feature called Voice Access to the latest build of Windows 11. Using this feature, users can control their computers using voice commands and extend the speech recognition platform’s functionality. If you find this feature useful, here is a guide on how to enable and disable Voice Access in Windows 11. Before we move on to how to enable this feature, let’s have a more detailed look at what it is and how it can be used for.
What is Voice Access in Windows 11?
Voice Access is a new Accessibility tool that allows users to control their computers by using voice commands. As of now, the feature is only available on the Development channel, but will soon be added to the Stable version as well. The tool belongs to the Accessibility tools family, which enables you to accomplish a variety of tasks. This allows you to open and switch between apps, browse the web, and read and write emails, among other functions. It also lets you use voice commands to drive keystrokes. Additionally, the program works offline, so you don’t need to be connected to the Internet.
How to enable Voice Access in Windows 11

The new feature makes it easy to access computers via voice commands and extends the capabilities of the speech recognition platform. To enable the Voice access feature in Windows 11, use the below suggestions:
- Open the Windows Settings.
- In the left pane, click on the Accessibility tab.
- Now find the Interaction section in the right pane, and click on Speech.
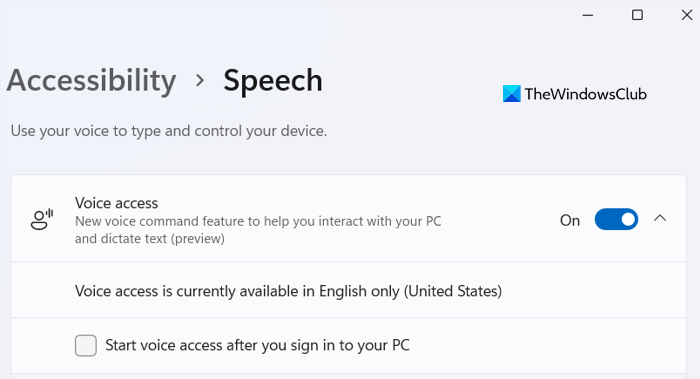
- Next to the Voice access option, turn on the toggle button.
In case you need more details, here are the steps:
To get it started, press the Windows key + I to open the Settings menu. On the left side of the Settings app, click the Accessibility tab.
Then, scroll down the right pane until you reach the Interaction section, and choose Speech.
Here you’ll see a toggle button next to the Voice access option. Click to enable it.
In order to disable this feature, you must open Settings > Accessibility > Interaction > Speech. Next, you will have to disable the toggle switch next to Voice access.
How to make Voice Access Autostart on Windows 11
As an additional option, you can also have the voice access feature run automatically when your PC boots up. To do so, follow these steps:
- Start the Windows Settings program.
- Select the Accessibility option from the left pane.
- On the right side, click on Speech in the Interaction section.
- Now check the “Start voice access after you sign in to your PC” checkbox.
When you turn on your PC, Windows will automatically start listening for voice commands. If this is your first time using this feature, you must download and install an offline voice recognition model. At the time of writing this post, this service is only available in the English language.
You can download and install the language pack for Voice access by clicking on the Download button from the top bar. Once you install the language pack, voice access will now be available as soon as you sign in to your account.
If you ever want to stop Voice access from starting, just uncheck the box that says “Start voice access after you sign in to your PC” at the latter section of the window.
Enable or disable the Voice Access autostart feature using Registry Editor
Alternatively, you can use the registry editor to enable or disable the voice access autostart feature:

- Press the Win+X keyboard shortcut and select Run.
- Type regedit in the dialog box and click OK.
- When UAC appears on the screen, click the Yes button to proceed.
- Go to the following location within the Registry Editor window:
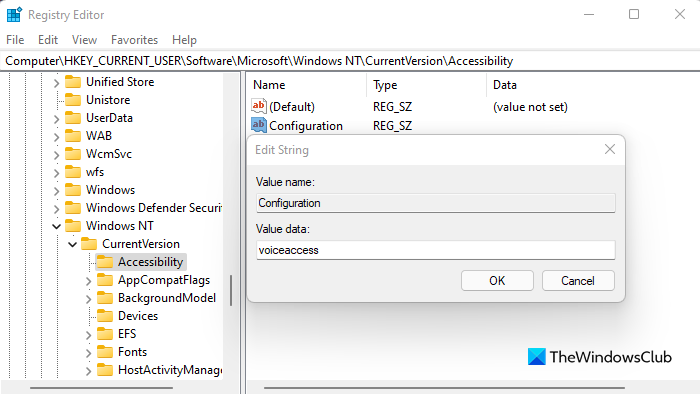
HKEY_CURRENT_USER\Software\Microsoft\Windows NT\CurrentVersion\Accessibility
- If you would like to save your time, you can simply copy and paste the above path into the address bar of the registry editor and press Enter.
- Click twice on the Configuration string on the right side of the window. You may need to create a new string (REG_SZ) value if the value is missing from the Accessibility key. To do this, right-click on the empty screen and choose the String value from its context menu. Type the name Configuration in the name field and hit Enter to save.
- Now double click on the newly created Configuration key, set its Value data voiceaccess, and press Enter. This will enable the Voice Access auto start feature in Windows 11.
- If you want to disable Voice Access from starting automatically, delete the Configuration key or leave it empty.
What is the default setting for voice access on Windows 11?
By default, the Voice Access feature in Windows 11 is disabled. If you want to enable Voice access by yourself, you must download and install an offline voice recognition model. When this post was written, this service was only available in English.
Related: How to disable Speech Recognition feature in Windows.
Leave a Reply